
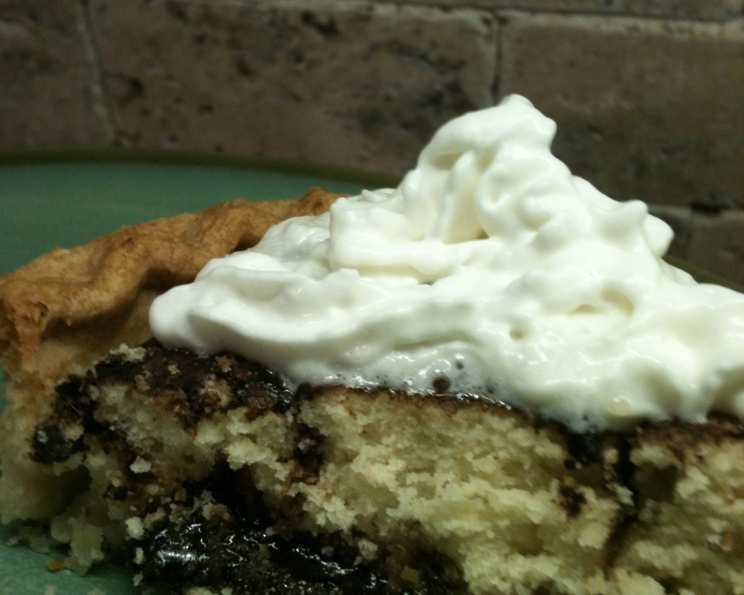
Funny Cake: A Chocolate-Bottomed Delight
I remember the first time I tasted Funny Cake. It was at a church potluck, and amidst the casseroles and salads sat this unassuming pie. One bite, and I was hooked. The combination of the tender cake, rich chocolate goo, and flaky crust was unlike anything I’d ever had. It was comforting, surprising, and utterly delicious – a little bit of unexpected joy on a paper plate. It instantly became a requested dessert in my family.
Recipe Overview
- Prep Time: 20 minutes
- Cook Time: 35-40 minutes
- Total Time: 55-60 minutes
- Servings: 24
- Yield: 3 pies
- Dietary Type: Not specified (contains dairy, gluten, and eggs)
Ingredients
-
For the Crust:
- 3 unbaked 8-inch pie shells
-
For the Chocolate Bottom Layer:
- 1 cup sugar
- 1/2 cup cocoa
- 3/4 cup water
- 1 teaspoon vanilla extract
-
For the Cake Layer:
- 1 1/2 cups sugar
- 1/2 cup butter or margarine, softened
- 2 eggs
- 1 cup milk
- 2 teaspoons baking powder
- 1 teaspoon vanilla extract
- 2 1/2 cups all-purpose flour
Equipment Needed
- Saucepan
- Mixing bowls
- Electric mixer
- Measuring cups and spoons
- Whisk
- Oven
Instructions
- Prepare the Chocolate Bottom Layer: In a saucepan, combine 1 cup sugar, 1/2 cup cocoa, and 3/4 cup water.
- Cook the Chocolate Mixture: Cook the mixture over medium heat, stirring constantly, until it just comes to a boil.
- Simmer the Chocolate Mixture: Reduce the heat to low and simmer gently for 2 to 3 minutes, stirring occasionally. This step is crucial for developing the rich chocolate flavor.
- Add Vanilla to the Chocolate Mixture: Remove from heat and stir in 1 teaspoon vanilla extract. Set the mixture aside to cool slightly.
- Prepare the Cake Layer: In a large mixing bowl, cream together 1 1/2 cups sugar and 1/2 cup softened butter or margarine until light and fluffy. An electric mixer works best for this.
- Add Eggs: Beat in 2 eggs one at a time, mixing well after each addition. Ensure the eggs are fully incorporated to avoid a curdled batter.
- Combine Dry Ingredients: In a separate bowl, whisk together 2 1/2 cups flour and 2 teaspoons baking powder. This ensures even distribution of the baking powder.
- Alternate Wet and Dry Ingredients: Gradually add the dry ingredients to the creamed mixture, alternating with 1 cup milk. Begin and end with the dry ingredients. Beat until just combined. Be careful not to overmix; overmixing can result in a tough cake.
- Add Vanilla to the Cake Batter: Stir in 1 teaspoon vanilla extract.
- Assemble the Pies: Pour the cake batter into the 3 unbaked 8-inch pie shells, dividing it evenly among them.
- Pour Chocolate Mixture over Cake Batter: Carefully pour the chocolate mixture over the top of the cake batter in each pie shell, again dividing evenly. Don’t worry that the chocolate mixture is very runny; it’s supposed to be.
- Bake the Pies: Bake in a preheated oven at 350ºF (175ºC) for 35 to 40 minutes. The cake is done when a toothpick inserted into the center comes out clean, though there may be some fudgy chocolate clinging to it. The chocolate will “sink” below the batter as it bakes, creating the signature chocolatey bottom layer.
- Cool the Pies: Let the pies cool completely on a wire rack before serving. This allows the cake and chocolate layers to set properly.
Expert Tips & Tricks
- Prevent a Soggy Crust: For an extra-crisp crust, blind bake the pie shells for 10 minutes before adding the filling.
- Room Temperature Ingredients: Using room temperature butter and eggs ensures they incorporate more easily into the batter, resulting in a smoother, more tender cake.
- Don’t Overmix: Overmixing the cake batter develops the gluten in the flour, leading to a tough cake. Mix until just combined.
- Chocolate Intensity: For a richer chocolate flavor, use dark cocoa powder instead of regular cocoa powder. You can also add a tablespoon of instant espresso powder to the chocolate mixture.
- Even Baking: To ensure even baking, rotate the pies halfway through the baking time.
- Margarine vs. Butter: While the recipe allows for either butter or margarine, butter will provide a richer flavor and a slightly more tender crumb.
Serving & Storage Suggestions
Serve Funny Cake at room temperature or slightly chilled. A dollop of whipped cream or a scoop of vanilla ice cream makes a delightful accompaniment.
- Room Temperature: Funny Cake can be stored at room temperature for up to 2 days. Cover loosely with plastic wrap or foil to prevent it from drying out.
- Refrigerator: For longer storage, refrigerate the pie for up to 5 days.
- Freezer: Funny Cake can be frozen for up to 2 months. Wrap the pie tightly in plastic wrap and then in foil. Thaw overnight in the refrigerator before serving.
- Reheating: If desired, you can gently reheat individual slices of Funny Cake in the microwave or oven.
Nutritional Information
| Nutrient | Amount per Serving | % Daily Value |
|---|---|---|
| Calories | 789 kcal | 39% |
| Total Fat | 32.97g | 51% |
| Saturated Fat | 12.47g | 62% |
| Cholesterol | 72.23mg | 24% |
| Sodium | 513.4mg | 21% |
| Total Carbohydrate | 113.76g | 38% |
| Dietary Fiber | 4.03g | 16% |
| Sugars | 55.81g | 223% |
| Protein | 10.57g | 21% |
Note: Nutritional information is an estimate and may vary based on specific ingredients and portion sizes.
Variations & Substitutions
- Gluten-Free Funny Cake: Use a gluten-free pie crust and a gluten-free flour blend in the cake layer. Ensure the baking powder is also gluten-free.
- Dairy-Free Funny Cake: Substitute the butter with a dairy-free butter alternative and the milk with almond, soy, or oat milk.
- Spice It Up: Add a pinch of cinnamon or nutmeg to the cake batter for a warm, comforting flavor.
- Nutty Version: Add 1/2 cup of chopped pecans or walnuts to the cake batter.
- Citrus Zest: Add the zest of one orange or lemon to the cake batter for a bright, refreshing twist.
FAQs (Frequently Asked Questions)
Q: Why is it called “Funny Cake”?
A: The name likely comes from the unusual method of preparation, where the runny chocolate mixture is poured over the cake batter, creating a layered effect as it bakes.
Q: Can I use a pre-made cake mix instead of making the cake batter from scratch?
A: While you can, the flavor and texture won’t be quite the same. Making the cake batter from scratch allows you to control the ingredients and achieve the perfect balance of sweetness and moistness.
Q: My chocolate layer sank to the bottom, but it’s still runny. Is this normal?
A: Yes, it’s normal for the chocolate layer to sink to the bottom and remain slightly fudgy. That’s part of what makes Funny Cake so delicious!
Q: Can I make Funny Cake ahead of time?
A: Yes, Funny Cake can be made a day or two in advance. Store it in the refrigerator until ready to serve.
Q: What’s the best way to serve Funny Cake?
A: Funny Cake is best served at room temperature or slightly chilled. A scoop of vanilla ice cream or a dollop of whipped cream is a perfect complement.
Final Thoughts
Funny Cake is more than just a dessert; it’s a nostalgic treat that evokes feelings of comfort and happiness. Whether you’re looking for a unique pie to share with friends and family or simply want to indulge in a delicious slice of chocolatey goodness, this recipe is sure to please. So, preheat your oven, gather your ingredients, and prepare to bake a Funny Cake that will bring a smile to everyone’s face. And please, let me know how it turns out! I’d love to hear your experiences.