
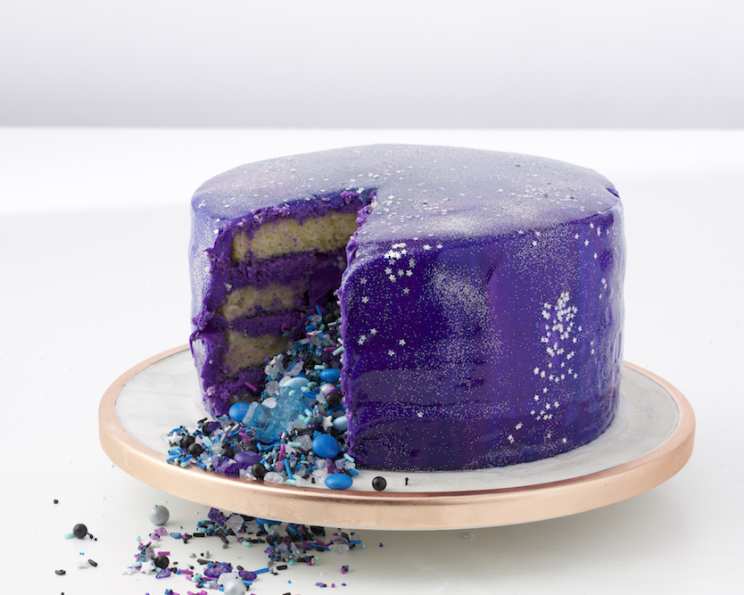
Galaxy Mirror Cake: A Culinary Journey to the Stars
My first encounter with a mirror glaze cake was at a small Parisian patisserie. The glistening surface, reflecting the shop’s warm light, looked less like dessert and more like a piece of art. I remember being utterly captivated, not just by the flawless shine, but by the sense of wonder it evoked. It was a culinary challenge I couldn’t resist, and this Galaxy Mirror Cake, with its hidden celestial surprise, is my tribute to that initial inspiration. The vibrant colors and cosmic candy filling make it a showstopper, guaranteed to bring smiles to faces of all ages.
Recipe Overview
- Prep Time: 2 hours
- Cook Time: 35 minutes
- Chill Time: 1 hour 30 minutes
- Total Time: 3 hours 5 minutes
- Yields: 1 8-inch cake
- Dietary Type: Not specified (contains dairy, eggs, and gluten)
Ingredients
For the Galaxy Cake:
- 2 (15 1/4 ounce) packages white cake mix
- 6 eggs
- 2 cups water
- 1 cup vegetable oil
- 4 (16 ounce) cans white frosting
- Purple gel food coloring
- Galaxy candy sprinkles
- M&M’s, blue
- Rock candy, blue & purple & white
- Carbonated candy, blue pop rocks
For the Mirror Glaze:
- 1 1⁄4 cups white chocolate chips
- 2 (1 ounce) packets gelatin
- 2⁄3 cup and 2 tablespoons cold water, divided
- 1 cup sugar
- 2⁄3 cup light corn syrup
- 1⁄2 cup sweetened condensed milk
- Gel food coloring, navy blue & light blue & magenta & purple
- Silver edible glitter
- Silver star candy sprinkles
Equipment Needed
- 4 (8-inch) cake pans
- Parchment paper
- Non-stick cooking spray
- Large bowl
- Serrated knife
- Large offset spatula
- Pastry bag
- 4-inch round cutter
- 1-inch round pastry tip
- Candy thermometer
- Small paintbrush
- Small pot
- Glass or cake pan (smaller diameter than cake)
- Parchment-lined baking sheet
Instructions
-
Prepare the Cake Pans: Preheat the oven to 350 degrees F (175 degrees C). Line four 8-inch cake pans with parchment paper and spray with non-stick cooking spray. This ensures easy removal of the cakes and prevents sticking.
-
Mix the Cake Batter: In a large bowl, combine the two packages of white cake mix, eggs, water, and vegetable oil. Stir until thoroughly combined, ensuring there are no lumps. Avoid overmixing, which can result in a tough cake.
-
Bake the Cakes: Evenly divide the batter between the prepared cake pans. Bake for approximately 35 minutes, or until a tester inserted into the center of the cake comes out clean. Ovens vary, so check for doneness a few minutes early.
-
Cool and Level the Cakes: Once baked, set the cakes aside to cool completely in the pans. Once cooled, remove them from the pans. Use a serrated knife to level off the domed tops of the cakes, creating a flat surface for stacking. This ensures a stable and visually appealing final product.
-
Prepare the Frosting: In a large bowl, place the contents of all four cans of white frosting. Add purple gel food coloring gradually until you achieve the desired color. Mix until the color is fully incorporated and the frosting is smooth.
-
Assemble the Cake: Fit a pastry bag with a large round tip. Fill the bag with the purple frosting.
-
Create the Center Cavity: Attach one cake layer to a cake board with a dollop of frosting. Place a 4-inch circle cookie cutter in the center of the cake and fully frost around it, leaving the area inside the cookie cutter unfrosted. Then, use the cookie cutter to cut out a center hole in the middle of the next two cake layers.
-
Stack and Frost: Place one of the cut-out cake layers on top of the first layer, frosting the ring of cake. Repeat with the next cut-out layer.
-
Fill with Candy: Fill the center cavity of the cake with a mix of galaxy sprinkles, M&Ms, rock candy, and Pop Rocks. This creates a fun and surprising element when the cake is cut.
-
Final Layer and Crumb Coat: Add a final layer of frosting around the cake ring and attach the last cake layer upside down. Frost the top and sides of the cake with a thin, even layer of frosting – this is your crumb coat. It traps any crumbs and creates a smooth base for the final frosting layer.
-
Chill the Crumb Coat: Chill the cake, uncovered, in the refrigerator for 30 minutes. This helps the crumb coat set.
-
Final Frosting Layer: Once chilled, add a ½-inch layer of frosting around the entire cake with the remaining frosting. Smooth the tops and sides of the cake using a large offset spatula. Make sure the top coat is straight and level. The smoother the coat of frosting, the better the mirror glaze will adhere.
-
Chill the Cake: Chill the cake in the refrigerator for at least 1 hour. This ensures the frosting is firm and the glaze will set properly.
-
Prepare the Gelatin: While the cake chills, prepare the mirror glaze. Place the white chocolate chips in a large bowl and set aside. Whisk together 1/3 cup of cold water and the gelatin in a small bowl until smooth. Set aside to bloom.
-
Make the Sugar Syrup: In a small pot over medium-high heat, stir together 1/3 cup plus 2 tablespoons of water, sugar, and corn syrup. Bring to a boil.
-
Combine and Melt: Remove the sugar syrup from the heat and whisk in the bloomed gelatin. Mix until smooth. Add the sweetened condensed milk and mix until combined.
-
Pour over White Chocolate: Pour the hot mixture over the white chocolate chips. Whisk until the white chocolate is completely melted and the mixture is smooth.
-
Cool the Glaze: Stir the glaze occasionally while it cools to 95 degrees F (35 degrees C), using a candy thermometer to monitor the temperature. This is crucial for achieving the correct consistency.
-
Color the Glaze: Take out 3/4 cup of the mixture and divide it evenly between 3 smaller bowls. Color the large portion with navy blue gel food coloring. Color the three smaller portions with light blue, magenta, and purple gel food coloring, respectively.
-
Prepare for Glazing: Place the chilled cake on an upside-down bowl glass or cake pan set on a parchment-lined baking sheet. The diameter of the glass or pan should be smaller than the diameter of the cake, allowing the excess glaze to drip off.
-
Pour and Marble the Glaze: Once the temperature of the glazes reaches 90 degrees F (32 degrees C), pour the dark blue glaze all over the cake. The excess glaze will run down the sides of the cake and into the pan.
-
Create the Galaxy Effect: Using a spoon, create streaks across the cake with the light blue, magenta, and purple glazes. This creates the marbled, galaxy-like effect.
-
Smooth and Drip: Gently glide a large offset spatula across the top of the cake to smooth the top and further create a marbled effect. Let the excess glaze drip off.
-
Add Glitter and Sprinkles: Use a small paint brush to splatter silver edible glitter all over the cake, then sprinkle with silver star candy sprinkles. This adds a final touch of sparkle and cosmic flair.
-
Set the Glaze: Allow the glaze to set, about 20 minutes, before cutting off the excess glaze drips with a sharp knife or spatula.
-
Storage: The Galaxy Mirror Cake can be stored, covered, for up to 5 days in the refrigerator.
Expert Tips & Tricks
- White Chocolate Quality: Use high-quality white chocolate for the mirror glaze. Cheaper varieties may not melt smoothly or provide the same glossy finish.
- Glaze Temperature: Maintaining the correct glaze temperature (around 90 degrees F/32 degrees C) is critical for a smooth, even finish. If the glaze is too hot, it will be too thin and run right off the cake. If it’s too cold, it will be too thick and won’t spread properly.
- Practice Makes Perfect: Mirror glaze cakes can be tricky! Don’t be discouraged if your first attempt isn’t perfect. Each cake is a learning experience.
- Gel Food Coloring: Gel food coloring is preferred over liquid food coloring because it’s more concentrated and won’t affect the consistency of the glaze.
- Plan Ahead: The cake layers and frosting can be made a day in advance.
Serving & Storage Suggestions
Serve the Galaxy Mirror Cake chilled for the best flavor and texture. To serve, carefully slice the cake with a sharp knife, revealing the hidden candy center. This cake is best stored in the refrigerator in an airtight container. It will keep for up to 5 days. Due to the glaze, freezing is not recommended. It pairs beautifully with a scoop of vanilla ice cream or a glass of sparkling wine.
Nutritional Information
(Note: These values are estimates and may vary based on specific ingredients and portion sizes.)
| Nutrient | Amount per Serving | % Daily Value |
|---|---|---|
| Calories | 710 kcal | 36% |
| Total Fat | 35g | 54% |
| Saturated Fat | 8g | 40% |
| Cholesterol | 60mg | 20% |
| Sodium | 510mg | 21% |
| Total Carbohydrate | 312g | 104% |
| Dietary Fiber | 0.4g | 2% |
| Sugars | 261g | N/A |
| Protein | 7g | 14% |
Variations & Substitutions
- Gluten-Free Galaxy: Use a gluten-free cake mix in place of the regular mix. Ensure all other ingredients, like sprinkles and candy, are also gluten-free.
- Dairy-Free Galaxy: Substitute the white chocolate chips with dairy-free white chocolate chips, the sweetened condensed milk with coconut condensed milk, and use a dairy-free frosting.
- Flavor Variations: Infuse the cake layers with almond extract or lemon zest for a subtle flavor boost.
- Different Candy Filling: Swap out the galaxy sprinkles, M&Ms, rock candy, and Pop Rocks for other candies of your choice, such as gummy bears, chocolate chips, or chopped nuts.
- Vegan Galaxy: Substitute cake mix with a homemade vegan recipe and replace eggs with apple sauce or flax eggs. Ensure all ingredients are vegan and free of any animal products.
FAQs (Frequently Asked Questions)
Q: Why is my mirror glaze not shiny?
A: The most common reason is the temperature. Ensure the glaze is cooled to around 90 degrees F (32 degrees C) before pouring. Also, using high-quality white chocolate is essential.
Q: Can I make the mirror glaze ahead of time?
A: Yes, you can make the mirror glaze a day in advance. Store it in an airtight container in the refrigerator. Reheat it gently in the microwave or over a double boiler until it reaches the correct pouring consistency (around 90 degrees F/32 degrees C).
Q: How do I prevent bubbles in the mirror glaze?
A: Avoid overmixing the glaze, as this can incorporate air. If bubbles appear, gently tap the bowl on the counter to release them.
Q: Can I reuse the excess mirror glaze that drips off the cake?
A: Yes, you can strain the excess glaze to remove any crumbs or impurities and store it in the refrigerator for future use.
Q: My cake is too tall to fit in my refrigerator, what should I do?
A: You can carefully cut the cake in half horizontally and stack it after the crumb coat is set to make it shorter for refrigeration and easy handling.
Final Thoughts
Creating a Galaxy Mirror Cake is a labor of love, but the results are truly out of this world. From the colorful, hidden candy center to the flawlessly smooth and reflective glaze, this cake is a guaranteed showstopper. Don’t be afraid to experiment with colors and candy fillings to create your own unique celestial masterpiece. I encourage you to give this recipe a try and share your creations. After all, every great dish starts with a little bit of daring and a whole lot of heart. Now go, and bake your way to the stars!