
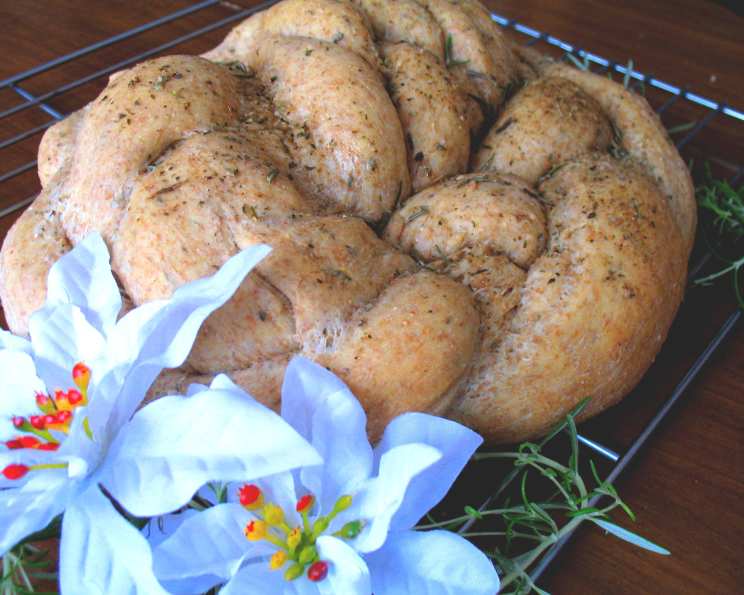
Garden Herb Loaf: A Taste of the Countryside
The scent of freshly baked bread has always been a comforting beacon in my life. As a child, I remember my grandmother tending to her garden, a vibrant tapestry of herbs and vegetables. One of my fondest memories is helping her harvest the fragrant sprigs of rosemary, thyme, and marjoram, their earthy aroma filling the air. She’d then weave these herbs into her famous herb loaf, a bread so flavorful and comforting it tasted like sunshine and happiness. This recipe brings back those cherished moments with every bite.
Recipe Overview
- Prep Time: 30 minutes
- Cook Time: 30-35 minutes
- Total Time: 1 hour 35 minutes
- Yield: 1 loaf
- Servings: 12
- Dietary Type: Vegetarian
Ingredients
- 4 cups all-purpose flour
- 3 tablespoons sugar
- 1/2 ounce fast rising yeast
- 1 1/2 teaspoons salt
- 3/4 teaspoon dried marjoram
- 3/4 teaspoon dried thyme leaves
- 3/4 teaspoon dried rosemary leaves
- 3/4 cup milk
- 1/2 cup water
- 1/4 cup butter or margarine
- 1 tablespoon butter or margarine (for brushing)
- 1 egg
Equipment Needed
- Large Mixing Bowl
- Measuring Cups and Spoons
- Baking Sheet
- Rolling Pin
- Wire Rack
Instructions
-
In a large bowl, combine 1 1/2 cups of the all-purpose flour, sugar, undissolved yeast, salt, dried marjoram, dried thyme leaves, and dried rosemary leaves. Ensure all ingredients are evenly distributed.
-
In a separate, microwave-safe bowl or small saucepan, heat the milk, water, and 1/4 cup of butter or margarine until very warm (120° to 130°F). The butter should be mostly melted. Be careful not to overheat the mixture, as it can kill the yeast.
-
Pour the warm milk mixture into the large bowl with the dry ingredients and stir to combine.
-
Add the egg and enough of the remaining flour to create a soft dough. The dough should be slightly sticky but manageable.
-
Turn the dough out onto a lightly floured surface and knead until smooth and elastic, about 4 to 6 minutes. If the dough is too sticky, add a little more flour, one tablespoon at a time.
-
Cover the dough and let it rest on the floured surface for 10 minutes. This allows the gluten to relax, making it easier to shape.
-
Divide the dough into 3 equal pieces.
-
Using a rolling pin, roll each piece into a 30-inch rope. Try to maintain an even thickness throughout each rope.
-
Braid the three ropes together, pinching the ends to seal the braid securely.
-
Tie a knot in the center of the braid. Then, wrap the ends around the knot in opposite directions, and tuck them underneath to create a round loaf shape. This might seem tricky at first, but it’s easier than it looks.
-
Place the shaped loaf on a greased baking sheet.
-
Cover the loaf loosely with plastic wrap or a clean kitchen towel and let it rise in a warm, draft-free place until doubled in size, about 20 to 40 minutes. The rising time will depend on the temperature of your environment.
-
Preheat the oven to 375°F (190°C).
-
Bake the loaf at 375°F (190°C) for 30 to 35 minutes, or until golden brown and the internal temperature reaches 200-210°F. If the top of the loaf starts to brown too quickly, cover it loosely with foil during the last 10 minutes of baking to prevent excess browning.
-
While the loaf is baking, melt the remaining 1 tablespoon of butter or margarine.
-
Once the loaf is baked, remove it from the oven and immediately brush it with the melted butter.
-
If desired, sprinkle the top of the loaf with additional marjoram, thyme, and rosemary.
-
Remove the loaf from the baking sheet and let it cool completely on a wire rack before slicing and serving.
Expert Tips & Tricks
- For a richer flavor, use whole milk instead of low-fat milk.
- If you don’t have fresh herbs, you can use a blend of dried herbs. Just be sure to adjust the amount to taste.
- To ensure even baking, rotate the baking sheet halfway through the baking time.
- If you prefer a softer crust, brush the loaf with melted butter immediately after removing it from the oven and cover it with a clean kitchen towel while it cools.
- For a more rustic look, slash the top of the loaf with a sharp knife or lame before baking.
- If you are using active dry yeast instead of rapid rise yeast, you will need to proof the yeast in warm water with a pinch of sugar before adding it to the dry ingredients. Proofing the yeast will require a longer rising time for the dough, approximately 1 hour for each rise.
Serving & Storage Suggestions
Serve the Garden Herb Loaf warm or at room temperature. It’s delicious on its own, or as a complement to soups, stews, salads, or cheese boards. Store leftover bread in an airtight container at room temperature for up to 3 days. For longer storage, wrap the loaf tightly in plastic wrap and freeze it for up to 2 months. To reheat, thaw completely and warm in a 350°F oven for 10-15 minutes, or until heated through. You can also revive slightly stale bread by sprinkling it with water and baking it for a few minutes.
Nutritional Information
| Nutrient | Amount per Serving | % Daily Value |
|---|---|---|
| Calories | 226 kcal | 11% |
| Total Fat | 6.25g | 8% |
| Saturated Fat | 3.59g | 18% |
| Cholesterol | 32.48mg | 11% |
| Sodium | 339.74mg | 15% |
| Total Carbohydrate | 36.23g | 12% |
| Dietary Fiber | 1.43g | 6% |
| Sugars | 3.3g | – |
| Protein | 5.84g | 12% |
Note: Nutritional information is an estimate and may vary based on specific ingredients and preparation methods.
Variations & Substitutions
- Whole Wheat Garden Herb Loaf: Substitute half of the all-purpose flour with whole wheat flour for a nuttier flavor and increased fiber.
- Gluten-Free Garden Herb Loaf: Use a gluten-free flour blend and a binder such as xanthan gum to create a gluten-free version of this bread.
- Vegan Garden Herb Loaf: Replace the milk with plant-based milk (almond, soy, or oat) and use a plant-based butter substitute. You can also use an egg replacer or flaxseed meal to replace the egg.
- Cheese and Herb Loaf: Add shredded cheddar, Parmesan, or Gruyere cheese to the dough along with the herbs for a cheesy, savory bread.
- Garlic Herb Loaf: Add minced garlic to the dough for a more pungent flavor.
FAQs (Frequently Asked Questions)
Q: Can I use fresh herbs instead of dried herbs?
A: Yes, you can! Use about 1 tablespoon of fresh, chopped herbs for every 1 teaspoon of dried herbs.
Q: What is the best way to store this bread?
A: Store it in an airtight container at room temperature for up to 3 days, or in the freezer for up to 2 months.
Q: Can I make this dough in a bread machine?
A: Yes, you can. Follow your bread machine’s instructions for making dough. Then, shape the dough into a loaf and bake as directed.
Q: Why did my bread not rise properly?
A: This could be due to several factors, including using old yeast, not allowing the dough to rise in a warm enough place, or using too much flour.
Q: Can I add other herbs to this bread?
A: Absolutely! Feel free to experiment with different herbs, such as basil, oregano, or chives, to create your own unique flavor combination.
Final Thoughts
This Garden Herb Loaf is more than just bread; it’s a celebration of simple pleasures and the joy of baking. The aroma that fills your kitchen as it bakes, the satisfying texture, and the burst of herbal flavors will transport you to a place of warmth and comfort. So, gather your ingredients, embrace the process, and create a loaf that will nourish your body and soul. And please, let me know how it turns out – I love hearing your baking stories! Enjoy!