
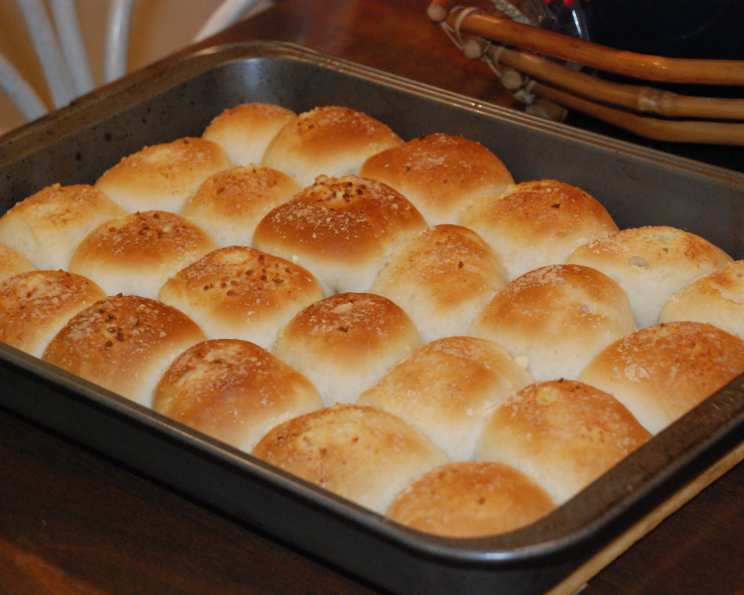
Garlic Cheese Rolls: A Bread Machine Delight
I can still picture it – the aroma of garlic and warm bread filling the kitchen, a welcome hug after a long day. My grandma used to make these garlic cheese rolls for every family gathering, and they’d disappear in minutes. There was something so comforting about pulling apart those soft, cheesy morsels, each one a tiny explosion of flavor. I finally got her recipe, and it’s just as magical as I remember – especially when the bread machine does most of the work!
Recipe Overview
- Prep Time: 20 minutes
- Cook Time: 10-15 minutes
- Total Time: 1 hour 10 minutes – 1 hour 15 minutes (includes rising time)
- Servings: 24 rolls
- Yields: 24 rolls
- Dietary Type: Vegetarian
Ingredients
- 1 cup water
- 3 cups bread flour
- 1 1/2 teaspoons salt
- 1 1/2 tablespoons butter
- 3 tablespoons sugar
- 2 tablespoons nonfat dry milk powder
- 2 teaspoons yeast
- 1/4 cup butter, melted
- 1 garlic clove, crushed
- 2 tablespoons parmesan cheese, plus more for sprinkling
Equipment Needed
- Bread Machine
- Floured Work Surface
- Sharp Knife
- Two 8-inch pie pans or one 13×9 inch pan
- Small Bowl
Instructions
- Place the water, bread flour, salt, butter, sugar, nonfat dry milk powder, and yeast into your bread machine pan in the order recommended by your bread machine manufacturer.
- Select the dough cycle on your bread machine and press start. This cycle will mix and knead the dough, then allow it to rise.
- Once the dough cycle is complete, carefully turn the dough out onto a lightly floured countertop or cutting board. Use flour sparingly to prevent the dough from becoming dry.
- Gently roll and stretch the dough into a long rope, approximately 24 inches in length. Aim for a uniform thickness to ensure even baking.
- Grease two 8-inch pie pans or one 13×9-inch baking pan. This will prevent the rolls from sticking and make it easier to remove them after baking.
- Using a sharp knife, divide the dough into 24 equal pieces. A bench scraper can also be helpful for this step.
- Shape each piece of dough into a smooth ball. This helps create a uniform and appealing final product.
- Place the dough balls into the prepared pans, arranging them evenly. Leave a small amount of space between each roll to allow for expansion during the second rise.
- In a small bowl, combine the melted butter and crushed garlic. Mix well until the garlic is evenly distributed.
- Pour the garlic butter mixture evenly over the rolls in the pans. Ensure each roll is coated to infuse them with the delicious garlic flavor.
- Sprinkle the rolls generously with the parmesan cheese. You can add more parmesan if desired, depending on your preference.
- Cover the pans with a clean kitchen towel or plastic wrap. Let the rolls rise in a warm place for 30-45 minutes, or until they have doubled in size. This step is crucial for achieving a light and fluffy texture.
- Preheat your oven to 375ºF (190ºC).
- Bake the rolls in the preheated oven for 10-15 minutes, or until they are golden brown on top. Keep a close eye on them during the last few minutes of baking to prevent burning.
- Remove the rolls from the oven and let them cool slightly before serving. Cut or pull them apart and serve warm.
Expert Tips & Tricks
- For a richer flavor, use European-style butter, which has a higher fat content.
- If you don’t have nonfat dry milk powder, you can omit it, but it does contribute to the soft texture of the rolls.
- Don’t over-flour your work surface, as this can make the dough tough.
- For a more intense garlic flavor, let the crushed garlic sit in the melted butter for about 30 minutes before pouring it over the rolls.
- If your rolls are browning too quickly, tent the pan with foil during the last few minutes of baking.
- To make these rolls ahead of time, you can prepare them up to the point of baking, cover tightly, and refrigerate overnight. Let them come to room temperature for about 30 minutes before baking.
Serving & Storage Suggestions
Serve these garlic cheese rolls warm as a side dish with your favorite Italian meals, such as pasta, lasagna, or pizza. They are also delicious on their own as a snack or appetizer.
- Room Temperature: These rolls are best enjoyed fresh, but can be stored at room temperature for up to 2 days in an airtight container.
- Refrigerator: For longer storage, keep them in the refrigerator for up to 5 days in an airtight container.
- Freezer: To freeze, wrap the cooled rolls individually in plastic wrap and then place them in a freezer-safe bag or container. They can be frozen for up to 2 months.
- Reheating: To reheat, wrap the rolls in foil and warm them in a 350°F (175°C) oven for about 10-15 minutes, or until heated through. You can also microwave them for a shorter period, but they may become slightly softer.
Nutritional Information
| Nutrient | Amount per Serving | % Daily Value |
|---|---|---|
| Calories | 91.6 kcal | N/A |
| Calories from Fat | 26 g | 29% |
| Total Fat | 2.9 g | 4% |
| Saturated Fat | 1.8 g | 8% |
| Cholesterol | 7.5 mg | 2% |
| Sodium | 179.1 mg | 7% |
| Total Carbohydrate | 14 g | 4% |
| Dietary Fiber | 0.5 g | 2% |
| Sugars | 1.9 g | 7% |
| Protein | 2.2 g | 4% |
Note: Nutritional information is an estimate and may vary based on specific ingredients and portion sizes.
Variations & Substitutions
- Herb-Infused: Add 1-2 teaspoons of dried herbs like oregano, basil, or rosemary to the dough for an herbaceous twist.
- Spicy: Mix a pinch of red pepper flakes into the garlic butter for a bit of heat.
- Cheesy Explosion: Incorporate shredded cheddar, mozzarella, or provolone cheese into the dough before shaping the rolls for an extra cheesy delight.
- Gluten-Free: Substitute the bread flour with a gluten-free bread flour blend, but note that the texture may be slightly different.
- Vegan: Replace the butter with vegan butter and the nonfat dry milk powder with a plant-based milk powder substitute. Ensure the parmesan cheese is also a vegan variety, or simply omit it.
FAQs (Frequently Asked Questions)
Q: Can I use all-purpose flour instead of bread flour?
A: While bread flour is recommended for a chewier texture, you can use all-purpose flour in a pinch. The rolls might be slightly less chewy, but still delicious.
Q: My dough didn’t rise properly. What could be the reason?
A: Several factors can affect the dough’s rise, including using expired yeast, the water being too hot or cold, or the room being too cold. Ensure your yeast is fresh, the water is lukewarm, and the rising environment is warm.
Q: Can I make these rolls without a bread machine?
A: Yes! You can mix and knead the dough by hand or with a stand mixer. Allow for a longer rising time, and ensure the dough is properly kneaded for a good texture.
Q: How do I prevent the rolls from drying out?
A: Cover the rolls with a clean kitchen towel while they are rising, and don’t overbake them. Brushing them with a little extra melted butter after baking can also help keep them moist.
Q: Can I add other toppings besides parmesan cheese?
A: Absolutely! Feel free to experiment with other toppings like garlic powder, dried herbs, or even a sprinkle of everything bagel seasoning.
Final Thoughts
These garlic cheese rolls are more than just a recipe; they’re a little slice of comfort, a warm memory brought to life with every bite. I urge you to try this recipe and experience the joy of sharing these delectable rolls with your loved ones. Don’t be afraid to experiment with variations and make them your own. And please, share your feedback – I’d love to hear how they turned out for you! Serve alongside a hearty bowl of spaghetti and meatballs for a truly unforgettable meal.