
Garlic Pita “Naan”: A Chef’s Quick Fix
The aroma of garlic sizzling in olive oil is a scent that instantly transports me back to my grandmother’s kitchen. She always had a jar of garlic-infused oil on the counter, ready to elevate any dish with its pungent magic. One evening, craving that familiar flavor alongside a spicy lentil soup, I found myself without naan bread. A quick scan of my pantry revealed a bag of mini pitas – a perfect canvas for a garlic-infused transformation. What emerged was a delightful, crispy “naan” imposter that satisfied my craving and brought back cherished memories.
Recipe Overview
- Prep Time: 5 minutes
- Cook Time: 2 minutes
- Total Time: 7 minutes
- Servings: 8 mini pitas
- Yield: 8 mini pitas
- Dietary Type: Vegetarian
Ingredients
- 1-2 garlic cloves, peeled and minced or chopped
- 1/4 – 1/3 cup olive oil
- 2 tablespoons chopped parsley
- 1-2 dashes salt
- 8 mini pita pockets
Equipment Needed
- Baking sheet
- Small bowl
- Spoon
Instructions
-
Preheat your broiler. Ensure the oven rack is positioned so the pitas will be a few inches from the broiler. This will ensure they crisp up quickly without burning.
-
In a small bowl, combine the minced or chopped garlic, olive oil, chopped parsley, and salt. Mix well to ensure the garlic is evenly distributed throughout the oil. This mixture is the key to infusing the pitas with that delicious garlic flavor.
-
Arrange the mini pita pockets on a baking sheet. It’s important to give them a little space so they can crisp up properly.
-
Drizzle approximately a teaspoonful of the garlic/oil mixture over each pita.
-
Using the back of a spoon, carefully spread the garlic/oil mixture evenly across the surface of each pita, making sure to reach the edges. This ensures that every bite is packed with garlicky goodness.
-
Place the baking sheet under the preheated broiler. Broil for a couple of minutes, keeping a very close eye on the pitas. They should lightly brown and become crispy, but you want to avoid burning them. Broilers can vary in intensity, so watch them carefully.
-
Remove from the oven and serve immediately.
Expert Tips & Tricks
- For a more intense garlic flavor, you can infuse the olive oil ahead of time. Gently heat the olive oil with the minced garlic in a saucepan over low heat for about 10 minutes. Then, remove from heat and let it cool completely before using. This will extract even more flavor from the garlic.
- If you don’t have fresh parsley, you can use dried parsley. Just remember that dried herbs are generally more potent than fresh, so use about half the amount.
- To prevent burning, keep a close watch on the pitas while they’re under the broiler. You can also lower the oven rack if needed.
- If you want a little extra kick, add a pinch of red pepper flakes to the garlic/oil mixture.
- Feel free to experiment with other herbs and spices. A sprinkle of dried oregano, thyme, or rosemary would also be delicious.
- For a vegan option, ensure your pita pockets are vegan-friendly, as some brands may contain dairy.
Serving & Storage Suggestions
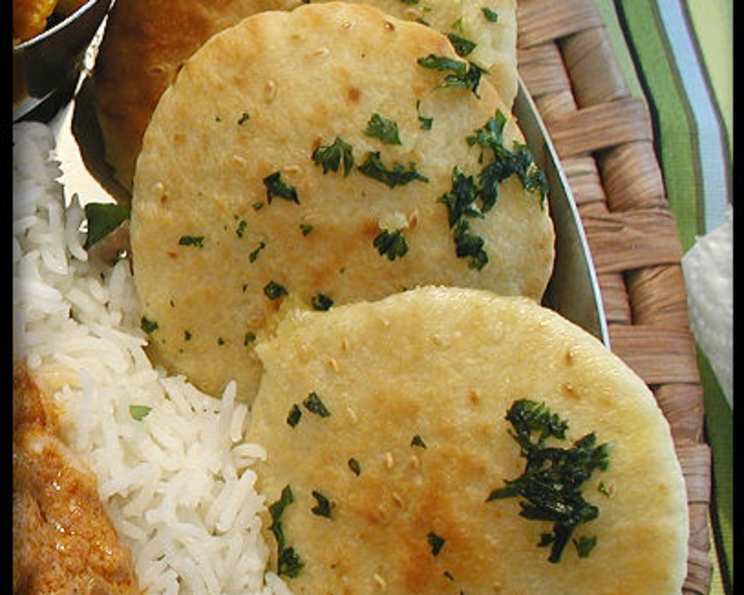
Serve these garlic pita “naans” immediately while they are still warm and crispy. They are a fantastic accompaniment to soups, stews, curries, hummus, or any Mediterranean-inspired dish. They can also be enjoyed as a simple snack on their own.
If you have any leftovers, store them in an airtight container at room temperature for up to 2 days. To reheat, you can broil them again for a minute or two, or toast them in a toaster oven. You can also reheat them in a dry skillet over medium heat. Keep in mind that they will lose some of their crispiness upon reheating.
Nutritional Information
| Nutrient | Amount per Serving | % Daily Value |
|---|---|---|
| Calories | 138 kcal | 7% |
| Total Fat | 7g | 9% |
| Saturated Fat | 1g | 5% |
| Cholesterol | 0mg | 0% |
| Sodium | 170mg | 7% |
| Total Carbohydrate | 16g | 6% |
| Dietary Fiber | 1g | 4% |
| Sugars | 0g | 0% |
| Protein | 3g | 6% |
Note: Nutritional information is an estimate and may vary based on specific ingredients and portion sizes.
Variations & Substitutions
- Spicy Garlic Pita: Add a pinch of red pepper flakes or a dash of hot sauce to the garlic/oil mixture for a spicy kick.
- Herb & Cheese Pita: Sprinkle some grated Parmesan or mozzarella cheese over the pitas before broiling for a cheesy, herby twist.
- Vegan Garlic Pita with Nutritional Yeast: Replace the optional cheese with a sprinkle of nutritional yeast for a cheesy, savory flavor.
- Gluten-Free Option: Use gluten-free pita pockets for those with gluten sensitivities.
- Roasted Garlic Pita: Roast the garlic cloves before mincing for a sweeter, mellower garlic flavor.
- Sun-dried Tomato Pita: Add finely chopped sun-dried tomatoes to the garlic/oil mixture for a tangy, Mediterranean-inspired flavor.
FAQs (Frequently Asked Questions)
Q: Can I use regular-sized pita bread instead of mini pitas?
A: Yes, you can! Just adjust the amount of garlic/oil mixture accordingly and broil for a slightly longer time.
Q: Can I grill these pita breads instead of broiling them?
A: Absolutely! Grill them over medium heat for a minute or two per side, until they are lightly browned and crispy.
Q: Can I prepare the garlic/oil mixture ahead of time?
A: Yes, you can prepare the garlic/oil mixture up to a day in advance and store it in the refrigerator. Just bring it to room temperature before using.
Q: What if I don’t have fresh parsley?
A: You can use dried parsley as a substitute. Use about half the amount, as dried herbs are generally more potent than fresh.
Q: My pitas burned under the broiler. What did I do wrong?
A: Broilers can vary in intensity, so it’s important to keep a close eye on the pitas. You may need to lower the oven rack or reduce the broiling time.
Final Thoughts
This garlic pita “naan” recipe is a testament to the fact that you don’t always need authentic ingredients to create a delicious and satisfying dish. It’s a quick, easy, and flavorful way to elevate simple pita bread into something special. I encourage you to try this recipe and experiment with different herbs, spices, and toppings to create your own unique variations. Let me know what you think and how you’ve made this recipe your own. Enjoy!