
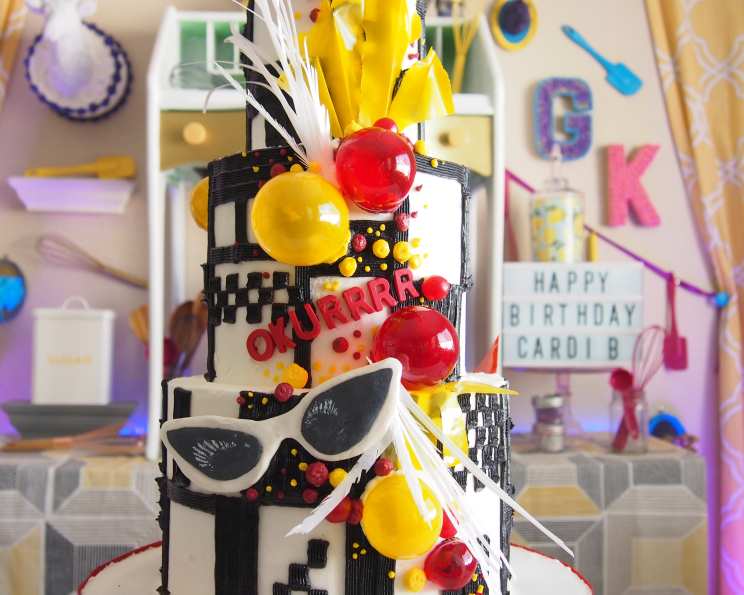
Edible Gelatin Spheres: A Chef’s Secret to Whimsical Cakes
I remember the first time I saw edible gelatin spheres adorning a cake. It was at a high-end pastry competition, and the cake looked like it was straight out of a fairy tale – delicate, shimmering orbs catching the light. I was immediately captivated, not just by the beauty, but by the ingenuity. It seemed like a technique shrouded in mystery, something only seasoned pastry chefs could accomplish. Little did I know, with a bit of patience and a few simple ingredients, I could bring that magic to my own kitchen. Now, I’m excited to share my expertise to help you master this impressive skill.
Recipe Overview
- Prep Time: 20 minutes
- Cook Time: 15 seconds
- Total Time: 24-48 hours
- Servings: Varies
- Yield: Approximately 6-10 spheres, depending on balloon size
- Dietary Type: Not suitable for vegans or vegetarians. Gelatin is derived from animals.
Ingredients
- 2 tablespoons gelatin powder
- 8 tablespoons cold water
- Gel paste food coloring (any color)
- Balloons (small to medium sized)
- Vegetable oil (optional, for greasing balloons)
Equipment Needed
- Microwave-safe bowl
- Whisk or fork
- Skewers
- Tape
- Styrofoam block or other stand to hold balloons upright
- Microwave
Instructions
-
Prepare Ahead: This project requires 1-2 days of drying time, so plan accordingly. It’s best to start this process well in advance of when you need to use the spheres.
-
Balloon Preparation: Inflate your balloons to your desired sphere size. Secure each balloon to a skewer using tape. This will act as a handle during the dipping process and allow you to stand the balloons up to dry.
-
Greasing (Optional): Lightly grease each inflated balloon with vegetable oil. While this step is optional and the gelatin often comes off without it, greasing ensures easier removal and prevents the gelatin from sticking too firmly to the balloon. Use a very light coating of oil to avoid any pooling, which can affect the gelatin’s finish.
-
Gelatin Bloom: In the microwave-safe bowl, combine the gelatin powder and cold water. Mix well with a whisk or fork to ensure there are no lumps. Allow the mixture to bloom, or rest, for 10 minutes. This allows the gelatin granules to absorb the water, creating a smoother texture.
-
Dissolving the Gelatin: Place the bloomed gelatin mixture in the microwave for 15 seconds, or until the gelatin is completely dissolved. Be careful not to overheat the gelatin, as this can affect its setting properties. It should be clear and smooth.
-
Adding Color: Now, add a small amount of gel paste food coloring to the dissolved gelatin. Use a toothpick or small spoon to stir in the color until it’s evenly distributed. Remember, a little goes a long way with gel paste, so start with a tiny amount and add more until you achieve your desired shade.
-
Dipping the Balloons: Carefully dip each balloon into the gelatin mixture, ensuring that the majority of the balloon is coated. Avoid getting any gelatin on the tied end of the balloon where it meets the skewer. This area needs to remain clean so you can easily deflate and remove the balloon later.
-
Drying: Insert the skewer end of each coated balloon into a piece of styrofoam. This will hold the balloons upright, allowing them to dry evenly. Ensure the balloons are not touching each other. Allow the coated balloons to dry for 24-48 hours, or until the gelatin is completely firm and dry to the touch. The drying time will depend on the humidity in your environment.
-
Balloon Removal: Once the gelatin is fully dry, carefully cut a small slit near the knot of each balloon using a sharp knife or scissors. Slowly and gently pull the balloon away from the inside of the sphere. The greasing (if done) helps greatly at this stage.
-
Finishing: If necessary, you can trim the base of each sphere, where the hole is, to create a flat surface so that it sits evenly on your cake or other dessert. Use a small, sharp knife for a clean cut.
Expert Tips & Tricks
- Temperature Control: Don’t overheat the gelatin during the dissolving stage. This can degrade its gelling ability. If you accidentally overheat it, let it cool slightly before proceeding.
- Air Bubbles: To minimize air bubbles in your spheres, gently tap the bowl of gelatin against the counter after dissolving it. This will help any trapped air rise to the surface.
- Multiple Coats: For a thicker, more durable sphere, you can dip the balloons multiple times, allowing each coat to dry partially before applying the next.
- Humidity: High humidity can significantly extend the drying time. If you live in a humid climate, consider using a dehumidifier or placing the balloons in a cool, dry room.
- Dust Protection: Drying in a clean, dust-free environment is crucial. Dust can settle on the surface of the spheres while they are drying, creating an uneven finish.
- Gelatin Quality: The quality of the gelatin can affect the clarity and strength of the spheres. Use a high-quality gelatin powder for best results.
- Color Intensity: Remember that the color will be more concentrated in the bowl than it appears on the balloon. Adjust the amount of food coloring accordingly.
Serving & Storage Suggestions
Gelatin spheres are best used shortly after they are made, as they can become sticky or soften over time. Store them in a cool, dry place, away from direct sunlight or heat. Do not refrigerate them, as this can cause them to become cloudy and lose their shine.
-
Serving: Carefully arrange the gelatin spheres on your cake, cupcakes, or other desserts. They can be attached using a small amount of buttercream, royal icing, or melted chocolate.
-
Storage: These spheres are best used within 24 hours of making. They are not ideal for storing for extended periods because they may start to soften and lose their shape. If you must store them, keep them in an airtight container at room temperature, away from humidity.
Nutritional Information
Note: Nutritional information is an estimate and will vary based on the specific gelatin and food coloring used.
| Nutrient | Amount per Sphere | % Daily Value |
|---|---|---|
| Calories | 5 kcal | 0% |
| Total Fat | 0g | 0% |
| Saturated Fat | 0g | 0% |
| Cholesterol | 0mg | 0% |
| Sodium | 1mg | 0% |
| Total Carbohydrate | 0g | 0% |
| Dietary Fiber | 0g | 0% |
| Sugars | 0g | 0% |
| Protein | 1g | 2% |
Variations & Substitutions
- Flavored Gelatin: Use flavored gelatin powder to add a subtle flavor to your spheres. Be mindful of the color of the gelatin, as it will affect the final color of the spheres.
- Different Shapes: While this recipe focuses on spheres, you can experiment with other shapes by using different molds or forms to support the gelatin as it dries.
- Edible Glitter: Add edible glitter to the gelatin mixture for extra sparkle.
- Ombre Effect: Create an ombre effect by dipping the balloons in different shades of colored gelatin, allowing each layer to dry partially before applying the next.
FAQs (Frequently Asked Questions)
Q: How do I prevent the balloons from popping during the dipping process?
A: Avoid overinflating the balloons. Inflate them to a size that is firm but not overly stretched. Also, be gentle when dipping them into the gelatin mixture.
Q: Can I use regular food coloring instead of gel paste?
A: Gel paste food coloring is recommended because it is more concentrated and won’t add excess liquid to the gelatin. Liquid food coloring can dilute the gelatin and affect its setting properties.
Q: My gelatin spheres are sticky. What did I do wrong?
A: Stickiness is often caused by high humidity. Ensure the spheres are drying in a cool, dry place. You can also try lightly dusting them with cornstarch after they are completely dry.
Q: Can I make these spheres ahead of time?
A: While they are best used fresh, you can make them a day or two in advance. Store them in an airtight container at room temperature, away from humidity and direct sunlight.
Q: My spheres are cloudy. Why?
A: Cloudiness can be caused by refrigerating the spheres or using water that is not completely clear. Also, make sure the gelatin is fully dissolved and that there are no undissolved granules.
Final Thoughts
Creating edible gelatin spheres might seem daunting at first, but with a little practice and patience, you’ll be adding a touch of elegance and whimsy to your cakes and desserts in no time. Don’t be afraid to experiment with different colors, flavors, and shapes to create your own unique edible decorations. And remember, the best part of cooking is sharing your creations with others, so go ahead and wow your friends and family with these stunning gelatin spheres! I encourage you to try out this recipe and would love to hear about your experiences and any creative variations you come up with. Happy baking!