
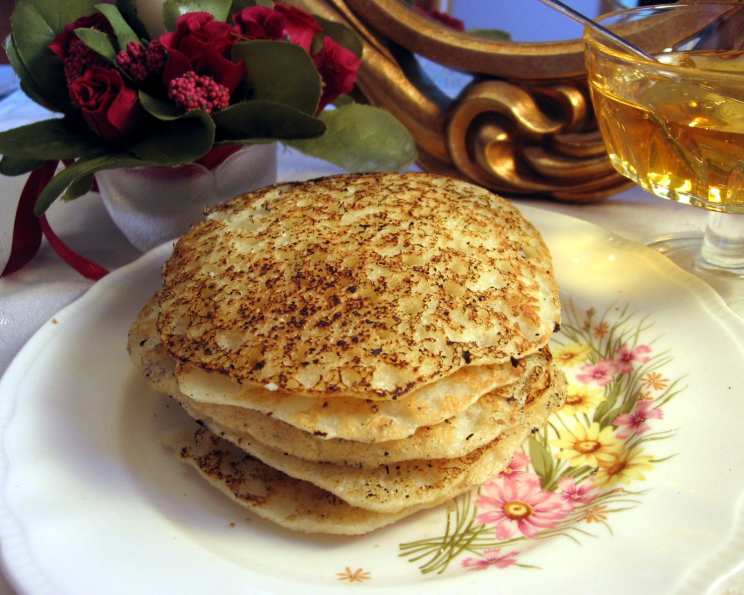
George Washington’s Morning Corn Cakes: A Taste of History
There’s something magical about recreating dishes from the past. I remember the first time I attempted to make a recipe from a vintage cookbook – a slightly yellowed, brittle-paged volume inherited from my grandmother. The aroma that filled my kitchen that day wasn’t just of spices and butter; it was the scent of connection, of history unfolding in the warmth of my oven. It was almost as if time itself was an ingredient, subtly seasoning the dish with stories of generations past. I’m transported back to that cherished feeling every time I make these simple but satisfying corn cakes.
Recipe Overview
- Prep Time: 15 minutes (plus overnight soaking)
- Cook Time: 15 minutes
- Total Time: 12 hours 30 minutes
- Servings: 4
- Yield: 8-12 cakes
- Dietary Type: Vegetarian
Ingredients
- 2 cups stone-ground white cornmeal (or yellow)
- 1 ½ – 2 cups lukewarm water
- 1 (¼ ounce) package active dry yeast
- ½ teaspoon salt
- 1 large egg
- Mild vegetable oil, for greasing griddle
- Honey, for serving (optional)
- Butter, for serving (optional)
Equipment Needed
- Medium-size, nonreactive bowl
- Whisk
- Cast-iron skillet or griddle
- Paper towels
Instructions
-
The night before you plan to enjoy these delightful corn cakes, in a medium-size, nonreactive bowl, combine 1 cup of the cornmeal, 1 ½ cups of the lukewarm water, and the yeast.
-
Using a whisk, blend the ingredients together thoroughly. The resulting mixture will be quite thin, almost like a liquid. Don’t worry, this is perfectly normal.
-
Cover the bowl tightly with plastic wrap or a lid. Then, find a warm place in your kitchen (like near a slightly warm oven, or on top of the refrigerator) to let the mixture sit overnight. This allows the yeast to activate and develop the flavor.
-
The next morning, take the bowl from the refrigerator. Whisk in the remaining 1 cup cornmeal, the ½ teaspoon of salt, and the 1 large egg. Make sure everything is fully incorporated.
-
Re-cover the bowl, and allow the batter to stand for 15-20 minutes. This resting period allows the newly added cornmeal to absorb some of the liquid and soften slightly, which will result in a more tender corn cake.
-
After the resting period, it’s time to check the consistency of the batter. It should resemble a thin pancake batter – not too runny, but definitely not as thick as heavy cream. If the batter seems too thick, gradually add more lukewarm water, a tablespoon at a time, until you reach the desired consistency.
-
Place a cast-iron skillet or griddle over medium-high heat. A well-seasoned cast-iron skillet will yield the best results, but a nonstick griddle will also work well.
-
To prevent sticking, lightly oil the hot skillet or griddle. You can do this by dipping a paper towel in vegetable oil and carefully wiping it over the surface, or by spraying with nonstick cooking spray.
-
Give the batter a good stir to ensure that all the ingredients are evenly distributed. This is especially important as the cornmeal can sometimes settle to the bottom.
-
Using a ladle, carefully pour 3-4 thin, 3-inch pancakes onto the hot skillet. Be sure to leave some space between each cake so that they don’t run into each other. The batter will spread out fairly thin, creating delicate corn cakes.
-
Pay close attention to the skillet as you pour the batter. If the batter doesn’t sizzle a little as it hits the surface, it means the skillet isn’t hot enough. If it sizzles a lot and starts to smoke, you may need to reduce the heat slightly. You’re looking for gentle sizzle.
-
Watch the corn cakes closely. Almost immediately, you’ll see little bubbles begin to appear throughout the surface of each cake. This is a good sign – it means the yeast is doing its job and the cakes are cooking properly.
-
When the top surface of each cake is completely dry and the edges are beginning to curl slightly, it’s time to flip.
-
Carefully flip one cake using a thin spatula. The underside should be a beautiful golden-brown color, with a nicely speckled appearance. If it’s too light, allow the cake to cook for a little longer before flipping.
-
Cook the first side for about 1 minute, and the second side for about 30-50 seconds, or until the second side is also golden-brown and cooked through.
-
Repeat the process with the remaining batter, making sure to stir the batter occasionally to prevent it from separating.
-
Serve the corn cakes immediately, while they’re still warm and delicious.
-
For an extra touch of flavor and sweetness, serve with a drizzle of honey and a pat of butter.
Expert Tips & Tricks
- Don’t skip the overnight soak: This is crucial for developing the unique flavor and texture of the corn cakes. The yeast needs time to work its magic.
- Adjust the water: The amount of water needed may vary depending on the type of cornmeal you use. Start with 1 ½ cups and add more as needed to achieve the desired consistency.
- Use a well-seasoned cast-iron skillet: This will help prevent sticking and give the corn cakes a beautiful golden-brown crust.
- Keep the skillet hot: Maintaining the correct temperature is essential for cooking the corn cakes properly. If the skillet is too cold, the cakes will be pale and soggy. If it’s too hot, they’ll burn.
- Experiment with flavors: Try adding a pinch of cinnamon, nutmeg, or even a dash of hot sauce to the batter for a unique twist.
Serving & Storage Suggestions
Serve these corn cakes hot off the griddle with a generous pat of butter and a drizzle of honey. They are also wonderful with maple syrup, fruit preserves, or even a savory topping like crumbled bacon or a fried egg. Leftovers can be stored in an airtight container in the refrigerator for up to 3 days. Reheat them in a skillet or toaster oven until warmed through.
Nutritional Information
| Nutrient | Amount per Serving | % Daily Value |
|---|---|---|
| Calories | 276.1 kcal | N/A |
| Calories from Fat | 22 g | 8% |
| Total Fat | 2.5 g | 3% |
| Saturated Fat | 0.6 g | 2% |
| Cholesterol | 52.9 mg | 17% |
| Sodium | 312.9 mg | 13% |
| Total Carbohydrate | 54.4 g | 18% |
| Dietary Fiber | 5.5 g | 21% |
| Sugars | 0.5 g | 2% |
| Protein | 8.1 g | 16% |
Variations & Substitutions
- Gluten-free: While cornmeal is naturally gluten-free, ensure your yeast is certified gluten-free if you have a strict gluten intolerance.
- Dairy-free: Substitute the butter with a dairy-free alternative like coconut oil or vegan butter.
- Sweet Corn Cakes: Add a tablespoon of sugar or maple syrup to the batter for a sweeter flavor. You can also incorporate fresh or frozen corn kernels.
- Savory Corn Cakes: Mix in some chopped herbs like chives, parsley, or dill, along with a pinch of black pepper, for a savory version.
- Spicy Corn Cakes: Add a pinch of cayenne pepper or some finely chopped jalapeños to the batter for a kick of heat.
FAQs (Frequently Asked Questions)
Q: Can I use yellow cornmeal instead of white?
A: Absolutely! Yellow cornmeal will work just as well and will give the corn cakes a slightly different color and flavor.
Q: Can I make the batter ahead of time?
A: The initial overnight soaking is necessary, but after adding the egg and remaining cornmeal, it’s best to cook the cakes shortly after. If you need to, you can let the batter sit for up to an hour, but the longer it sits, the more the yeast will continue to work, potentially affecting the texture.
Q: My corn cakes are sticking to the skillet. What am I doing wrong?
A: Make sure your skillet is hot enough and properly oiled. A well-seasoned cast-iron skillet is ideal for preventing sticking. Also, avoid flipping the cakes too early – wait until the top surface is dry and the edges are beginning to curl.
Q: Can I freeze these corn cakes?
A: Yes, you can freeze them. Allow the cooked corn cakes to cool completely, then wrap them individually in plastic wrap and place them in a freezer-safe bag. They can be stored in the freezer for up to 2 months. Reheat them in a skillet, toaster oven, or microwave.
Q: My batter is too thick. What should I do?
A: Gradually add more lukewarm water, a tablespoon at a time, until you reach the desired consistency – similar to a thin pancake batter.
Final Thoughts
I hope this recipe transports you back in time, if only for a few moments, to experience a taste of history. Whether you’re a seasoned chef or a beginner in the kitchen, these George Washington’s Morning Corn Cakes are sure to delight. Don’t be afraid to experiment with variations and substitutions to make them your own. And most importantly, enjoy the process of creating something delicious and unique. I would love to hear about your experience making these corn cakes! Share your photos and feedback, and let me know what variations you tried. Enjoy!