
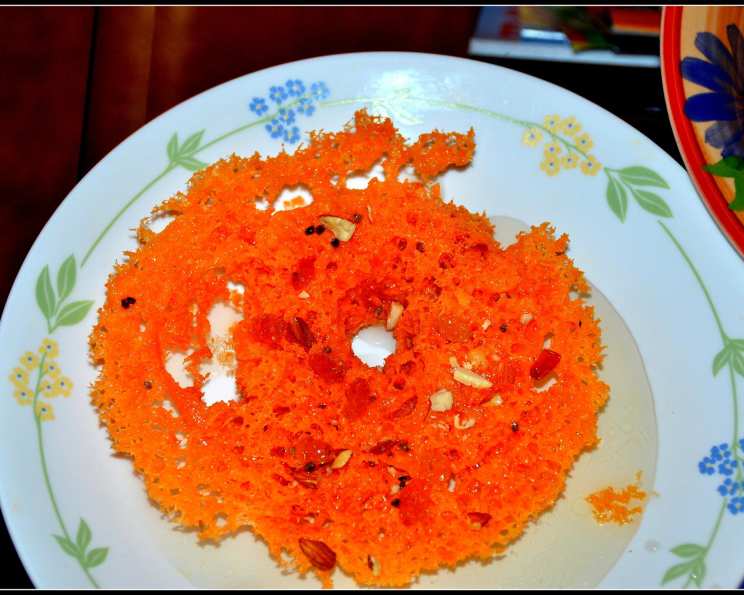
Ghevar: A Taste of Rajasthan’s Festive Spirit
My earliest memory of Ghevar is entwined with the vibrant celebrations of Teej in my grandmother’s courtyard. The air was thick with the scent of ghee, cardamom, and the joyous chatter of women dressed in their finest. From my vantage point, perched on a stool, I watched with wide-eyed fascination as my grandmother, a culinary maestro in her own right, expertly crafted these delicate, disc-shaped sweets. The rhythmic clanging of her bangles against the kadhai, the mesmerizing dance of the batter in hot ghee – it was a sensory feast that etched Ghevar forever in my heart as a symbol of tradition, love, and celebration.
Recipe Overview
- Prep Time: 20 minutes
- Cook Time: 20 minutes
- Total Time: 40 minutes
- Servings: 24
- Yield: 24 ghevars
- Dietary Type: Vegetarian
Ingredients
- 2 cups plain flour
- 1 tablespoon cornflour
- ½ cup ghee
- 1 cup sugar
- ½ cup water
- 1 teaspoon cardamom powder
- Edible color (optional)
- Water (approximately 3 cups, adjust as needed)
- Ghee, for frying
- Almonds and pistachios, for garnish
- Rabdi, for topping (optional)
Equipment Needed
- Kadhai (deep frying pan)
- Ghevar mold
- Whisk
- Small bowls
- Wooden skewer
- Pan
- Serving plate
Instructions
-
Prepare the Sugar Syrup: In a pan, combine the sugar, cardamom powder, and water. Simmer over medium heat until the syrup reaches a one-string consistency. To check for this, take a small drop of the syrup between your thumb and forefinger. When you pull them apart, a single string should form. Remove from heat and keep warm.
-
Process for Ghevar Batter: In a bowl, combine the plain flour, cornflour, and edible color (if using). Add the melted ghee to the flour mixture.
-
Emulsify the Batter: Gradually add 1 cup of water in a thin, steady stream while whisking continuously. It is crucial to ensure that an emulsion forms, preventing the ghee and water from separating. If the ghee starts to separate, stop adding water and whisk vigorously until it comes back together.
-
Achieve Coating Consistency: Continue adding 2 more cups of water in the same thin stream, whisking continuously. The batter should have a coating consistency, similar to that of a thin pancake batter. If needed, add more water to achieve the desired consistency. The key is to add water slowly and consistently whisk to avoid lumps and separation.
-
Chill the Batter: Keep the prepared batter in a cool place away from heat. This helps to maintain the emulsion and prevents the batter from thickening too quickly.
-
Prepare the Frying Setup: Place the ghevar mold in a kadhai. Pour melted ghee into the kadhai until it reaches approximately 3/4 of the height of the mold.
-
Portion the Batter: Remove about 2 ladles of the batter into a small bowl and place it near the gas range for easy access.
-
Heat the Ghee: Heat the ghee in the kadhai over medium heat. Ensure the ghee is hot enough, but not smoking.
-
First Ladle: Carefully pour one spoonful of the batter into the mold in a thin stream. The batter should settle and spread out within the mold.
-
Repeat the Pouring: When the initial froth subsides, pour another spoonful of the batter into the center of the mold in a thin stream.
-
Create the Center Hole: Repeat the process of pouring the batter into the center of the mold approximately seven times, each time creating a hole in the center of the ghevar using a wooden skewer stick. Pour the batter directly into this center hole.
-
Increase the Flame: Increase the flame to medium-high. Allow the ghevar to cook in the center by carefully pouring ladlefuls of hot ghee into the center of the mold two or three times. This ensures the center cooks evenly.
-
Remove from the Mold: When the center is firm and cooked through, gently pull the ghevar out of the ghee by inserting a wooden skewer in the center hole and carefully lifting it out. Be patient and avoid breaking the delicate structure.
-
Immerse in Sugar Syrup: Immediately immerse the cooked ghevar in the warm sugar syrup, ensuring it is evenly coated. Drain quickly to prevent it from becoming soggy.
-
Serve: Place the syrup-soaked ghevar on a serving plate.
-
Repeat: Repeat steps 7 through 13 using the remaining batter to make approximately 24 ghevars.
-
Garnish and Serve: Serve the ghevar with a generous topping of rabdi, if desired. Garnish with chopped almonds and pistachios for an extra touch of elegance and flavor.
Expert Tips & Tricks
- Batter Consistency is Key: The consistency of the batter is crucial for a good ghevar. It should be thin enough to spread easily in the ghee but not so thin that it breaks apart. Adjust the amount of water accordingly.
- Temperature Control: Maintaining the correct temperature of the ghee is essential. If the ghee is not hot enough, the ghevar will absorb too much oil. If it’s too hot, the ghevar will burn quickly.
- Mold Matters: If you don’t have a traditional ghevar mold, you can use a deep, round cake pan with a hole cut out in the center.
- Make-Ahead Prep: The sugar syrup can be made a day in advance and stored in the refrigerator. Reheat before using.
Serving & Storage Suggestions
Serve Ghevar fresh for the best taste and texture. It can be enjoyed at room temperature. If you have leftovers, store them in an airtight container at room temperature for up to 2 days. For longer storage, refrigerate for up to 5 days. Be aware that refrigerating might alter the texture slightly. To reheat, you can briefly warm it in a low-temperature oven. Avoid microwaving as it can make the ghevar soggy.
Nutritional Information
| Nutrient | Amount per Serving | % Daily Value |
|---|---|---|
| Calories | 658 kcal | N/A |
| Total Fat | 27g | 41% |
| Saturated Fat | 16g | 81% |
| Cholesterol | 67mg | 22% |
| Sodium | 3mg | 0% |
| Total Carbohydrate | 99g | 33% |
| Dietary Fiber | 2g | 7% |
| Sugars | 50g | N/A |
| Protein | 7g | 13% |
Variations & Substitutions
- Mawa Ghevar: Crumble mawa (khoya) over the ghevar after soaking it in sugar syrup for an enriched flavor.
- Malai Ghevar: Top the ghevar with a layer of thick malai (cream) for a richer, more decadent dessert.
- Gluten-Free Ghevar: Substitute the plain flour with a gluten-free flour blend, such as a mix of rice flour, tapioca starch, and almond flour. You may need to adjust the water content to achieve the correct batter consistency.
FAQs (Frequently Asked Questions)
Q: Why is my ghevar turning out soft instead of crispy?
A: This could be due to the ghee not being hot enough or the batter being too thick. Ensure the ghee is at the right temperature and the batter is of coating consistency.
Q: How do I prevent the ghee and water from separating in the batter?
A: Add the water very slowly and gradually, whisking continuously and vigorously. Chilling the batter also helps prevent separation.
Q: Can I make ghevar without a mold?
A: Yes, you can use a deep, round cake pan with a hole cut out in the center. Alternatively, you can carefully pour the batter directly into the hot ghee in a circular motion.
Q: How long does ghevar last?
A: Ghevar can last for up to 2 days at room temperature or up to 5 days in the refrigerator.
Q: What is one-string consistency of sugar syrup?
A: One-string consistency means when you take a small amount of syrup between your thumb and forefinger and pull them apart, a single, unbroken string forms.
Final Thoughts
Ghevar, with its intricate latticework and delicate sweetness, is more than just a dessert; it’s a celebration of tradition and a testament to the artistry of Indian sweets. Don’t be intimidated by the process. With a little patience and attention to detail, you can recreate this iconic Rajasthani treat in your own kitchen and bring a touch of festive cheer to your table. I encourage you to try this recipe, share your creations, and perhaps even pair it with a cooling glass of spiced buttermilk for the ultimate indulgence. Happy cooking!