
Giant Ornament Brownie: A Holiday Showstopper
The aroma of baking brownies always takes me back to childhood Christmases. My grandmother, bless her heart, wasn’t the most adventurous baker, but her fudge brownies were legendary. I remember one year, in a fit of holiday spirit (and perhaps a touch of boredom), I tried decorating one of her brownies like a Christmas ornament, complete with a candy cane “hook.” It was a gloppy, glittery mess, but it tasted amazing and sparked a tradition of festive brownie decorating that continues to this day, though thankfully, my decorating skills have improved somewhat! This Giant Ornament Brownie is an homage to those early, delicious disasters, but elevated to a level worthy of any holiday table.
Recipe Overview
- Prep Time: 20 minutes
- Cook Time: 30-35 minutes
- Total Time: 2 hours 5 minutes (includes cooling)
- Servings: 25
- Yield: 1 giant brownie ornament
- Dietary Type: Vegetarian
Ingredients
- Nonstick cooking spray
- 2 boxes brownie mix (plus required ingredients, such as eggs, oil, water – check your box instructions)
- 1 cup peanut butter chips
- 2 cups buttercream frosting, white
- Turquoise gel food coloring
- Blue decorating icing
- 6 silver dragees
- 7 purple gumdrops
- Green decorating gel
- Pink decorating icing
- 2 teaspoons candy sprinkles, pink
- 2 teaspoons candy sprinkles, purple
- 2 teaspoons candy sprinkles, blue
- 4 jumbo yellow marshmallows
- 1 candy cane
Equipment Needed
- 12-inch cake pan
- Parchment paper
- Stand mixer (or hand mixer)
- Spatula
- Pastry bags
- #825 star tip
- #6 round tip
- Kitchen shears
Instructions
- Preheat your oven to 350°F (175°C). This temperature ensures even baking and prevents the edges from burning before the center is cooked through.
- Line the inside of a 12-inch cake pan with parchment paper, leaving an overhang to easily lift the brownie out later. Then, generously spray the parchment paper with nonstick cooking spray. This double-layer protection guarantees a clean release.
- Prepare the brownie batter according to the instructions on the box mixes. Add the brownie mix plus the required ingredients (usually eggs, oil, and water) to a stand mixer fitted with the paddle attachment. Beat until just combined. Overmixing can lead to a tough brownie, so be careful.
- Gently fold in the peanut butter chips with a spatula. Ensure they’re evenly distributed throughout the batter for that perfect peanut butter-chocolate balance in every bite.
- Pour the batter into the prepared cake pan, spreading it evenly to ensure a uniform thickness.
- Bake for 30-35 minutes. To check for doneness, insert a toothpick into the center of the brownie. It should come out with moist crumbs clinging to it, but not wet batter. Remember that ovens can vary, so start checking at 30 minutes and adjust accordingly. If the top is browning too quickly, tent it loosely with foil.
- Let the brownie cool completely in the pan before removing it. This is crucial! Warm brownies are fragile and can easily break apart. Placing it on a cooling rack will help it cool faster.
- Once completely cool, carefully lift the brownie out of the pan using the parchment paper overhang. Place it on a serving platter or cake stand.
- Frost the entire top of the brownie with an even layer of white buttercream frosting. This base layer provides a blank canvas for your decorative masterpiece.
- Add the remaining white frosting to a bowl and add a couple drops of turquoise gel food coloring. Fold together with a spatula until the color is evenly distributed. Be careful not to overmix, or the frosting can become thin. Transfer the turquoise frosting to a pastry bag fitted with a #825 star tip. Set aside.
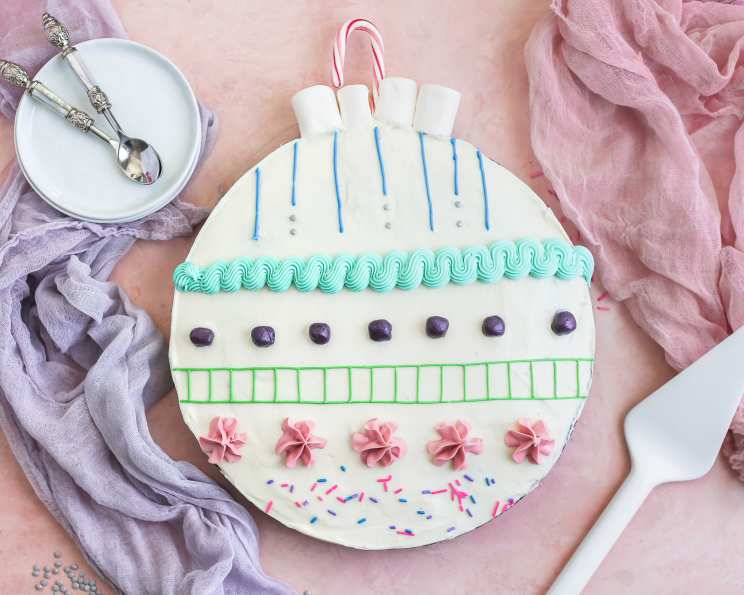
- Transfer the blue decorating icing to a small pastry bag fitted with a #6 round tip. Pipe 7 vertical lines at the top of the brownie, alternating long and short lines, to create the illusion of a shiny ornament top. Place 2 silver dragees underneath the shorter icing lines, resembling rivets.
- Pipe the turquoise frosting underneath the blue vertical lines in a horizontal squiggle pattern. This adds a touch of whimsy and festive color.
- Place a horizontal line of purple gumdrops directly under the turquoise frosting, creating a border of sweet chewiness.
- Use the green decorating gel to pipe two horizontal lines across the brownie underneath the purple gumdrops. Pipe vertical lines in between the horizontal lines so that it looks like a sideways ladder.
- Transfer the pink decorating icing to a pastry bag fitted with a #825 star tip. Pipe 6 pink stars underneath the green decorating icing, adding a touch of elegance.
- Mix the pink, purple, and blue candy sprinkles together in a small bowl. Scatter the sprinkle mix over the white frosting underneath the pink frosting stars, creating a sparkly, festive base.
- Insert the candy cane into the top of the ornament to act as the hanger.
- Use kitchen shears to make a vertical cut halfway into 2 marshmallows. Place those on both sides of the candy cane, opening up the slits, to secure the candy cane inside so that it is not exposed. The marshmallows act as “glue” to hold the candy cane in place. Add one more marshmallow on each side so there are 4 marshmallows at the top.
Expert Tips & Tricks
- For an extra fudgy brownie, reduce the baking time by a minute or two.
- To prevent the peanut butter chips from sinking to the bottom, toss them in a tablespoon of flour before folding them into the batter.
- If you don’t have gel food coloring, you can use liquid food coloring, but you may need to use more to achieve the desired color intensity. Be aware that liquid food coloring can sometimes thin the frosting, so add it sparingly.
- Make the brownie a day ahead of time and decorate it the next day. This will allow the brownie to cool completely and make the decorating process easier.
- If you don’t have pastry bags and tips, you can use zip-top bags and cut a small hole in one of the corners.
- For a richer flavor, substitute melted butter for the oil in the brownie mix.
- To prevent the decorations from sliding off the brownie, chill it in the refrigerator for 30 minutes after decorating.
Serving & Storage Suggestions
Serve this Giant Ornament Brownie as a festive dessert for holiday gatherings. It’s best served at room temperature. To store, cover loosely with plastic wrap or store in an airtight container. It will keep at room temperature for up to 3 days or in the refrigerator for up to 5 days. Freezing is not recommended as it can affect the texture of the frosting and decorations.
Nutritional Information
| Nutrient | Amount per Serving | % Daily Value |
|---|---|---|
| Calories | 438 kcal | N/A |
| Calories from Fat | 162 kcal | N/A |
| Total Fat | 18 g | 41% |
| Saturated Fat | 0.9 g | 4% |
| Cholesterol | 0.1 mg | 0% |
| Sodium | 18.2 mg | 0% |
| Total Carbohydrate | 5.2 g | 1% |
| Dietary Fiber | 0.3 g | 1% |
| Sugars | 3.9 g | 15% |
| Protein | 1.2 g | 2% |
Note: Nutritional information is an estimate and may vary based on specific ingredients and brands used.
Variations & Substitutions
- Nut-Free: Omit the peanut butter chips or substitute with chocolate chips, white chocolate chips, or butterscotch chips.
- Gluten-Free: Use a gluten-free brownie mix. Be sure to check the labels of all the decorating candies to ensure they are gluten-free as well.
- Dairy-Free: Use a dairy-free brownie mix and dairy-free frosting. Substitute dairy-free chocolate chips for the peanut butter chips.
- Different Flavors: Experiment with different flavor extracts in the brownie batter, such as peppermint or almond. You can also use different colors of frosting and sprinkles to create different holiday-themed ornaments.
- Mini Ornaments: Bake the brownie batter in muffin tins to create individual brownie ornaments.
FAQs (Frequently Asked Questions)
Q: Can I use a different size cake pan?
A: While a 12-inch pan is ideal for the ornament shape, you can use a different size, but the baking time may need to be adjusted. Smaller pans will require a longer baking time, and larger pans will require a shorter baking time.
Q: Can I make the brownie batter from scratch?
A: Absolutely! Feel free to use your favorite homemade brownie recipe instead of boxed mixes. Just be sure the recipe yields enough batter to fill a 12-inch cake pan.
Q: Can I freeze the decorated brownie?
A: While technically you can freeze it, it’s not highly recommended. Freezing can affect the texture of the frosting and decorations, causing them to become soggy or lose their shape.
Q: What if I don’t have all the decorating candies listed?
A: Get creative! Use whatever decorating candies you have on hand. The goal is to create a festive and fun ornament, so don’t be afraid to improvise.
Q: How do I prevent the candy cane from falling out?
A: Make sure the marshmallows are securely attached to the candy cane and the brownie. You can also use a small amount of melted chocolate to “glue” the candy cane in place.
Final Thoughts
This Giant Ornament Brownie is more than just a dessert; it’s a statement piece, a conversation starter, and a delicious way to spread holiday cheer. Gather your family, crank up the Christmas carols, and get ready to create a show-stopping treat that will be the highlight of your holiday celebration. Don’t be afraid to get creative with the decorations and personalize it to your own taste. And most importantly, have fun! I’d love to see your creations – share your photos and feedback so we can all be inspired. Pair this magnificent brownie with a glass of chilled eggnog or a steaming mug of hot chocolate for the ultimate holiday indulgence.