
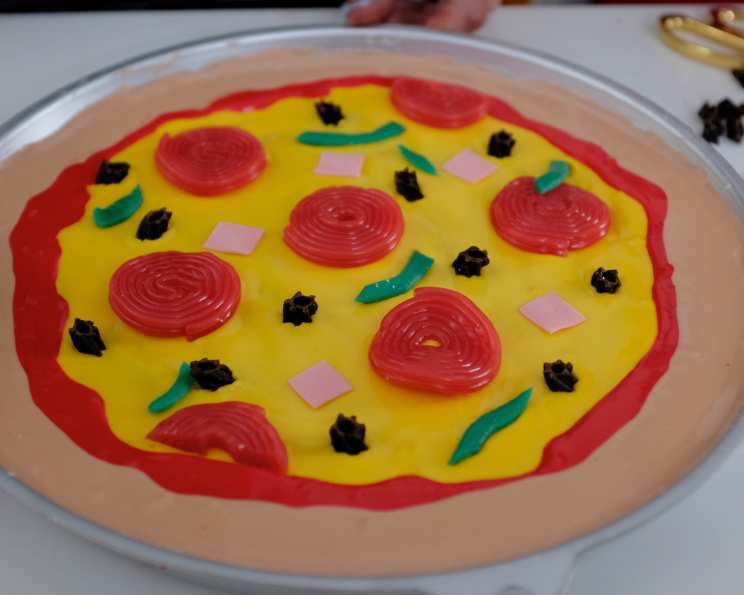
Giant Pizza Cookie: A Sweet Slice of Fun
I remember being a kid, utterly obsessed with both pizza and cookies. My dream, of course, was to somehow combine the two. I’d spend hours sketching ideas, convinced I was on the verge of a culinary breakthrough. While my early attempts were… less than stellar, the pure joy of experimenting with flavors and textures sparked a lifelong passion for baking. Now, many years later, I can finally say I’ve perfected the ultimate dessert fusion: the Giant Pizza Cookie. It’s playful, delicious, and guaranteed to bring a smile to anyone’s face.
Recipe Overview
- Prep Time: 30 minutes
- Cook Time: 15-20 minutes
- Total Time: 2 hours 30 minutes (includes cooling time)
- Servings: 10
- Yield: 1 giant cookie
- Dietary Type: Vegetarian
Ingredients
- 1 roll refrigerated sugar cookie dough
- 1 (14 ounce) box royal icing
- Food coloring (gel icing colors recommended)
- Piping bag for icing
- Pastry tips #2A and #125 for icing
- Optional Candy Toppings:
- Red licorice wheels or red fruit leather
- Black licorice
- Square piece bubble gum
- Green and/or purple taffy candy
- Pink bubble tape
Equipment Needed
- Round cookie pan (pizza pan or baking sheet)
- Mixing bowls
- Spatula
- Pizza cutter or large knife
Instructions
-
Prepare the Cookie Base: Preheat your oven according to the sugar cookie dough package instructions. Generally, this will be around 350°F (175°C). Lightly grease a round cookie pan or baking sheet. Press the sugar cookie dough evenly into the prepared pan, creating a large, circular cookie base.
-
Bake the Cookie: Bake the cookie according to the package instructions, or until the edges are golden brown and the center is set. Baking time will vary depending on your oven and the thickness of the dough, but typically it takes between 15 and 20 minutes. Keep a close eye on it to prevent burning.
-
Cool Completely: Once baked, remove the cookie from the oven and let it cool completely in the pan. This can take at least 2 hours. Cooling the cookie completely is crucial for the icing to set properly. You can leave it in the pan or gently transfer it to a serving platter.
-
Prepare the Royal Icing: Make the royal icing according to the instructions on the box or your preferred recipe. Ensure the icing is smooth and has a consistency suitable for piping. If it’s too thick, add a tiny bit of water, a drop at a time, until you reach the desired consistency.
-
Divide and Color the Icing: Divide the royal icing into three bowls. One bowl should contain approximately half of the icing. Divide the remaining half into two bowls, with one containing slightly more than the other. Color the largest portion of icing in the separate bowls yellow (to resemble cheese), the smallest portion red (to resemble pizza sauce), and the last bowl a tan/crust-like color. I recommend using gel icing colors, as they provide vibrant colors without significantly altering the consistency of the icing. For the “crust” color, a combination of a little copper and a little brown food coloring works well.
-
Create the “Cheese” Layer: Fit a piping bag with a large round tip (like #2A). Fill the bag with the yellow icing. Pipe a large circle onto the cooled cookie, leaving about 1 1/2 inches around the edge for the “sauce” and “crust”. Immediately fill the circle with the remaining yellow icing, spreading it evenly with a spatula if needed.
-
Let the “Cheese” Set: Allow the yellow icing to set for a few minutes until a slight crust forms on top. This will help prevent the red “sauce” from bleeding into the yellow “cheese”.
-
Apply the “Sauce”: Fill another piping bag, again with the #2A tip, with the red icing. Pipe the red icing around the edge of the “cheese” circle, creating a border that resembles pizza sauce. Don’t worry about making it perfect; a slightly uneven layer adds to the realistic effect. Let this layer set for a few minutes too.
-
Add the “Crust”: Fill a piping bag with the crust-colored icing. A flatter icing tip, such as #125, is perfect for this step. Pipe the crust-colored icing along the outer edge of the cookie, spreading it out to the edge to create the “crust”.
-
Decorate with “Toppings”: Now comes the fun part – decorating your pizza cookie with candy toppings! Get creative and use your favorite pizza toppings as inspiration.
- Red licorice wheels or red fruit leather cut into circles make great pepperonis.
- Black licorice cut into small rings represents olives.
- Square pieces of bubble gum can be used as tomatoes.
- Yellow candies can stand in for pineapple.
- Green or purple taffy candy can be sliced to resemble peppers or purple onions.
- Bubble gum tape cut into squares can represent ham.
-
Slice and Serve: Once you’ve added your desired toppings, use a pizza cutter or a large knife to slice the giant pizza cookie into pieces and serve. Enjoy!
Expert Tips & Tricks
- For the most vibrant colors, use gel food coloring. Liquid food coloring can thin out the royal icing too much.
- If your royal icing becomes too stiff, add a few drops of water at a time, mixing well after each addition, until you reach the desired consistency. If it’s too thin, add a small amount of powdered sugar.
- To prevent the cookie from sticking to the pan, line it with parchment paper before pressing in the dough.
- If you want to add sprinkles, do so immediately after piping the icing, while it’s still wet.
- Feel free to experiment with different candy toppings to customize your pizza cookie to your liking!
Serving & Storage Suggestions
Serve the Giant Pizza Cookie immediately after decorating for the best presentation. Leftovers can be stored in an airtight container at room temperature for up to 3 days. The cookie will soften slightly over time, but it will still be delicious. I do not recommend freezing this cookie.
Nutritional Information
(Note: Nutritional information is an estimate and will vary based on specific ingredients and portion sizes.)
| Nutrient | Amount per Serving | % Daily Value |
|---|---|---|
| Calories | 350 kcal | 18% |
| Total Fat | 15g | 23% |
| Saturated Fat | 8g | 40% |
| Cholesterol | 30mg | 10% |
| Sodium | 200mg | 9% |
| Total Carbohydrate | 50g | 17% |
| Dietary Fiber | 1g | 4% |
| Sugars | 30g | — |
| Protein | 3g | 6% |
Variations & Substitutions
- Gluten-Free: Use gluten-free sugar cookie dough. Many brands are available in the refrigerated section of most grocery stores.
- Vegan: Use vegan sugar cookie dough and vegan royal icing. Look for brands that use plant-based butter and egg replacements. You can also make your own vegan royal icing using aquafaba (chickpea brine).
- Chocolate Chip Cookie Base: Substitute the sugar cookie dough with chocolate chip cookie dough for a richer flavor.
- Different Flavored Icing: Experiment with different flavor extracts in the royal icing, such as vanilla, almond, or lemon.
FAQs (Frequently Asked Questions)
Q: Can I make the cookie dough from scratch?
A: Absolutely! Using homemade sugar cookie dough will add an extra layer of deliciousness to your Giant Pizza Cookie. Just ensure the dough is firm enough to hold its shape when baked.
Q: Can I use a different type of icing?
A: While royal icing provides a smooth, even surface for decorating, you can use other types of icing, such as buttercream or cream cheese frosting. Keep in mind that these icings may not set as firmly as royal icing.
Q: How do I prevent the cookie from browning too much?
A: If the cookie starts to brown too quickly, tent it with foil during the last few minutes of baking.
Q: Can I make the cookie base ahead of time?
A: Yes, you can bake the cookie base a day or two in advance. Wrap it tightly in plastic wrap and store it at room temperature until you’re ready to decorate.
Q: What if I don’t have piping bags and tips?
A: You can use zip-top bags with the corner snipped off as a makeshift piping bag. Alternatively, you can spread the icing with a spatula.
Final Thoughts
This Giant Pizza Cookie is more than just a dessert; it’s a conversation starter, a centerpiece, and a delicious way to unleash your inner child. It’s surprisingly simple to make, and the decorating possibilities are endless. I encourage you to try this recipe, get creative with your toppings, and share your creations with friends and family. And don’t be afraid to let me know what you think – I’m always eager to hear about your baking adventures! Pair it with a tall glass of cold milk or a scoop of vanilla ice cream for the ultimate dessert experience. Happy baking!