
The Unexpected Delight: Gluten-Free Bread That Actually Tastes Amazing (Breadmaker Edition)
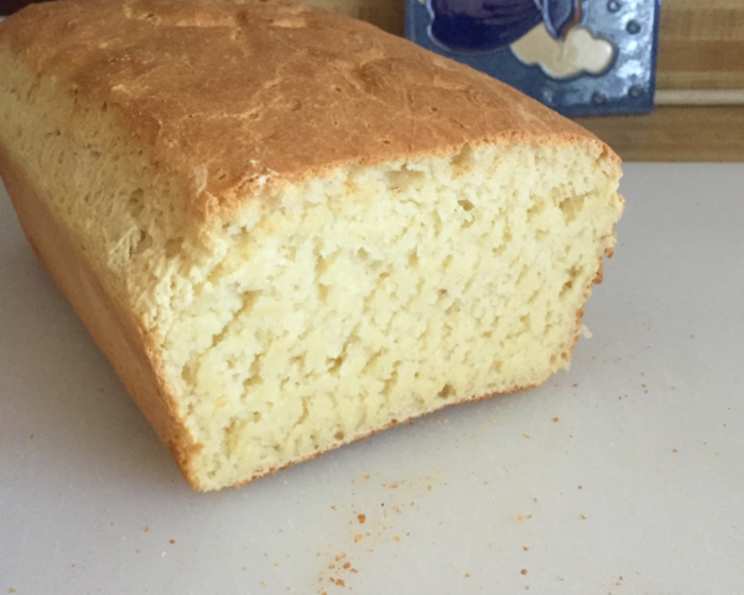
I’ll never forget the look on my face the first time I bit into truly delicious gluten-free bread. For years, I’d resigned myself to the dense, crumbly disappointments that plagued the gluten-free aisle. Then, a friend shared this recipe with me, and it completely changed my perspective. The aroma that filled my kitchen as it baked, the light, airy texture, and the surprisingly wonderful taste – it was a revelation! This bread proves that gluten-free doesn’t have to mean taste-free.
Recipe Overview
- Prep Time: 15 minutes
- Cook Time: 40 minutes (plus rising time)
- Total Time: 1 hour 55 minutes (including rising time)
- Yield: 1 loaf
- Dietary Type: Gluten-Free
Ingredients
- 3 eggs
- 1 tablespoon cider vinegar
- 1/4 cup olive oil
- 1/4 cup honey
- 1 1/2 cups buttermilk (or almond milk for a dairy-free option) – ensure it’s at room temperature
- 1 teaspoon salt
- 1 tablespoon xanthan gum
- 1/3 cup cornstarch
- 1/2 cup potato starch
- 1/2 cup soy flour
- 2 1/4 cups rice flour
- 1 tablespoon active dry yeast
Equipment Needed
- Breadmaker machine
- Measuring cups and spoons
- Bread pan (optional, for baking in the oven after the dough cycle)
Instructions
- First, ensure that your buttermilk (or almond milk) is at room temperature. This is crucial for activating the yeast properly.
- Place all ingredients into your breadmaker pan, strictly following the order recommended by the breadmaker’s manufacturer. The order can affect how well the ingredients mix and rise.
- Select the dough cycle or sweet dough cycle on your breadmaker. These cycles typically involve kneading and a period of rising.
- Let the dough cycle run for about five minutes. Then, pause the machine and carefully check the consistency of the dough. It should be smooth and elastic.
- If the dough appears too dry, add a small amount of additional liquid (either buttermilk or almond milk), one tablespoon at a time, until you reach the desired consistency. If the dough is too wet, add a tablespoon of rice flour until it thickens slightly.
- Allow the dough cycle to complete. This usually takes around an hour.
- Optional Oven Baking Method: Once the dough cycle is finished, gently remove the dough from the breadmaker pan. Shape it into a loaf and place it into a greased bread pan. Cover loosely and let it rise in a warm place until it has doubled in size, which should take approximately 30-45 minutes.
- Preheat your oven to 350°F (175°C).
- Bake the loaf in the preheated oven for approximately 40 minutes, or until the crust is golden brown and the internal temperature reaches 200°F (93°C). You can test this with a food thermometer.
- Breadmaker Baking Method: If you prefer, you can skip the oven baking method and allow the breadmaker to complete the entire baking cycle. Select the appropriate baking setting for a loaf of bread, typically a medium crust setting is best to avoid burning the crust. This will take about 45-60 minutes.
- When the bread is finished, whether baked in the oven or the breadmaker, let it cool in the pan for 10 to 15 minutes before carefully removing it. This prevents the loaf from crumbling.
- Place the bread on a wire rack to cool completely before slicing and serving. This helps to prevent a soggy bottom.
Expert Tips & Tricks
- Xanthan gum is crucial! Don’t skip it. It acts as a gluten substitute, providing the necessary structure and elasticity to the bread.
- Room temperature ingredients are key. Cold ingredients can inhibit the yeast’s activity, resulting in a dense loaf.
- Don’t overmix the dough. Overmixing can develop unwanted toughness in gluten-free bread.
- For a richer flavor, try using brown rice flour instead of white rice flour.
- If you live in a humid climate, you may need to reduce the amount of liquid slightly, as the flour can absorb more moisture from the air.
- If your bread browns too quickly, tent it with aluminum foil during the last 15 minutes of baking.
- To avoid a gummy texture, ensure the bread is fully cooled before slicing.
- Adding a tablespoon of chia seeds to the dough can enhance the nutritional value and provide extra binding.
Serving & Storage Suggestions
This gluten-free bread is delicious lightly toasted and served with your favorite preserves, such as homemade strawberry jam or orange marmalade. It also makes excellent sandwiches. Store the bread in an airtight container at room temperature for up to 3 days. For longer storage, wrap it tightly in plastic wrap and freeze it for up to 2 months. To reheat, thaw at room temperature and then toast or warm in the oven. You can also slice the bread before freezing and then toast the individual slices directly from frozen.
Nutritional Information
Please note that the following nutritional information is an estimate and may vary based on specific ingredients and portion sizes.
| Nutrient | Amount per Serving | % Daily Value |
|---|---|---|
| Calories | 256 kcal | 13% |
| Total Fat | 11g | 17% |
| Saturated Fat | 2g | 10% |
| Cholesterol | 53mg | 18% |
| Sodium | 280mg | 12% |
| Total Carbohydrate | 34g | 11% |
| Dietary Fiber | 1g | 4% |
| Sugars | 7g | N/A |
| Protein | 6g | 12% |
Variations & Substitutions
- Dairy-Free: As mentioned above, substitute buttermilk with almond milk (or any other non-dairy milk alternative).
- Herbaceous Bread: Add 1-2 tablespoons of chopped fresh herbs like rosemary, thyme, or oregano to the dough for a savory flavor.
- Mediterranean Delight: Mix in 1/4 cup of chopped sun-dried tomatoes, 1/4 cup of pitted and chopped black olives, and 2 cloves of minced garlic for a Mediterranean-inspired loaf.
- Sweet Bread: Increase the honey to 1/2 cup and add 1/2 teaspoon of cinnamon for a sweeter bread, perfect for French toast or snacking. You can also add 1/4 cup of raisins or other dried fruit.
- Seed Bread: Incorporate two tablespoons of your favorite seeds into the dough. Pumpkin seeds, sunflower seeds, or flax seeds all add a nice texture and flavor.
FAQs (Frequently Asked Questions)
Q: Can I use a different type of gluten-free flour blend?
A: While this recipe is specifically formulated for the combination of flours listed, you can experiment with other gluten-free blends. Be aware that you may need to adjust the liquid content to achieve the correct dough consistency.
Q: My bread is too dense. What am I doing wrong?
A: Density can be caused by several factors, including using cold ingredients, not using enough liquid, or overmixing the dough. Make sure your ingredients are at room temperature, add liquid gradually until the dough is smooth, and avoid overmixing.
Q: Can I make this recipe without a breadmaker?
A: Yes, you can! Mix all ingredients in a bowl, knead for 5-7 minutes, let rise for 1-1.5 hours, then bake at 350°F (175°C) for 40-45 minutes.
Q: How do I prevent the bread from being too crumbly?
A: Xanthan gum helps bind the ingredients, so make sure you use the correct amount. Also, let the bread cool completely before slicing.
Q: Is it possible to make this recipe vegan?
A: While this recipe calls for eggs, you could try using a vegan egg replacement. However, keep in mind that this may affect the texture and rise of the bread. Substitute the buttermilk with almond milk and the honey with agave nectar or maple syrup.
Final Thoughts
Don’t let the words “gluten-free” intimidate you. This recipe is surprisingly easy, and the results are incredibly rewarding. Imagine the satisfaction of pulling a warm, fragrant loaf from your breadmaker (or oven!), knowing that you’ve created something delicious and safe for everyone to enjoy. I encourage you to give this recipe a try. Feel free to experiment with different variations and share your creations with friends and family. And don’t forget to let me know how it turns out! Happy baking!