
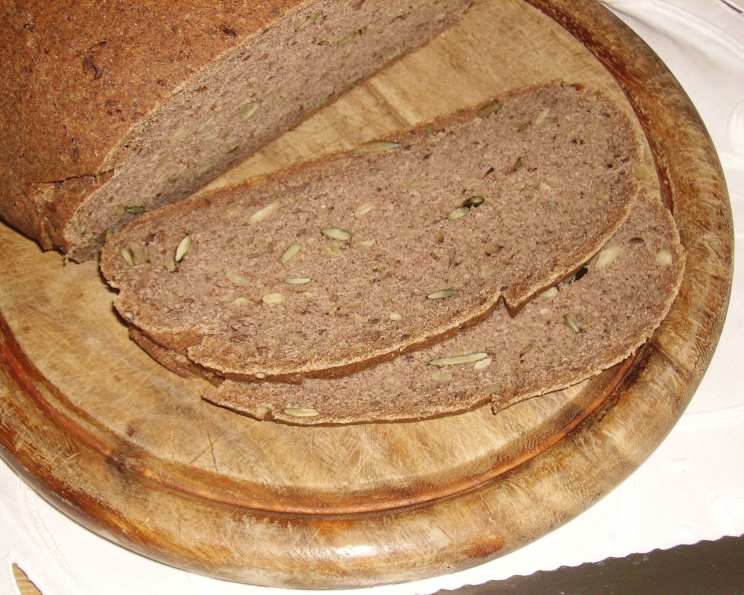
Gluten-Free Buckwheat Millet Bread: A Rustic Delight
There’s a particular memory etched in my mind – the aroma of freshly baked bread weaving through my grandmother’s sun-drenched kitchen. It wasn’t just any bread; it was her signature, a dense, earthy loaf made with buckwheat. I remember sneaking slices still warm from the oven, its slightly nutty flavor a comforting constant. But after discovering my gluten intolerance, I thought those days were gone. Until now. This recipe revives that cherished flavor in a gluten-free form, bringing back memories with every slice.
Recipe Overview
- Prep Time: 25 minutes
- Cook Time: 1 hour
- Resting Time: 2 hours
- Total Time: 3 hours 25 minutes
- Yields: 1 loaf
- Serves: 12-16 slices
- Dietary Type: Gluten-Free
Ingredients
- 1 cup buckwheat flour
- 1 cup millet flour
- 1 cup teff flour
- ¼ cup arrowroot
- ¼ cup tapioca starch
- ¼ cup rice flour
- ¼ cup sweet rice flour
- 2 tablespoons flax seeds, ground
- ½ cup pecans, ground
- ½ cup almond meal
- 2 tablespoons psyllium husks
- 4 tablespoons psyllium husks
- 2 teaspoons xanthan gum
- 1 teaspoon baking soda
- 1 teaspoon baking powder
- 2 eggs
- 2 tablespoons active dry yeast
- ⅓ cup olive oil
- ½ cup water, lukewarm
- ¾ cup water, room temperature
- 1 teaspoon agave syrup
- 1 tablespoon salt
- ¼ cup pumpkin seeds
- ¼ cup sunflower seeds
Equipment Needed
- Large mixing bowl
- Measuring cups and spoons
- Whisk
- Starch duster
- Baking sheet
- Parchment paper
- Wire rack
- Wooden skewer or toothpick
Instructions
- In a large bowl, thoroughly combine the buckwheat flour, millet flour, teff flour, arrowroot, tapioca starch, rice flour, sweet rice flour, ground flax seeds, ground pecans, almond meal, 2 tablespoons of psyllium husks, xanthan gum, baking soda, baking powder, and salt. Make sure to whisk well to evenly distribute the ingredients.
- In a separate small bowl, dissolve the active dry yeast in ½ cup of lukewarm water. Add the agave syrup to activate the yeast. Let it sit for about 5-10 minutes until it becomes foamy.
- In another bowl, whisk together the eggs and olive oil. Add the remaining ½ cup of lukewarm water and combine.
- In a separate, small bowl, mix the 4 tablespoons of psyllium husks into ¾ cup of room temperature water. Stir well to dissolve. This creates a gel-like mixture that acts as a binder in the gluten-free bread. Immediately add the dissolved psyllium husks to the egg-oil-water mixture and beat until you have a smooth, creamy consistency.
- Pour the dissolved yeast mixture into the large bowl with the flour mixture. Then, pour in the egg mixture.
- Begin kneading the dough by hand. This step is critical! It’s important to feel the consistency of the dough. If it’s too dry, slowly add more lukewarm water, a tablespoon at a time, until you have a moist but well-kneadable dough.
- Knead the dough for at least 10 minutes on a surface lightly dusted with starch (tapioca or arrowroot work well). The dough should come together and become more elastic.
- Shape the dough into a round loaf. Place the loaf in a large bowl, cover it with a clean cloth or plastic wrap, and let it rest in a warm place for 2 hours. This allows the dough to rise.
- After the 2-hour resting period, DO NOT PUNCH THE DOUGH DOWN! Gently lift the risen loaf out of the bowl and place it carefully on a baking tray lined with parchment paper.
- Sprinkle the pumpkin seeds and sunflower seeds evenly over the top of the loaf, gently pressing them into the dough.
- Place the tray with the loaf into a COLD oven. Then, heat the oven to 350 degrees F (180 degrees Celsius). DO NOT PREHEAT! This slow heating process helps the bread to rise evenly.
- Bake for 1 hour.
- After one hour, test for doneness by inserting a wooden skewer or toothpick into the middle of the loaf. If it comes out clean, and the bottom of the loaf sounds hollow when tapped, the bread is done.
- Remove the bread from the oven and let it cool on a wire rack.
- Unlike many other gluten-free breads, this Buckwheat Millet Bread can be sliced and enjoyed warm.
Expert Tips & Tricks
- Temperature is Key: Using lukewarm water for the yeast and egg mixtures is crucial for optimal activation and dough consistency. Too hot and you’ll kill the yeast; too cold and it won’t activate properly.
- Psyllium Power: The psyllium husk is what holds this bread together. Don’t skip it or try to reduce the amount. It’s the gluten-free baker’s secret weapon.
- Kneading is Essential: Don’t underestimate the importance of kneading. It develops the structure of the gluten-free dough.
- Slow Start in a Cold Oven: Starting the baking process in a cold oven allows the bread to rise more gradually, resulting in a lighter and more even texture.
- Seed Security: Gently press the seeds into the dough before baking to prevent them from falling off during slicing.
Serving & Storage Suggestions
This Gluten-Free Buckwheat Millet Bread is fantastic served warm with a smear of butter, a drizzle of honey, or alongside a hearty soup. It also makes excellent toast or sandwiches.
Store any leftover bread at room temperature in an airtight container for up to 3 days. For longer storage, wrap the bread tightly and freeze it for up to 2 months. To reheat, thaw the bread completely and warm it in the oven or toaster.
Nutritional Information
| Nutrient | Amount per Serving (approx. 1 slice) | % Daily Value* |
|---|---|---|
| Calories | 268 kcal | 13% |
| Total Fat | 16.4 g | 25% |
| Saturated Fat | 2.1 g | 11% |
| Cholesterol | 31 mg | 10% |
| Sodium | 733 mg | 31% |
| Total Carbohydrate | 25.7 g | 9% |
| Dietary Fiber | 4.7 g | 19% |
| Sugars | 0.8 g | |
| Protein | 7.8 g | 16% |
*Based on a 2,000 calorie diet. Values are approximate and may vary based on specific ingredients used.
Variations & Substitutions
- Nut-Free: Replace the almond meal and pecans with an equal amount of sunflower seed meal or another gluten-free flour blend.
- Egg-Free: Substitute the eggs with flax eggs (2 tablespoons ground flaxseed mixed with 6 tablespoons water, let sit for 5 minutes to gel).
- Seed Sensations: Experiment with different seeds like chia seeds, sesame seeds, or poppy seeds for added flavor and texture.
- Herbal Infusion: Add 1-2 tablespoons of chopped fresh herbs like rosemary or thyme to the dough for a savory twist.
FAQs (Frequently Asked Questions)
Q: Why is the oven cold when I start baking?
A: Starting in a cold oven allows the bread to rise more gradually and evenly, preventing a hard crust from forming too quickly.
Q: Can I use a bread machine for this recipe?
A: While it’s possible, hand-kneading is recommended for better control of the dough’s consistency, which is crucial for gluten-free bread. If using a bread machine, monitor closely and adjust the liquid as needed.
Q: What can I do if the dough is too sticky to handle?
A: Lightly dust your hands and the kneading surface with tapioca starch or arrowroot flour to prevent sticking.
Q: How can I tell if the bread is fully cooked?
A: Insert a wooden skewer into the center of the loaf. If it comes out clean, the bread is done. You can also tap the bottom of the loaf; it should sound hollow.
Q: Can I make this bread ahead of time?
A: Yes, you can bake the bread a day or two in advance. Store it in an airtight container at room temperature. Reheat before serving for the best flavor and texture.
Final Thoughts
This Gluten-Free Buckwheat Millet Bread is more than just a recipe; it’s a gateway to rediscovering the simple pleasures of freshly baked bread. Its rustic charm and hearty flavor make it a welcome addition to any meal. Don’t be intimidated by the list of ingredients – the process is straightforward, and the results are well worth the effort. So, gather your ingredients, embrace the warmth of your kitchen, and let the aroma of this delightful bread fill your home. I encourage you to try this recipe and make it your own!