
Gluten-Free Farmhouse Sourdough “Whole Wheat” Bread
The aroma of baking bread is a powerful time machine. One whiff of this particular loaf, and I’m instantly transported back to my grandmother’s farmhouse kitchen. Sunlight streamed through the window, illuminating dust motes dancing in the air as she pulled a similar, deeply golden loaf from her ancient oven. The hearty, earthy scent filled every corner of the room, promising warmth, comfort, and a connection to something truly fundamental. Now, years later, this gluten-free version brings back those same cherished memories, proving that deliciousness transcends dietary restrictions.
Recipe Overview
- Prep Time: 30 minutes
- Cook Time: 40 minutes
- Total Time: 1 hour 10 minutes + starter fermentation time
- Servings: 16-20
- Yields: 1 large loaf
- Dietary Type: Gluten-Free, Top 8 Allergen Free (with modifications)
Ingredients
-
For the Teff Starter:
- Teff Flour
- Distilled or Bottled Water
-
For the Bread:
- 2 cups Oat Flour
- 1 cup Teff Flour
- 1 cup Water
- 1 ½ cups Teff Starter (see directions)
- ½ cup Bob’s Red Mill 1 to 1 Gluten Free Baking Flour (can substitute for some of the oat flour)
- 3 tablespoons Oil (vegetable, olive, or other preferred oil)
- 2 tablespoons Whole Psyllium Husks
- 3 tablespoons Ground Chia Seeds
- ¼ cup Arrowroot
- 1 teaspoon Sugar
- 1 ¼ teaspoons Salt
- 2 ½ teaspoons Yeast
- Optional: Poppy and Sesame Seeds (for topping)
Equipment Needed
- Large Mixing Bowl
- Large Measuring Cup or another Mixing Bowl
- Mixing Spoon
- Parchment Paper or Oiled Bowl
- Damp Towel
- Baking Sheet
Instructions
- Prepare the Teff Starter: In a large bowl, combine equal parts teff flour and distilled or bottled water. I often start with about ½ cup of teff flour. Stir well to combine. Cover the bowl with a clean dishtowel and place it in a warmish spot. The teff should bubble slightly almost immediately. If it doesn’t bubble, you can add a tiny pinch of yeast. Important: do not use tap water, as the chlorine can kill off the yeast culture.
- Feed the Starter: Feed the starter once or twice a day, stirring with a clean fork each time. Recover with the dishtowel, just as you would with a sourdough starter. You can also use this starter to make injera. The longer the teff ferments, the more sour it will become – similar to a traditional sourdough starter. A slightly bubbly and sour smell indicates it is ready. Separation is normal; just stir well before using.
- Combine Dry Ingredients: In a large mixing bowl, combine oat flour, gluten-free flour (Bob’s Red Mill 1 to 1), dry teff flour, salt, and arrowroot powder. Whisk together thoroughly to ensure even distribution.
- Combine Wet Ingredients: In a large measuring cup or another mixing bowl, combine water, teff starter, yeast, sugar, oil, psyllium husks, and ground chia seeds. Stir well to combine, and then let the mixture sit for 2-3 minutes. This allows the psyllium husks and chia seeds to absorb some of the liquid, which will help bind the dough.
- Mix Wet and Dry Ingredients: Whisk the wet ingredients again to ensure everything is fully incorporated. Then, pour the wet ingredients into the bowl of dry ingredients. Use a large mixing spoon to mix the ingredients together until just combined.
- Knead (Optional): You can turn the dough out onto a lightly floured surface and knead it briefly, adding oat flour as needed until the dough holds together and isn’t too sticky. However, kneading is not strictly necessary for this recipe. I often skip this step for a more rustic loaf.
- First Rise: Place the dough in a large oiled bowl, or onto a piece of parchment paper. Roughly shape the dough into a loaf. Cover the dough with a damp towel and let it rise in a warm place for 30-40 minutes.
- Preheat the Oven: Preheat your oven to 400°F (200°C).
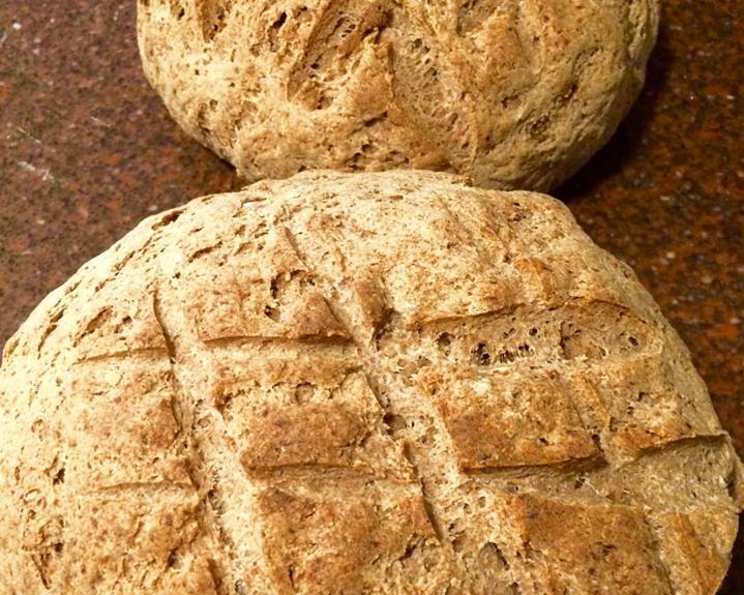
- Prepare for Baking: Once the bread has risen, carefully move it to a baking sheet if it’s not already on one. Using a sharp knife or lame, cut a shallow tic-tac-toe pattern into the top of the loaf. This helps control how the bread expands during baking and also creates an attractive design.
- Add Toppings (Optional): If desired, scatter poppy and/or sesame seeds on top of the loaf before baking for added flavor and visual appeal.
- Bake: Bake the bread at 400°F (200°C) for approximately 40 minutes.
- Cool: Let the bread cool completely on a wire rack before slicing and serving. This is crucial for the internal structure to set properly.
Expert Tips & Tricks
- Starter Sourness: For a more pronounced sourdough flavor, allow your teff starter to ferment for longer periods. The longer it ferments, the tangier it will become.
- Flour Adjustment: If you prefer, you can substitute Bob’s Red Mill 1 to 1 Gluten Free Baking Flour for some of the oat flour. This can alter the texture slightly, so experiment to find what works best for you.
- Humidity: Humidity can affect the amount of flour needed. In humid environments, you might need to add a bit more oat flour during kneading to achieve the desired dough consistency.
- Oven Calibration: Every oven is different! Keep a close eye on the bread during the last 10 minutes of baking. If it’s browning too quickly, tent it loosely with foil to prevent burning.
- Doneness Check: The bread is done when it sounds hollow when tapped on the bottom.
Serving & Storage Suggestions
This gluten-free farmhouse sourdough is delicious served warm with a smear of butter, a drizzle of olive oil, or alongside your favorite soup or stew. It also makes fantastic toast and sandwiches.
Store leftover bread in an airtight container at room temperature for up to 2 days, in the refrigerator for up to 5 days, or in the freezer for longer storage (up to 2 months). To reheat, wrap the bread in foil and warm in a 350°F (175°C) oven for 10-15 minutes, or toast individual slices.
Nutritional Information
Note: Nutritional information is an estimate and may vary based on specific ingredients and portion sizes.
| Nutrient | Amount per Serving | % Daily Value |
|---|---|---|
| Calories | 97.2 kcal | N/A |
| Calories from Fat | 27g | 29% |
| Total Fat | 3.1 g | 4% |
| Saturated Fat | 0.4 g | 2% |
| Cholesterol | 0 mg | 0% |
| Sodium | 184.2 mg | 7% |
| Total Carbohydrate | 15.8 g | 5% |
| Dietary Fiber | 1.8 g | 7% |
| Sugars | 0.7 g | 2% |
| Protein | 2.6 g | 5% |
Variations & Substitutions
- Seed Variations: Experiment with different seed combinations on top of the loaf, such as sunflower seeds, pumpkin seeds, or flax seeds.
- Herb Infusion: Add dried herbs, such as rosemary, thyme, or oregano, to the dry ingredients for an herbed sourdough.
- Sweet Version: Add a tablespoon or two of maple syrup or honey to the wet ingredients for a slightly sweeter loaf. You can also add dried fruit like cranberries or raisins.
- Dairy-Free: Ensure your oil choice is dairy-free (most vegetable oils are).
- Egg-Free: This recipe is already naturally egg-free!
- Nut-Free: The recipe is nut-free, but always check the labels of your ingredients to ensure they were not processed in a facility that also handles nuts, if that is a concern.
FAQs (Frequently Asked Questions)
Q: Can I use a different gluten-free flour blend?
A: Yes, you can experiment with other gluten-free flour blends, but be aware that the texture and rise of the bread may vary. Bob’s Red Mill 1 to 1 is recommended, but others may work with some adjustments.
Q: My starter isn’t bubbling; what should I do?
A: Make sure you are using distilled or bottled water. If it’s still not bubbling after a day or two, add a tiny pinch of yeast to help kickstart the fermentation process. Be patient, as it may take a few days for the starter to become active.
Q: The dough is too sticky. What can I do?
A: Add a tablespoon of oat flour at a time until the dough becomes more manageable. Remember that gluten-free doughs tend to be stickier than traditional wheat-based doughs.
Q: Can I make this bread in a bread machine?
A: While it’s possible, it may require some experimentation with the settings and order of ingredients. Consult your bread machine’s manual for gluten-free bread recipes as a guide.
Q: How do I know when the bread is done baking?
A: The bread is done when it sounds hollow when tapped on the bottom and the internal temperature reaches approximately 200-210°F (93-99°C).
Final Thoughts
I sincerely hope you’ll give this gluten-free farmhouse sourdough bread a try. It’s more than just a recipe; it’s an invitation to create new memories and share the warmth of homemade bread with those you love. Don’t be afraid to experiment with the variations and make it your own. And please, share your experiences and feedback – I’d love to hear how it turns out! Perhaps enjoy it alongside a hearty bowl of tomato soup, or toasted with avocado for a simple yet satisfying meal. Happy baking!