
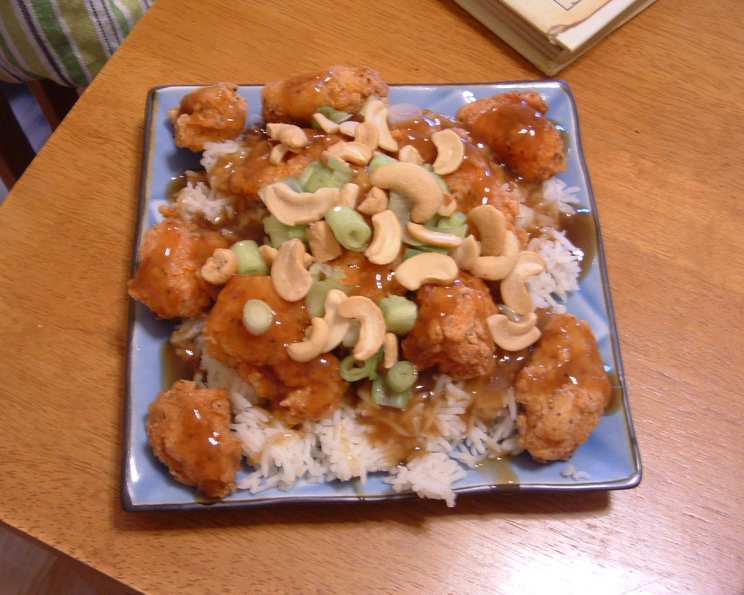
[Gluten-Free!!!] Springfield Style Cashew Chicken
The first time I tasted Springfield-style Cashew Chicken, I was a wide-eyed culinary student visiting Missouri. The savory-sweet sauce clinging to crispy chicken, the crunch of cashews, and the comforting bed of rice – it was an explosion of textures and flavors that imprinted itself on my memory. I’ve since made it my mission to recreate that iconic dish, but with a gluten-free twist that honors both tradition and dietary needs. This version captures all the magic of the original, ensuring everyone can enjoy this Midwestern delight.
Recipe Overview
- Prep Time: 30 minutes
- Cook Time: 45 minutes
- Total Time: 1 hour 15 minutes
- Servings: 4
- Dietary Type: Gluten-Free
Ingredients
- For the Chicken:
- 2 lbs chicken, cut into bite-sized pieces
- 1 part rice flour
- 1 part tapioca starch
- 1 part cornstarch
- Spices (such as garlic powder, onion powder, paprika, salt, and pepper – adjust to your preference)
- 2 eggs
- ¼ to ½ cup milk (enough to form an emulsion with the eggs)
- Oil (for frying – about ¼ inch deep in the pan)
- For the Sauce:
- 1 cup chicken stock
- ½ cup water
- 2 teaspoons sugar
- 2 teaspoons oyster sauce (check for gluten-free options!)
- 2 teaspoons soy sauce (use tamari for gluten-free)
- 2 tablespoons cornstarch
- To Serve:
- Cashews
- Green onion, chopped
- Rice, prepared
Equipment Needed
- Three bowls for breading the chicken
- Large skillet or frying pan
- Saucepan
- Spatula
- Whisk
- Measuring cups and spoons
Instructions
- Prepare the Chicken Breading Station: In a bowl, mix together equal parts rice flour, tapioca starch, and cornstarch. Add your favorite spices (garlic powder, onion powder, paprika, salt, and pepper are good choices). Split this mixture into two separate bowls.
- Make the Egg Wash: In a third bowl, beat the eggs. Gradually add milk, whisking until the mixture forms a light emulsion (about ¼ to ½ cup should do it).
- Set Up the Breading Assembly Line: Arrange the bowls in the order you’ll use them: Flour Mixture, Egg Wash, Flour Mixture.
- Bread the Chicken: Take the chicken pieces and dredge them in the first flour mixture, ensuring they are lightly but completely coated.
- Egg Soak: Transfer the coated chicken to the egg wash. Let them soak for about 10 seconds. This helps the breading adhere and keeps the chicken moist.
- Final Flour Coating: Move the chicken pieces from the egg wash to the second flour mixture. Cover them thoroughly, pressing gently to ensure the breading sticks.
- Fry the Chicken: Heat the oil in a large skillet or frying pan over medium-high heat. The oil should be about ¼ inch deep. Carefully place the breaded chicken pieces in the hot oil, being careful not to overcrowd the pan.
- Cook the Chicken: Fry the chicken for about 3 minutes on each side, or until it is golden brown and cooked through. Ensure the internal temperature reaches 165°F (74°C).
- Remove and Drain: Remove the fried chicken from the pan and place it on a wire rack or paper towel-lined plate to drain excess oil.
- Prepare the Sauce: In a saucepan, combine the chicken stock, water, sugar, oyster sauce (ensure it’s gluten-free), soy sauce (or tamari), and cornstarch.
- Simmer the Sauce: Place the saucepan over medium heat. Bring the sauce to a simmer, stirring constantly with a whisk.
- Thicken the Sauce: Continue to simmer and stir the sauce until it thickens to your desired consistency. This should take about 5-7 minutes.
- Assemble and Serve: Serve the fried chicken on a bed of cooked rice. Pour the thickened sauce over the chicken. Garnish with cashews and chopped green onions.
Expert Tips & Tricks
- Crispy Chicken Secrets: The key to crispy, gluten-free fried chicken is the combination of rice flour, tapioca starch, and cornstarch. Tapioca starch helps create a light and airy texture, while cornstarch adds extra crispness.
- Spice it Up: Don’t be afraid to experiment with different spices in the flour mixture. A pinch of cayenne pepper or some smoked paprika can add a wonderful depth of flavor.
- Double Fry for Extra Crunch: For an even crispier coating, you can double-fry the chicken. Fry it once as directed, then let it cool slightly before frying it again for another minute or two.
- Sauce Consistency: Adjust the amount of cornstarch in the sauce to achieve your preferred thickness. For a thinner sauce, use less cornstarch; for a thicker sauce, use more.
- Gluten-Free Oyster Sauce: Finding a gluten-free oyster sauce can be tricky. Look for brands that specifically state “gluten-free” on the label. If you can’t find it, you can substitute with a mixture of soy sauce, hoisin sauce, and a touch of fish sauce (adjusting the amounts to taste).
Serving & Storage Suggestions
Serve this Springfield-style Cashew Chicken immediately for the best flavor and texture. The crispy chicken will soften over time as it sits in the sauce.
- Storage: Leftovers can be stored in an airtight container in the refrigerator for up to 3 days.
- Reheating: Reheat the chicken and sauce separately to maintain the crispness of the chicken. You can reheat the chicken in the oven at 350°F (175°C) or in a skillet over medium heat. Reheat the sauce in a saucepan over low heat, stirring occasionally.
- Freezing: While the sauce freezes well, the fried chicken may become soggy after thawing. If you plan to freeze the dish, consider freezing the sauce separately and preparing the chicken fresh when you’re ready to serve.
Nutritional Information
Note: Nutritional information is an estimate and may vary based on specific ingredients and portion sizes.
| Nutrient | Amount per Serving | % Daily Value |
|---|---|---|
| Calories | 600 kcal | 30% |
| Total Fat | 30g | 46% |
| Saturated Fat | 8g | 40% |
| Cholesterol | 150mg | 50% |
| Sodium | 1200mg | 50% |
| Total Carbohydrate | 40g | 13% |
| Dietary Fiber | 2g | 8% |
| Sugars | 10g | N/A |
| Protein | 40g | 80% |
Variations & Substitutions
- Vegetarian Option: Substitute the chicken with firm tofu, cut into bite-sized pieces and pressed to remove excess moisture. Follow the same breading and frying instructions.
- Spicy Version: Add a pinch of red pepper flakes or a dash of chili oil to the sauce for a spicy kick.
- Vegetable Boost: Stir-fry some chopped vegetables, such as bell peppers, broccoli, or carrots, and add them to the dish along with the chicken.
- Sweetness Level: Adjust the amount of sugar in the sauce to suit your taste preference.
- Nut Allergy: If you have a nut allergy, you can omit the cashews or substitute them with toasted sunflower seeds or pumpkin seeds.
FAQs (Frequently Asked Questions)
Q: Can I make this ahead of time?
A: Yes, you can prepare the sauce ahead of time and store it in the refrigerator for up to 3 days. However, it’s best to fry the chicken just before serving to maintain its crispiness.
Q: Is it possible to bake the chicken instead of frying?
A: While baking will result in a slightly different texture, you can bake the breaded chicken at 400°F (200°C) for about 20-25 minutes, or until cooked through. For extra crispiness, try placing the chicken on a wire rack on a baking sheet.
Q: What if I don’t have oyster sauce?
A: If you don’t have oyster sauce, you can substitute with a mixture of soy sauce, hoisin sauce, and a touch of fish sauce. Adjust the amounts to taste, starting with equal parts soy sauce and hoisin sauce and adding fish sauce sparingly.
Q: Can I use a different type of rice?
A: Absolutely! Feel free to use your favorite type of rice, such as jasmine rice, brown rice, or even quinoa.
Q: How do I prevent the chicken from sticking to the pan when frying?
A: Ensure that the oil is hot enough before adding the chicken. Also, avoid overcrowding the pan, as this can lower the oil temperature and cause the chicken to steam instead of fry. Using a non-stick pan can also help.
Final Thoughts
Now, it’s your turn to experience the magic of Springfield-style Cashew Chicken, made entirely gluten-free! Don’t hesitate to get creative with the spices and vegetables to make it your own. I hope this recipe brings a little bit of Midwestern sunshine to your kitchen. And be sure to share your feedback and photos – I’d love to see your culinary creations! Perhaps pair it with a crisp glass of Riesling or a refreshing iced tea for the perfect meal. Happy cooking!