
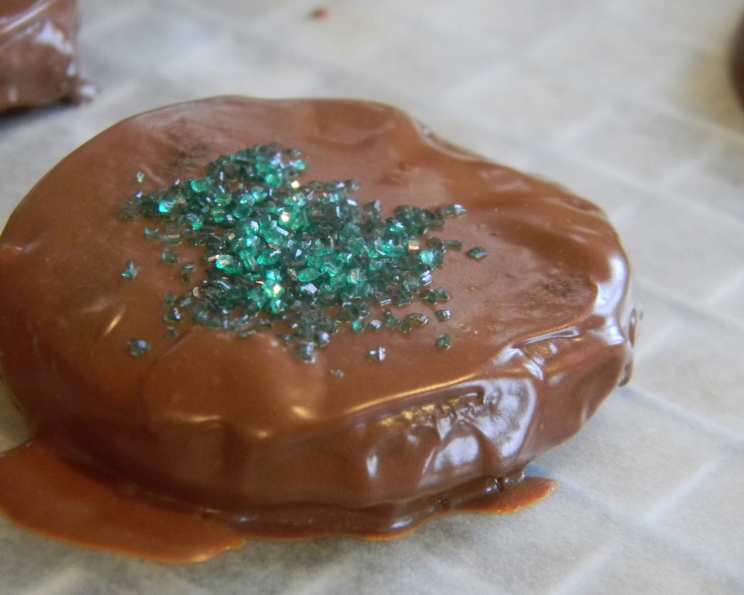
Gluten-Free Vegan Thin Mints: A Culinary Dream Come True
My grandmother, bless her heart, was the queen of shortcuts in the kitchen, but she always made sure everything tasted delicious. I remember one Christmas, she tried to pass off store-bought mint cookies as her own, tucked amongst her homemade fudge and peanut brittle. The jig was up the minute my eagle-eyed cousin, a former Girl Scout, spotted the suspiciously uniform shape and inquired about the brand. We all erupted in laughter, and Grandma, never one to admit defeat, declared they were “her special recipe, adapted for convenience!” These gluten-free vegan thin mints, while requiring a bit more effort than Grandma’s shortcut, are guaranteed to earn you accolades – no deception required!
Recipe Overview
- Prep Time: 2 hours 15 minutes
- Cook Time: 15 minutes
- Total Time: 3 hours
- Yields: 60 cookies
- Serves: 60
- Dietary Type: Vegan, Gluten-Free
Ingredients
- 1 cup rice flour
- 1/2 cup sorghum flour
- 1/4 cup millet flour
- 1/4 cup sweet rice flour
- 1/4 cup arrowroot
- 7 tablespoons dark unsweetened cocoa, sifted
- 1/2 teaspoon salt
- 1/2 cup vegan margarine, room temperature
- 2 tablespoons shortening
- 3/4 cup sugar
- 1/4 cup brown sugar
- 3 tablespoons soymilk or rice milk
- 5 tablespoons vodka
- 1/2 teaspoon pure vanilla extract
- 1 tablespoon peppermint extract
- 10 ounces bittersweet chocolate
- 1 tablespoon shortening
- 1/2 teaspoon peppermint extract
Equipment Needed
- Small bowl
- Large bowl
- Plastic wrap
- Baking sheets
- Parchment paper or silicone baking mats
- Wire rack
- Double boiler or heatproof bowl and saucepan
Instructions
- In a small bowl, whisk together the rice flour, sorghum flour, millet flour, sweet rice flour, arrowroot, sifted cocoa powder, and salt. Sifting the cocoa powder is key to avoiding lumps in the final cookie dough.
- In a large bowl, cream together the vegan margarine, shortening, sugar, and brown sugar until light and fluffy. This is best achieved with an electric mixer, but can be done by hand with some elbow grease.
- Add the soymilk (or rice milk), vodka, vanilla extract, and peppermint extract to the creamed mixture. Don’t be alarmed if the mixture looks slightly curdled; this is normal due to the vodka.
- Gradually add the dry flour mixture to the wet ingredients, mixing until just fully incorporated. Be careful not to overmix the dough, as this can lead to tough cookies.
- Shape the dough into two logs, each about 1 1/2 inches in diameter. Wrap each log tightly in plastic wrap and freeze for at least 1-2 hours, or until the dough is very firm. This step is crucial for easy slicing and helps prevent the cookies from spreading too much during baking. You can even freeze them overnight.
- Preheat your oven to 375°F (190°C). Line baking sheets with parchment paper or silicone baking mats. These will prevent the cookies from sticking and ensure even baking.
- Slice the frozen dough into rounds no more than 1/4 inch thick. If the dough is too soft to slice cleanly, return it to the freezer for a few more minutes. The thinner the slices, the crispier the cookies will be.
- Place the cookie rounds on the prepared baking sheets, fairly close together. They don’t spread much during baking, so you can maximize the number of cookies per sheet.
- Bake for 14-15 minutes. Keep a close eye on them, as baking times can vary depending on your oven. The edges should be slightly firm and the cookies should be set.
- Cool the cookies completely on a wire rack before dipping them in chocolate. This prevents the chocolate from melting and ensures a crisp cookie base.
- Combine the bittersweet chocolate and shortening in a double boiler over simmering water (or in a heatproof bowl set over a saucepan of simmering water). Make sure the bottom of the bowl doesn’t touch the water.
- Melt the chocolate until smooth, stirring occasionally. Once melted, stir in the remaining peppermint extract. This will give the chocolate coating an extra minty kick.
- Dip each cookie in the melted chocolate, ensuring it’s fully coated. Transfer the dipped cookies to a wire rack set over a piece of wax paper (or parchment paper) to allow the excess chocolate to drip off.
- Let the chocolate set up for at least 30 minutes to 1 hour, or until firm. You can speed up the process by placing the wire rack in the refrigerator.
Expert Tips & Tricks
- Don’t skip the vodka: While it might seem like an odd ingredient, vodka helps to inhibit gluten development in the gluten-free dough, resulting in a more tender cookie. The alcohol evaporates during baking, so don’t worry about any residual flavor.
- Control the chocolate: For a perfectly smooth chocolate coating, use a good quality bittersweet chocolate with a high cocoa butter content. Avoid overheating the chocolate, as this can cause it to seize up. If the chocolate becomes too thick, add a small amount of shortening to thin it out.
- Perfect the mint flavor: Adjust the amount of peppermint extract to your liking. Start with the recommended amount and add more gradually, tasting as you go. Remember that the flavor will intensify as the cookies sit.
- For a glossy finish: After dipping the cookies, sprinkle them with a pinch of sea salt or a few crushed peppermint candies before the chocolate sets.
- Prevent sticking: If the cookies are sticking to the wire rack, gently loosen them with a thin spatula before removing them.
Serving & Storage Suggestions
These gluten-free vegan thin mints are perfect enjoyed on their own, paired with a cup of hot cocoa or tea, or served as a delightful dessert after a meal. They also make a wonderful homemade gift.
To store the cookies, place them in an airtight container at room temperature. They will stay fresh for up to a week. For longer storage, you can freeze them for up to 2 months. Thaw them at room temperature before serving. It’s best to store them in a single layer or separated by parchment paper to prevent sticking.
Nutritional Information
| Nutrient | Amount per Serving | % Daily Value |
|---|---|---|
| Calories | 43.5 kcal | – |
| Calories from Fat | 7 g | 17% |
| Total Fat | 0.8 g | 1% |
| Saturated Fat | 0.2 g | 1% |
| Cholesterol | 0 mg | 0% |
| Sodium | 20.3 mg | 0% |
| Total Carbohydrate | 8.1 g | 2% |
| Dietary Fiber | 0.4 g | 1% |
| Sugars | 3.5 g | 13% |
| Protein | 0.5 g | 0% |
Variations & Substitutions
- Chocolate Variations: Experiment with different types of vegan chocolate, such as dark chocolate, semi-sweet chocolate, or even white chocolate. You can also add a swirl of peanut butter to the chocolate coating for a peanut butter-mint twist.
- Flour Blend Adjustments: If you don’t have all the flours listed, you can adjust the ratios or substitute with other gluten-free flours, such as tapioca flour or potato starch. However, be aware that this may affect the texture of the cookies. Aim for a blend that includes a mix of starches and flours for the best results.
- Extract Options: Try other extracts, such as almond extract or orange extract, for a different flavor profile. A touch of espresso powder added to the chocolate can also enhance the richness and depth of flavor.
- Sweetener Swaps: You can substitute the sugar with other sweeteners, such as maple syrup or agave nectar, but you may need to adjust the amount of liquid in the recipe accordingly.
- Vegan Butter Alternatives: Coconut oil can be used in place of vegan margarine/butter. Just make sure to use refined coconut oil to avoid any distinct coconut flavor.
FAQs (Frequently Asked Questions)
Q: Why is vodka used in the cookie dough?
A: Vodka inhibits gluten development (even in gluten-free flours), resulting in a more tender and delicate cookie. The alcohol evaporates during baking.
Q: Can I use regular flour instead of gluten-free flours?
A: No, this recipe is specifically designed for gluten-free flours. Substituting with regular flour will significantly alter the texture and baking properties.
Q: How do I prevent the chocolate from seizing up when melting?
A: Use a double boiler and melt the chocolate over low heat, stirring frequently. Avoid getting any water or steam into the chocolate. If it starts to seize, try adding a small amount of shortening to smooth it out.
Q: Can I freeze the cookie dough for longer than 2 hours?
A: Yes, you can freeze the cookie dough for up to 2 months. Just make sure it’s tightly wrapped in plastic wrap to prevent freezer burn.
Q: The cookies are too soft after baking. What did I do wrong?
A: The most common cause of soft cookies is not freezing the dough long enough. Make sure the dough is firm before slicing. You can also try baking the cookies for a minute or two longer.
Final Thoughts
These gluten-free vegan thin mints are a testament to the fact that you don’t have to compromise on flavor or texture when catering to dietary restrictions. So, gather your ingredients, preheat your oven, and prepare to be amazed by these crisp, minty, chocolatey delights. Don’t be afraid to experiment with variations and make them your own. And most importantly, share them with your loved ones and enjoy the smiles they bring! Be sure to leave a comment below with your experience and any creative twists you’ve added – I can’t wait to hear what you come up with.