
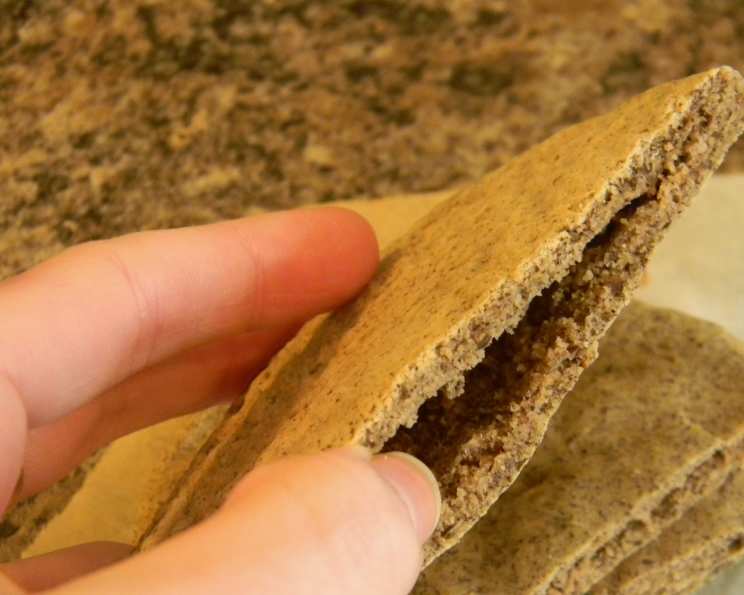
The Impossible Pita: A Gluten-Free, Yeast-Free, Vegan Dream Come True
I remember the first time I attempted gluten-free pita bread. It was a culinary disaster of epic proportions – dense, brick-like discs that resembled hockey pucks more than edible bread. My family good-naturedly tried to chew their way through them, but the disappointment was palpable. I vowed to conquer the gluten-free pita, and after countless experiments, I finally cracked the code, creating a version that’s not only gluten-free, but also vegan and yeast-free! This recipe delivers that coveted pocket, perfect for stuffing with falafel, hummus, or your favorite fillings.
Recipe Overview
- Prep Time: 15 minutes
- Cook Time: 12 minutes
- Total Time: 27 minutes
- Servings: 6
- Yield: 6 flatbreads
- Dietary Type: Vegan, Gluten-Free, Dairy-Free, Yeast-Free
Ingredients
- 1 cup all-purpose gluten-free flour (a blend like Bob’s Red Mill 1-to-1)
- 1/2 cup millet flour
- 1/2 cup brown rice flour
- 1/4 cup ground flax seed
- 1 teaspoon guar gum
- 1 1/2 teaspoons baking soda
- 1/4 teaspoon cream of tartar
- 1 pinch cumin (optional)
- 1 teaspoon kosher salt
- 1/4 cup warm water
- 1 tablespoon Ener-G Egg Replacer
- 1 tablespoon olive oil
- 1 teaspoon toasted sesame oil
- 3/4 – 1 cup warm water
Equipment Needed
- Large mixing bowl
- Whisk
- Measuring cups and spoons
- Pizza stone or baking sheet
- Parchment paper
- Dampened counter
- Sharp knife
Instructions
-
Preheat your oven to 400°F (200°C) and place a pizza stone or an upside-down baking sheet inside to heat up. This is crucial for achieving that signature pita puff.
-
In a large bowl, thoroughly whisk together the dry ingredients: gluten-free flour, millet flour, brown rice flour, ground flax seed, guar gum, baking soda, cream of tartar, cumin (if using), and kosher salt. Ensure everything is evenly distributed.
-
In a separate bowl, whisk together 1/4 cup of warm water and the Ener-G Egg Replacer according to package directions. This mixture acts as a binder in place of eggs.
-
Add the Ener-G Egg Replacer mixture to the dry ingredients, along with the olive oil and toasted sesame oil, and another 1/4 cup of warm water.
-
Mix to combine. Then, slowly add 1/2 cup of warm water, mixing as you go, to form a wet dough. The amount of water needed may vary slightly depending on the humidity and the blend of gluten-free flours used, so add it gradually.
-
Continue mixing until parts of the dough begin to pull away from the sides of the bowl. Don’t expect it to form a cohesive clump like traditional wheat dough; it will be quite sticky and wet.
-
Scrape the dough onto a dampened counter. The dampness prevents the dough from sticking excessively.
-
Divide the dough into 6 equal parts. Wetting your hands will make this process much easier and prevent the dough from sticking to your fingers.
-
With wet hands, place one piece of dough on a sheet of parchment paper. Using wet fingertips, gently smooth and flatten the dough into a 1/2-inch thick round. Aim for a uniform thickness to ensure even baking.
-
Repeat with the remaining pieces of dough, placing them about 1/2 inch apart on the parchment paper. This will prevent them from sticking together during baking.
-
Carefully place the parchment paper with the pita rounds onto the hot pizza stone or baking sheet in the preheated oven.
-
Bake for 5 minutes, then carefully flip the pitas over.
-
Continue baking for another 5 to 7 minutes, or until the pitas are lightly golden brown on both sides. Watch them closely during the last few minutes to prevent burning. The pitas should puff up during baking, creating a pocket inside.
-
Allow the pitas to cool for 3 to 5 minutes, or until they can be handled comfortably.
-
Slice each round in half through the center.
-
With a very sharp knife, gently coax open the center of each pita half to create a pocket. Be careful not to tear the pita.
-
Once cooled, the pitas will keep for 2 days in a plastic zip-lock bag on the counter.
Expert Tips & Tricks
-
The Hot Stone is Key: Don’t skip preheating the pizza stone or baking sheet. The intense heat from below is essential for creating the steam that causes the pita to puff up and form a pocket.
-
Wet Hands are Your Friend: Gluten-free dough can be sticky. Keeping your hands wet prevents the dough from sticking and makes it much easier to work with.
-
Don’t Overmix: Overmixing gluten-free dough can result in a tough texture. Mix just until the ingredients are combined.
-
Parchment Paper is Essential: Because of the dough’s delicate texture, using parchment paper is highly recommended to prevent sticking and facilitate easy transfer to the hot baking surface.
-
For Extra Flavor: Brush the pita rounds with olive oil and sprinkle with herbs like rosemary or thyme before baking.
-
Troubleshooting: If your pitas aren’t puffing up, make sure your oven is hot enough and that you’re using a pizza stone or preheated baking sheet. Also, ensure the dough is not too thick.
Serving & Storage Suggestions
These gluten-free, yeast-free, vegan pitas are incredibly versatile. Serve them warm, stuffed with your favorite fillings like falafel, hummus, roasted vegetables, or gyro-style “meat.” They’re also delicious alongside soups, stews, or salads.
To store leftovers, place the cooled pitas in a plastic zip-lock bag at room temperature for up to 2 days. For longer storage, freeze them in a freezer-safe bag for up to 1 month. To reheat, wrap the pita in a damp paper towel and microwave for 15-20 seconds, or toast them lightly in a toaster oven. You can also reheat them in a dry skillet over medium heat.
Nutritional Information
| Nutrient | Amount per Serving | % Daily Value |
|---|---|---|
| Calories | 146 kcal | N/A |
| Calories from Fat | 59 kcal | N/A |
| Total Fat | 6.6 g | 10% |
| Saturated Fat | 0.8 g | 3% |
| Cholesterol | 0 mg | 0% |
| Sodium | 610 mg | 25% |
| Total Carbohydrate | 19.4 g | 6% |
| Dietary Fiber | 3.6 g | 14% |
| Sugars | 0.3 g | 1% |
| Protein | 3.5 g | 7% |
Variations & Substitutions
-
Different Gluten-Free Flour Blend: While I recommend a blend like Bob’s Red Mill 1-to-1, you can experiment with other gluten-free all-purpose flour blends. Keep in mind that the texture and results may vary.
-
Spice it Up: Add other spices to the dough, such as garlic powder, onion powder, or smoked paprika, for a more flavorful pita.
-
Herb Infusion: Mix finely chopped fresh herbs like rosemary, thyme, or oregano into the dough.
-
Sweet Pita: For a sweeter pita, reduce the salt and add a tablespoon of maple syrup or agave nectar to the dough.
FAQs (Frequently Asked Questions)
Q: Can I make these pitas without Ener-G Egg Replacer?
A: The egg replacer acts as a binder. You could try using a chia seed “egg” (1 tablespoon chia seeds mixed with 3 tablespoons of water, let sit for 5 minutes to gel), but the results may vary.
Q: Why is my pita dough so sticky?
A: Gluten-free dough tends to be stickier than traditional wheat dough. This is normal. Keep your hands wet and use plenty of parchment paper.
Q: Can I use a different type of oil?
A: Yes, you can substitute the olive oil and toasted sesame oil with other oils like avocado oil or coconut oil. The toasted sesame oil adds a unique flavor, but it can be omitted if you don’t have it.
Q: How do I prevent the pitas from becoming too hard?
A: Don’t overbake them. As soon as they are lightly golden brown, remove them from the oven. Also, storing them in a plastic bag will help retain moisture.
Q: Can I make the dough ahead of time?
A: It’s best to bake the pitas immediately after making the dough. Gluten-free dough doesn’t typically rest well.
Final Thoughts
So, there you have it – the seemingly impossible made possible! These gluten-free, yeast-free, vegan pitas are a testament to the fact that dietary restrictions don’t have to limit your culinary creativity. I encourage you to give this recipe a try and experience the joy of biting into a warm, fluffy pita that’s both delicious and allergy-friendly. Share your feedback and any creative variations you come up with! Pair them with a refreshing cucumber and mint yogurt dip for the perfect Mediterranean meal.