
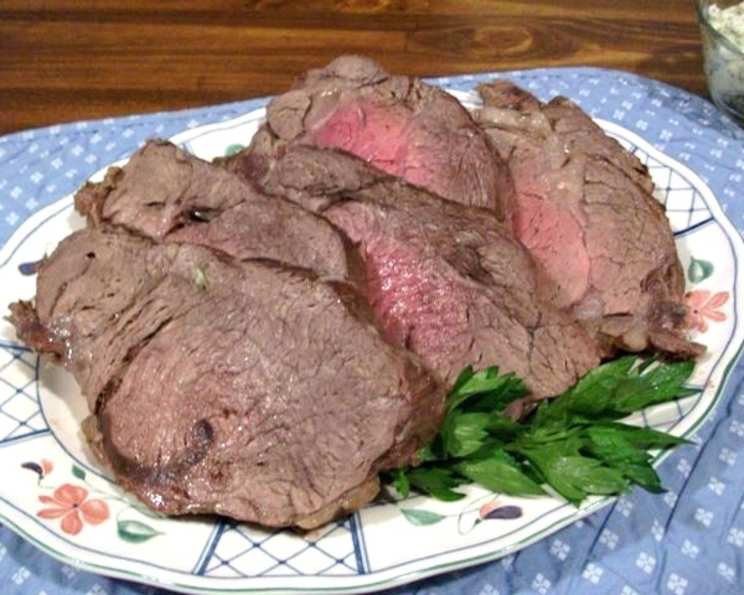
Good Eats Beef Tenderloin in Salt Crust (Alton Brown 2004)
I remember the first time I saw Alton Brown’s salt-crusted beef tenderloin on “Good Eats.” It was a revelation – a seemingly simple technique that promised to transform a humble cut of meat into something extraordinary. The way the salt crust cracked open to reveal a perfectly pink, juicy tenderloin beneath… it was pure culinary theater. Intrigued, I had to make it myself. And honestly, it’s become a Christmas mainstay, offering that festive “wow” factor without all the fuss.
Recipe Overview
- Prep Time: 30 minutes
- Cook Time: 30 minutes
- Rest Time: 30 minutes
- Total Time: 1 hour 30 minutes
- Servings: 6
- Dietary Type: N/A (Contains Meat)
Ingredients
- 2 tablespoons fresh parsley, chopped
- 2 tablespoons fresh thyme, chopped
- 2 tablespoons fresh sage, chopped
- 5 cups all-purpose flour
- 3 cups kosher salt
- 3 tablespoons black pepper
- 5 egg whites, beaten thoroughly with
- 1 1/2 cups water
- 6 lbs beef tenderloin
- 1 tablespoon olive oil
Equipment Needed
- Large bowl
- Potato masher (or stand mixer)
- Sturdy ziplock freezer bag
- Large electric griddle
- Rolling pin
- Baking sheet
- Meat thermometer
- Kitchen twine
Instructions
-
Start by preparing your herbs. Reserve half of the chopped fresh parsley, fresh thyme, and fresh sage for later use.
-
In a large bowl, combine the remaining half of the herbs with 5 cups of all-purpose flour, 3 cups of kosher salt, and 3 tablespoons of black pepper. This is the base of your salt crust, so ensure everything is well mixed.
-
Create a well in the center of the dry ingredients and add the 5 thoroughly beaten egg whites combined with 1 1/2 cups of water. The egg whites act as a binding agent, helping the crust to hold its shape.
-
Using a potato masher (or the dough hook attachment of a stand mixer if you have one), begin to mash and mix the dough. It will be very tough and crumbly at first. Don’t be discouraged – keep mashing. Scrape down the sides of the bowl and knead the mixture until it forms a solid mass, even if it remains somewhat crumbly.
-
Place the dough (break it up if needed) into a sturdy ziplock freezer bag. Seal the bag tightly and leave it on the counter for 4 to 24 hours. This resting period is crucial, as it allows the egg whites to fully hydrate the flour, resulting in a more cohesive and manageable dough.
-
About an hour before the dough is ready, prepare the beef tenderloin. To ensure even cooking, fold the slender tail end of the tenderloin over onto itself and tie it securely with kitchen twine. This will create a more uniform shape.
-
Set a large electric griddle to its highest setting. Brush the beef tenderloin with 1 tablespoon of olive oil and sear it on all sides until well browned, approximately 10 minutes. This searing process adds a depth of flavor and helps to lock in the juices.
-
Remove the tenderloin from the griddle and let it rest for at least 5 minutes, or until it is cool to the touch. This is essential; otherwise, the heat from the meat will melt the salt dough, creating a soggy crust.
-
Preheat your oven to 400°F (200°C).
-
Transfer the rested dough to a lightly floured surface and roll it out to a thickness of approximately 3/16 inch, creating a rectangle roughly 24 by 18 inches. Trim away any excess dough if necessary.
-
Sprinkle the reserved fresh parsley, fresh thyme, and fresh sage evenly over the center section of the rolled-out dough. Gently press the herbs down into the dough to ensure they adhere.
-
Place the seared beef tenderloin in the middle of the herb-covered dough. Gently take one side of the dough and fold it over the meat. Fold back a flap. Bring up the other end of the dough and crimp it together with the flap to seal. Fold the short ends of the dough over and crimp them to seal as well. The goal is to create a well-sealed “dough tube” around the tenderloin. You don’t want the dough to be tight around the meat, but you do want a good seal to prevent steam from escaping.
-
Carefully move the salt-crusted roast onto a baking sheet. Insert a meat thermometer into the center of the roast, ensuring it doesn’t touch the salt crust. Set the thermometer to 125°F (52°C) for medium-rare.
-
Bake the salt-crusted beef tenderloin in the preheated oven for approximately 25-30 minutes, or until the meat thermometer reaches your desired internal temperature.
-
Remove the baking sheet from the oven and allow the roast to rest for 30 minutes to 1 hour. During this resting period, the tenderloin will continue to cook, rising another 10 to 15 degrees in internal temperature.
-
To serve, cut the salt crust at one end and carefully extract the meat by pulling it out of the dough tube using tongs. Slice the beef tenderloin and serve immediately. As Alton Brown says, the salt crust can be tossed in the yard afterward, as it’s beneficial for local wildlife.
Expert Tips & Tricks
- Dough Consistency: Don’t worry if your dough seems crumbly; that’s normal! The long resting period allows the egg whites to fully hydrate the flour.
- Searing is Key: Don’t skip the searing step! It adds a crucial layer of flavor and helps prevent the salt crust from becoming soggy.
- Resting is Essential: Allow the tenderloin to rest both before and after baking. This helps the juices redistribute, resulting in a more tender and flavorful roast.
- Thermometer Placement: Ensure the meat thermometer is accurately placed in the thickest part of the tenderloin, without touching the salt crust.
- Doneness: Cook to your desired level of doneness. 125°F (52°C) will yield a medium-rare roast, 130°F (54°C) for medium, and 140°F (60°C) for medium-well.
Serving & Storage Suggestions
Serve the sliced beef tenderloin immediately after removing it from the salt crust. The dramatic presentation of cracking open the crust is part of the experience. Excellent accompaniments include roasted vegetables, mashed potatoes, or a simple green salad.
Leftover cooked beef tenderloin can be stored in an airtight container in the refrigerator for up to 3 days. To reheat, gently warm the slices in a skillet over medium-low heat or in a low oven (around 250°F/120°C) until heated through. Avoid overcooking, as the meat will become dry. Freezing cooked tenderloin is not recommended, as it can significantly impact the texture.
Nutritional Information
| Nutrient | Amount per Serving | % Daily Value |
|---|---|---|
| Calories | 1308 kcal | N/A |
| Total Fat | 71.5 g | 110% |
| Saturated Fat | 27.4 g | 137% |
| Cholesterol | 292.4 mg | 97% |
| Sodium | 42679 mg | 1778% |
| Total Carbohydrate | 61.8 g | 20% |
| Dietary Fiber | 3.1 g | 12% |
| Sugars | 0.4 g | 1% |
| Protein | 96.6 g | 193% |
Note: Nutritional information is an estimate and may vary based on specific ingredients and preparation methods. The sodium content is extremely high due to the salt crust, but this crust is not intended to be eaten.
Variations & Substitutions
- Herb Variations: Feel free to experiment with different combinations of fresh herbs, such as rosemary, oregano, or marjoram.
- Garlic Infusion: Add minced garlic to the herb mixture for an extra layer of flavor.
- Spice It Up: Incorporate a pinch of red pepper flakes or a dash of cayenne pepper into the salt crust for a subtle kick.
- Gluten-Free: While difficult to perfectly replicate the crust, a gluten-free flour blend could be substituted, though the texture will change.
- Smaller Roast: The recipe can be adjusted for a smaller tenderloin, but be sure to reduce the salt crust ingredients proportionally.
FAQs (Frequently Asked Questions)
Q: Can I use table salt instead of kosher salt?
A: No, kosher salt is essential. Table salt has a much finer grain and will result in an overly salty and unpalatable crust.
Q: Why do I need to rest the dough for so long?
A: The resting period allows the egg whites to fully hydrate the flour, creating a more cohesive dough that is easier to roll out and work with.
Q: The salt crust is rock hard! Is that normal?
A: Yes, the salt crust will be very hard and difficult to cut. That’s exactly what you want!
Q: Do I need to season the beef tenderloin before encasing it in the salt crust?
A: No, you don’t need to season the beef. The salt crust will impart plenty of flavor.
Q: Can I reuse the salt crust?
A: No, the salt crust is not reusable. It will be extremely salty and potentially contaminated with meat juices.
Final Thoughts
Alton Brown’s salt-crusted beef tenderloin is more than just a recipe; it’s an experience. From the satisfying crack of the salt crust to the succulent, perfectly cooked beef within, this dish is sure to impress. Don’t be intimidated by the seemingly large amount of salt – the crust isn’t meant to be eaten, but rather to create a unique cooking environment that results in a tender and flavorful roast. So, gather your ingredients, roll up your sleeves, and give this recipe a try. I promise you won’t be disappointed! Pair it with a robust red wine for the ultimate culinary indulgence.