
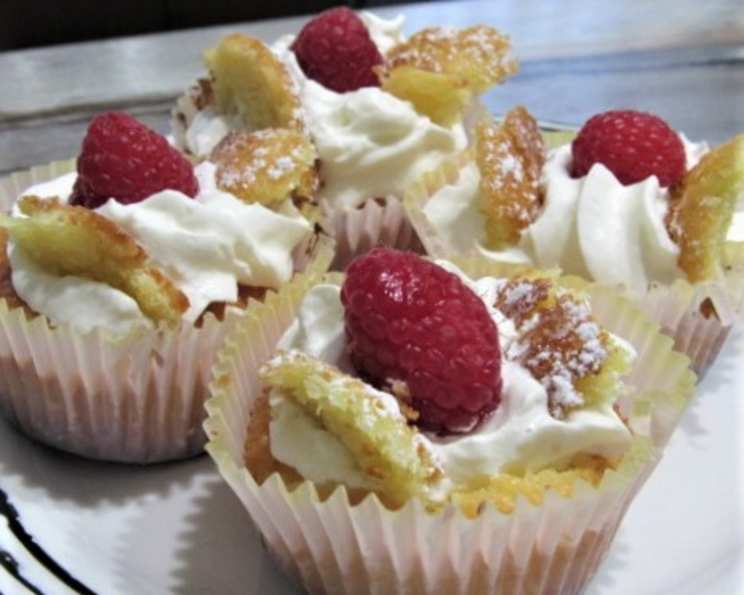
Gorgeous Little Butterfly Cakes (or Fairy Cakes!)
My earliest memories of baking involve standing on a rickety wooden stool, peering into a mixing bowl as my grandmother, Nana Elsie, whipped up a batch of these delightful butterfly cakes. The air would fill with the sweet scent of vanilla and sugar, and the anticipation of decorating those tiny wings was almost unbearable. Each cake was a miniature masterpiece, a testament to simple ingredients transformed into pure joy. To this day, the taste of a perfectly baked fairy cake transports me back to her sun-drenched kitchen, a reminder of the magic that can be created with a little flour, sugar, and love.
Recipe Overview
- Prep Time: 20 minutes
- Cook Time: 15 minutes
- Total Time: 35 minutes
- Servings: 12-18
- Yield: 12-18 cakes
- Dietary Type: Vegetarian
Ingredients
For the Cakes:
- 4 ounces (113g) butter or margarine, softened
- 4 ounces (113g) caster sugar
- 4 ounces (113g) self-raising flour
- 2 medium free-range eggs
- 1 teaspoon vanilla essence
For the Butter Icing:
- 2 ounces (57g) butter, softened
- 4 ounces (113g) sieved icing sugar
Flavorings (Optional):
- Vanilla essence
- Lemon rind
- Almond essence
- Orange rind
- Rose essence
Toppings:
- Icing sugar
- Colored crystal sugar
- Crystallised rose petals
- Lavender flowers
Equipment Needed
- Mixing bowl
- Electric hand mixer or whisk
- Sieve
- Measuring cups and spoons
- 12-18 paper cases (small size)
- Small pie or cake tins (to hold paper cases)
- Baking tray
- Cooling rack
- Knife
- Spoon or piping bag
Instructions
-
Begin by preheating your oven to 190°C (375°F). This ensures the cakes rise properly and bake evenly.
-
Prepare your baking tray by lining it with 12-18 paper cases. Remember, we’re aiming for dainty fairy cakes, not oversized muffins. Small pie or cake tins will help keep the paper cases in shape. If you only have muffin tins, you can still use them, but be aware the cakes will be slightly larger.
-
In a mixing bowl, cream together the softened butter or margarine and caster sugar. This step is crucial for creating a light and airy texture. Continue creaming until the mixture is light, fluffy, and pale in color. Using a wooden spoon is ideal for this, but a hand mixer can speed up the process.
-
In a separate bowl, lightly beat the eggs. Gradually add the beaten eggs to the creamed butter and sugar mixture, incorporating them a little at a time. For each addition of egg, add a spoonful of sifted flour. This helps prevent the mixture from curdling, ensuring a smooth batter.
-
Once all the egg has been incorporated, gently fold in any remaining flour. Be careful not to overmix at this stage, as this can result in tough cakes.
-
Now it’s time to add your flavorings. Stir in the vanilla essence, or experiment with lemon rind, orange rind, or almond essence for a different twist. If the mixture seems a bit stiff, add a splash of milk, lemon juice, or orange juice to loosen it up.
-
Carefully spoon the mixture into the prepared paper cases, filling each case about half full. This allows room for the cakes to rise without overflowing.
-
Bake in the preheated oven for approximately 15 minutes, or until the cakes are golden brown, risen, and spring back lightly when touched. Be careful not to overbake them, as this can make them dry. A toothpick inserted into the center should come out clean. If using muffin tins and making larger cakes, increase cooking time by about 5 minutes.
-
Remove the cakes from the oven and transfer them to a wire rack to cool completely. This prevents them from becoming soggy.
-
While the cakes are cooling, prepare the butter icing. In a clean bowl, cream together the softened butter and sieved icing sugar until light and fluffy. You can add a drop of vanilla, rose, or any other essence for extra flavor if desired.
-
Once the cakes have cooled, use a sharp knife to cut a slice from the top of each cake. Then, cut each slice in half to create the “wings” of the butterfly.
-
Spread a small amount of butter icing on the top of each cake.
-
Now, arrange the “wings” around the icing, positioning the rounded edge facing outwards and the cut edge towards the center, angled slightly downwards. This creates the classic butterfly or fairy wing appearance.
-
Finally, dust the cakes generously with icing sugar. For an extra touch of sparkle, you can also sprinkle on some colored crystal sugar, crystallised rose petals, or even lavender flowers.
Expert Tips & Tricks
- For the lightest, fluffiest cakes, ensure your butter is properly softened. Take it out of the refrigerator at least an hour before baking.
- Sifting the flour is essential for removing any lumps and creating a lighter texture.
- Don’t overmix the batter! Overmixing develops the gluten in the flour, resulting in tough cakes.
- If you want to add food coloring to the cakes, do so after incorporating the flavorings. Pink is particularly lovely with rose essence and crystallised rose petals.
- To make the butter icing extra smooth, use a stand mixer with the paddle attachment.
- For a more intense flavor, try browning the butter for the icing. This adds a nutty, caramel-like depth.
- If you’re short on time, you can use store-bought frosting instead of making your own.
- To create different variations, try adding chopped nuts, chocolate chips, or dried fruit to the cake batter.
Serving & Storage Suggestions
These gorgeous little butterfly cakes are best served fresh on the day they are made. They are perfect for afternoon tea, children’s parties, or any special occasion. Arrange them attractively on a tiered cake stand for a delightful presentation.
To store leftovers, place the cakes in an airtight container at room temperature. They will stay fresh for up to 2 days. You can also freeze them for longer storage. To freeze, place the cakes in a single layer on a baking sheet and freeze for 1-2 hours, or until solid. Then, transfer them to a freezer-safe container and freeze for up to 2 months. Thaw at room temperature before serving.
Nutritional Information
| Nutrient | Amount per Serving | % Daily Value |
|---|---|---|
| Calories | 222.9 kcal | N/A |
| Calories from Fat | N/A | 50% |
| Total Fat | 12.3 g | 18% |
| Saturated Fat | 7.5 g | 37% |
| Cholesterol | 57.8 mg | 19% |
| Sodium | 112.1 mg | 4% |
| Total Carbohydrate | 26.6 g | 8% |
| Dietary Fiber | 0.3 g | 1% |
| Sugars | 18.8 g | 75% |
| Protein | 2.1 g | 4% |
Note: Nutritional information is an estimate and may vary based on specific ingredients and portion sizes.
Variations & Substitutions
- Gluten-Free Butterfly Cakes: Substitute the self-raising flour with a gluten-free self-raising flour blend. You may need to add a small amount of xanthan gum to help bind the ingredients.
- Dairy-Free Butterfly Cakes: Use a dairy-free margarine instead of butter and a dairy-free spread for the icing. You can also use a plant-based milk, like almond or soy milk, if the batter needs thinning.
- Lemon Butterfly Cakes: Add the zest of one lemon to the cake batter and the juice of half a lemon to the icing for a refreshing citrus twist.
- Chocolate Butterfly Cakes: Add 2 tablespoons of cocoa powder to the dry ingredients for a chocolatey version. You can also add chocolate chips to the batter.
- Spiced Butterfly Cakes: Add ½ teaspoon of ground cinnamon, ¼ teaspoon of ground nutmeg, and a pinch of ground cloves to the batter for a warm and comforting flavor.
FAQs (Frequently Asked Questions)
Q: Can I make these cakes ahead of time?
A: Yes, you can bake the cakes a day ahead and store them in an airtight container at room temperature. Frost and decorate them just before serving for the best results.
Q: Can I use a different type of sugar?
A: Caster sugar is recommended for its fine texture, which helps create a smooth batter. However, you can use granulated sugar if you don’t have caster sugar on hand.
Q: What can I use if I don’t have self-raising flour?
A: You can make your own self-raising flour by adding 2 teaspoons of baking powder to every 150g (6 ounces) of plain flour.
Q: How do I prevent the cakes from sticking to the paper cases?
A: Ensure that the paper cases are properly fitted into the tins and that the cakes are fully cooled before attempting to remove them.
Q: Can I freeze the decorated butterfly cakes?
A: Freezing decorated cakes is not recommended, as the icing may become soggy upon thawing. It’s best to freeze the plain cakes and decorate them after thawing.
Final Thoughts
I hope this recipe inspires you to create your own batch of gorgeous little butterfly cakes! They’re a delightful treat for any occasion, and the decorating process is a fun activity to share with children. Don’t be afraid to experiment with different flavorings and toppings to create your own unique variations. And most importantly, enjoy the process of baking and sharing these sweet little delights with your loved ones. They are guaranteed to bring a smile to everyone’s face! Pair these cakes with a cup of Earl Grey tea for the perfect afternoon treat. Happy Baking!