
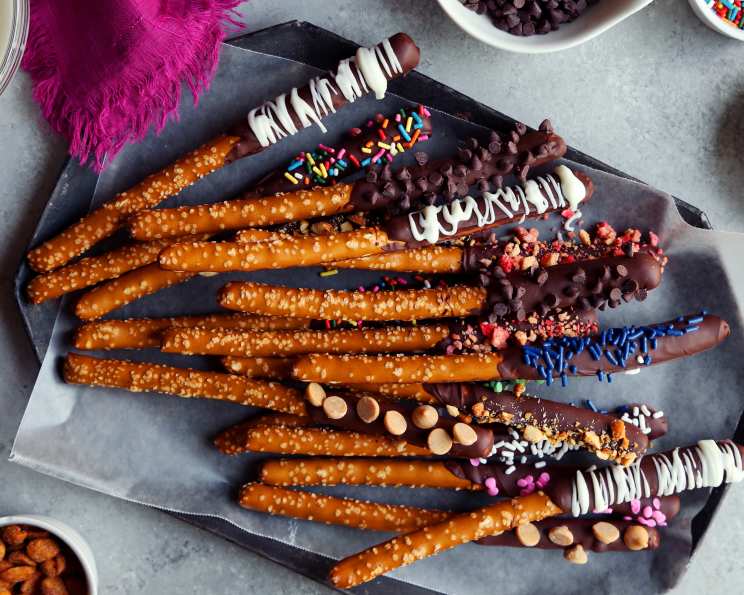
Gourmet Chocolate Dipped Pretzel Rods: A Sweet & Salty Symphony
The scent of melting chocolate always takes me back to childhood Christmases. My grandmother, a master of all things sweet, would transform our kitchen into a chocolate factory. While elaborate frosted cookies and towering gingerbread houses took center stage, it was the humble chocolate-dipped pretzel rod that truly captured my heart. The delightful contrast of salty pretzel and rich chocolate, adorned with colorful sprinkles, was pure magic. These weren’t just treats; they were edible works of art, each one lovingly crafted and imbued with the warmth of the holiday season. Now, I carry on that tradition, tweaking and embellishing to create gourmet versions that are as fun to make as they are to eat.
Recipe Overview
- Prep Time: 15 minutes
- Cook Time: 3 minutes (for melting chocolate)
- Total Time: 18 minutes
- Yields: 30 chocolate pretzels
- Dietary Type: Vegetarian
Ingredients
- 10 ounces pretzel rods
- 12 ounces milk chocolate chips (or melting disks)
- 1/2 cup white chocolate chips (optional)
- Candy sprinkles (optional)
- Miniature M&M’s chocolate candies (optional)
- Mini Reese’s pieces (optional)
- Chopped peanuts (optional)
Equipment Needed
- Double boiler or microwave-safe bowl
- Wax paper
- Baking sheet
- Fork
- Paper plate (for toppings)
Instructions
-
Begin by melting your milk chocolate chips. You can use a double boiler for a gentle, even melt, or utilize the microwave. If microwaving, place the chocolate chips in a microwave-safe bowl and heat in 30-second intervals, stirring well between each interval. This prevents the chocolate from burning. The goal is to achieve a smooth, glossy consistency.
-
If you plan to use white chocolate, melt it separately. It’s best to melt it after you’ve begun dipping the pretzel rods in milk chocolate, unless you have a double boiler and can keep the white chocolate warm over simmering water. White chocolate seizes more easily than milk chocolate, so close attention is needed. Use the same method as with the milk chocolate: short intervals in the microwave or a double boiler.
-
Now for the fun part: dipping! Take a pretzel rod and carefully dip it into the melted milk chocolate, covering approximately 2/3 of the pretzel. Gently tap off any excess chocolate back into the bowl.
-
Place the chocolate-dipped pretzel rod on a wax paper lined baking sheet. Arrange the pretzel rods in a row, leaving a small space between each one to prevent them from sticking together as the chocolate sets.
-
Allow the chocolate to set slightly, but not completely dry. This is important for the next step. While waiting, ensure your white chocolate is melted and ready to go.
-
Take a fork and dip it into the melted white chocolate. Hold the fork over a milk chocolate-dipped pretzel rod and drizzle the white chocolate over the milk chocolate by gently moving the fork back and forth. The goal is to create thin, elegant streaks of white chocolate. Avoid touching the pretzel with the fork for the best visual effect.
-
Prepare your toppings. Place your desired sprinkles, mini M&M’s, Reese’s pieces, or chopped peanuts on separate paper plates.
-
While the chocolate is still slightly wet, roll each pretzel rod in your chosen topping, ensuring even coverage. Alternatively, if you prefer, you can simply sprinkle the toppings onto the chocolate.
-
Return the decorated pretzel rods to the wax paper lined baking sheet and allow them to set completely. This may take 15-20 minutes at room temperature, or you can speed up the process by placing them in the refrigerator for a shorter period.
-
Once the chocolate is fully set, your gourmet chocolate-dipped pretzel rods are ready to be enjoyed or packaged as gifts!
Expert Tips & Tricks
- Tempering the Chocolate: For a truly professional finish, consider tempering your chocolate. Tempering gives the chocolate a glossy shine and a satisfying snap. This involves carefully heating and cooling the chocolate to specific temperatures. There are many resources online that detail the tempering process.
- Preventing Chocolate Bloom: “Bloom” is the white, chalky appearance that can sometimes form on chocolate. To minimize bloom, avoid temperature fluctuations while melting and setting the chocolate.
- Salvaging Seized Chocolate: If your chocolate seizes (becomes grainy and stiff), try adding a teaspoon of vegetable oil or shortening. Stir vigorously until the chocolate smooths out.
- Dipping Techniques: For a cleaner dipping experience, use a dipping tool specifically designed for chocolate. These tools help to create a smooth, even coating.
- Using Melting Wafers: If you’re new to chocolate dipping, melting wafers (also known as candy melts) are a great option. They melt smoothly and set easily, without the need for tempering.
Serving & Storage Suggestions
These gourmet chocolate-dipped pretzel rods are best served at room temperature. They make a delightful addition to dessert platters, party buffets, or as a thoughtful homemade gift. Display them in a decorative glass jar or mug for a visually appealing presentation.
To store leftover pretzel rods, keep them in an airtight container at room temperature. They will typically last for up to two weeks. For longer storage, you can freeze them for up to two months. Thaw them at room temperature before serving. Be aware that freezing may slightly affect the texture of the chocolate.
Nutritional Information
Note: Nutritional information is an estimate and may vary based on specific ingredients and quantities used.
| Nutrient | Amount per Serving | % Daily Value |
|---|---|---|
| Calories | 97 kcal | 5% |
| Total Fat | 3.6g | 5% |
| Saturated Fat | 2.1g | 10% |
| Cholesterol | 2.6mg | 0% |
| Sodium | 138.2mg | 6% |
| Total Carbohydrate | 14.3g | 5% |
| Dietary Fiber | 0.7g | 3% |
| Sugars | 6.1g | 12% |
| Protein | 1.9g | 4% |
Variations & Substitutions
- Dark Chocolate Delight: Substitute milk chocolate chips with dark chocolate chips for a richer, more intense flavor.
- Peanut Butter Bliss: Drizzle melted peanut butter over the chocolate-dipped pretzels before adding toppings.
- Festive Flavors: Experiment with seasonal flavors like peppermint extract in the white chocolate for Christmas, or cinnamon in the milk chocolate for fall.
- Vegan Option: Use vegan chocolate chips and ensure your toppings are also vegan-friendly.
- Gluten-Free: While pretzel rods themselves are not gluten-free, you could consider using gluten-free breadsticks and breaking them into rod-like shapes for a similar effect. The result will be slightly different, but it provides an alternative for those with gluten sensitivities.
FAQs (Frequently Asked Questions)
Q: Can I use chocolate bars instead of chocolate chips?
A: Yes, you can use chocolate bars, but make sure to chop them into small, even pieces for easier melting. Opt for high-quality chocolate for the best flavor.
Q: How do I prevent the chocolate from burning in the microwave?
A: Microwave the chocolate in 30-second intervals, stirring well in between. This helps to distribute the heat evenly and prevent scorching.
Q: What if I don’t have wax paper?
A: You can use parchment paper as a substitute for wax paper.
Q: Can I use different types of pretzels?
A: While pretzel rods are ideal for dipping, you can certainly experiment with other shapes, such as pretzel twists or mini pretzels. Just adjust the dipping time accordingly.
Q: How long do the chocolate-dipped pretzels last?
A: When stored properly in an airtight container, they will typically last for up to two weeks at room temperature.
Final Thoughts
I encourage you to try this recipe and unleash your creativity! The possibilities are endless when it comes to customizing these gourmet chocolate-dipped pretzel rods. Experiment with different types of chocolate, toppings, and flavor combinations to create your own signature treat. Whether you’re making them for a special occasion or simply indulging in a sweet craving, these pretzel rods are sure to bring a smile to your face. Don’t be afraid to share your creations with friends and family – they’re guaranteed to be a hit! And if you’re feeling extra ambitious, pair them with a steaming mug of hot cocoa for the ultimate cozy treat.