
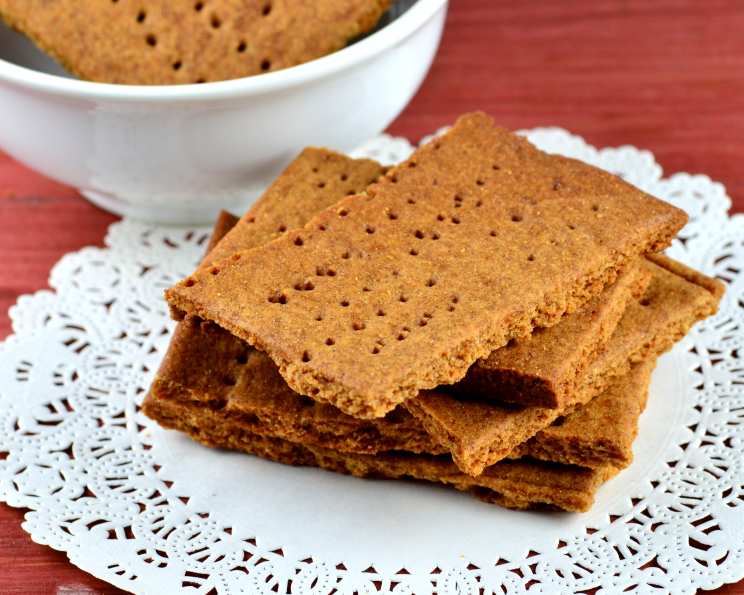
Gluten-Free Graham Crackers: A Taste of Nostalgia
I can almost smell it now: the smoky aroma of a campfire, the twinkling of stars against a velvet sky, and the gooey, melty perfection of a s’more. For years, gluten intolerance kept me from fully participating in this classic ritual. Store-bought gluten-free graham crackers were always a disappointment – dry, crumbly, and lacking that quintessential graham flavor. That’s why I embarked on a mission to recreate the real deal at home, and after much experimentation, I cracked the code. These gluten-free graham crackers evoke all those happy memories without any compromise on taste or texture.
Recipe Overview
- Prep Time: 20 minutes
- Cook Time: 20 minutes
- Total Time: 40 minutes
- Yields: About 3 cups of graham cracker crumbs (or approx. 24 crackers)
- Serves: 20
- Dietary Type: Gluten-Free
Ingredients
- 2 cups gluten-free flour (1 part each of bean flour, tapioca flour & cornstarch)
- ¼ cup sweet rice flour (Mochiko is gluten free)
- ½ cup packed brown sugar
- 1 ¾ teaspoons cinnamon
- 1 teaspoon baking powder
- ½ teaspoon baking soda
- ½ teaspoon xanthan gum
- ½ teaspoon salt
- 7 tablespoons butter or margarine, cut into pieces (cold)
- 3 tablespoons cold water
- 3 tablespoons honey
- 1 teaspoon vanilla
- Sugar, for sprinkling
Equipment Needed
- Large bowl
- Whisk
- Pastry cutter or two knives
- Measuring cups and spoons
- Two cookie sheets
- Wax or parchment paper
- Non-stick cooking spray
- Rolling pin
- Pizza cutter or knife
- Fork
Instructions
-
Combine Dry Ingredients: In a large bowl, whisk together the gluten-free flour blend (bean flour, tapioca flour, and cornstarch), sweet rice flour, brown sugar, cinnamon, baking powder, baking soda, xanthan gum, and salt. Make sure everything is well combined to ensure even distribution.
-
Cut in the Fat: Using a pastry cutter or two knives, cut in the cold butter (or margarine) into the dry ingredients. The mixture should resemble coarse cornmeal with no large pieces of fat remaining. This step is crucial for creating a tender and flaky texture.
-
Incorporate Wet Ingredients: Stir in the cold water, honey, and vanilla into the flour and butter mixture. Mix until a dough forms. If the dough is too dry and doesn’t come together, add more cold water, one tablespoon at a time, until it forms a cohesive ball. Be careful not to overwork the dough.
-
Preheat the Oven: Preheat your oven to 325 degrees Fahrenheit (160 degrees Celsius). This lower temperature helps the graham crackers bake evenly and develop a nice golden-brown color without burning.
-
Prepare Baking Sheets: Get out two cookie sheets and cover them with wax paper or parchment paper. Lightly spray the paper with non-stick cooking spray to prevent the crackers from sticking.
-
Divide and Roll the Dough: Gather the dough into a ball and divide it in half. On one of the prepared cookie sheets, use a lightly floured rolling pin (I recommend using sweet rice flour for this) to roll half of the dough into a rectangle about 1/8 inch thick. Repeat this process with the other half of the dough on the second cookie sheet. Work quickly to keep the dough cold.
-
Score and Prick: Use a pizza cutter or knife to score the dough into your desired graham cracker shapes. This will make it easier to break them apart after baking. Next, prick the dough all over with a fork. Plastic forks tend to make rounder and thicker holes, which is aesthetically pleasing. This step prevents the crackers from puffing up too much during baking.
-
Sprinkle with Sugar: Very lightly sprinkle all over the dough with sugar. This adds a touch of sweetness and creates a lovely, slightly crunchy texture on the surface of the crackers.
-
Bake: Bake for 20 minutes, or until the graham crackers are golden brown and starting to harden. Keep a close eye on them, as baking times may vary depending on your oven.
-
Cool and Crisp: Let the graham crackers cool on the baking sheets for 5 minutes before breaking them apart along the scored lines. If they are not fully crisped, you can put them back in the turned-off (but still warm) oven until they reach your desired level of crispness. This helps to dry them out without burning.
Expert Tips & Tricks
- Flour Power: Experiment with different gluten-free flour blends to find your favorite flavor and texture. A higher ratio of starchy flours (like tapioca and cornstarch) will result in a more tender cracker, while bean flour adds a slightly nutty flavor.
- Cold is Key: Make sure your butter (or margarine) is very cold before cutting it into the flour. This will prevent the gluten-free flour from developing too much “gluten” (even though it’s gluten-free), which can lead to a tough cracker.
- Chill Out: If your dough becomes too soft or sticky while rolling, pop it into the refrigerator for 10-15 minutes to firm up.
- Even Baking: Rotate the baking sheets halfway through baking to ensure even browning.
- Don’t Overbake: Gluten-free baked goods tend to dry out easily, so be careful not to overbake the graham crackers. They should be golden brown and firm to the touch.
- Spice it Up: Add a pinch of ground ginger, nutmeg, or cardamom to the dough for a warm and festive twist.
Serving & Storage Suggestions
These gluten-free graham crackers are delicious on their own as a snack, served with a glass of cold milk or a cup of hot tea. Of course, they are also essential for making s’mores! You can also crush them into crumbs to make a delicious gluten-free graham cracker crust for pies and cheesecakes.
To store, keep the graham crackers in an airtight container at room temperature. They will stay fresh for about 5-7 days. For longer storage, you can freeze them in a freezer-safe bag for up to 2 months. If they lose their crispness, you can re-crisp them in a low oven (200°F / 95°C) for a few minutes.
Nutritional Information
| Nutrient | Amount per Serving | % Daily Value |
|---|---|---|
| Calories | 75 kcal | N/A |
| Total Fat | 4.1 g | 6% |
| Saturated Fat | 2.6 g | 12% |
| Cholesterol | 10.7 mg | 3% |
| Sodium | 145 mg | 6% |
| Total Carbohydrate | 9.8 g | 3% |
| Dietary Fiber | 0.2 g | 0% |
| Sugars | 8 g | N/A |
| Protein | 0.2 g | 0% |
Note: Nutritional information is an estimate and may vary based on specific ingredients and portion sizes.
Variations & Substitutions
- Dairy-Free: Substitute the butter with a dairy-free margarine or coconut oil.
- Refined Sugar-Free: Replace the brown sugar with coconut sugar or maple sugar.
- Honey Substitute: Use agave nectar or maple syrup in place of honey.
- Spice it Up: Add a pinch of ground ginger, nutmeg, or cardamom to the dough for a warmer flavor.
- Chocolate Graham Crackers: Add 2 tablespoons of unsweetened cocoa powder to the dry ingredients for a chocolatey twist.
- Cinnamon Sugar Graham Crackers: After pricking the dough, brush it lightly with melted butter and sprinkle generously with cinnamon sugar before baking.
FAQs (Frequently Asked Questions)
Q: Can I use a different gluten-free flour blend?
A: Yes! Feel free to experiment with different gluten-free flour blends. Just make sure to use 2 1/4 cups total and include at least 1 cup of starchy flours (like tapioca or cornstarch) for the best texture.
Q: My dough is too sticky to roll. What should I do?
A: Wrap the dough in plastic wrap and chill it in the refrigerator for 15-20 minutes to firm up before rolling.
Q: Can I make these ahead of time?
A: Yes, you can prepare the dough ahead of time and store it in the refrigerator for up to 2 days. Let it soften slightly before rolling and baking.
Q: My graham crackers are not crispy enough. What can I do?
A: After baking, turn off the oven and leave the graham crackers inside to cool completely. The residual heat will help them dry out and crisp up.
Q: Can I freeze these graham crackers?
A: Yes, you can freeze them in an airtight container for up to 2 months. Thaw them at room temperature before serving.
Final Thoughts
These homemade gluten-free graham crackers are more than just a recipe; they’re a labor of love and a passport back to cherished memories. Now, you too can enjoy that iconic graham cracker taste and texture without compromising your dietary needs. So go ahead, gather your ingredients, preheat your oven, and get ready to create a batch of these irresistible treats. Don’t forget to share your creations and any variations you discover! I’d love to hear how they turn out. And of course, don’t forget the chocolate and marshmallows for the perfect gluten-free s’more experience!