
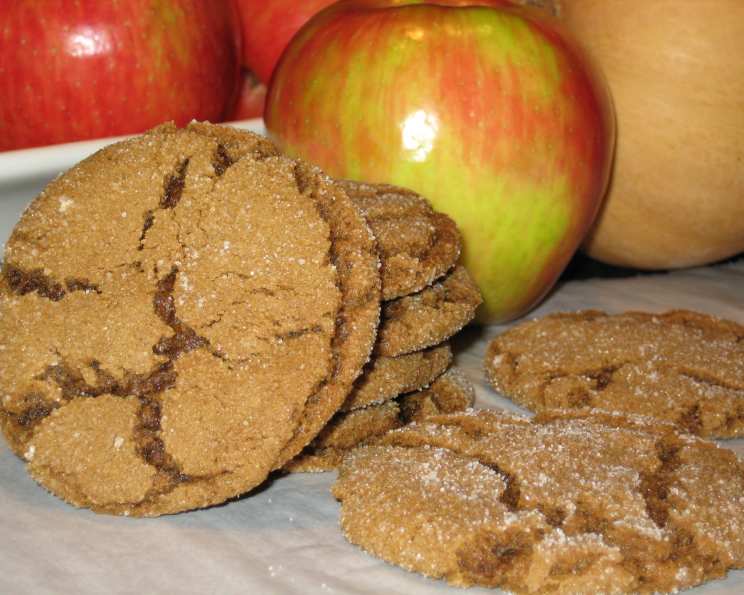
Grandma’s Chewy Molasses Cookies: A Taste of Home
The scent alone is enough to transport me back to Grandma’s kitchen. I can almost feel the warmth of the oven radiating on my face, hear the rhythmic clatter of her wooden spoon against a ceramic bowl, and see the dusting of flour that perpetually adorned her apron. Those chewy molasses cookies weren’t just a treat; they were a symbol of her love, baked into every spicy, perfectly imperfect bite. Every year, without fail, a tin of these cookies would arrive, a small piece of home, during those tough college years away from the family.
Recipe Overview
- Prep Time: 20 minutes
- Cook Time: 12-13 minutes
- Total Time: 1 hour 33 minutes (includes chilling time)
- Servings: 20 large cookies
- Yield: 20 cookies
- Dietary Type: Vegetarian
Ingredients
- ½ cup butter, room temperature
- 1 cup brown sugar, packed
- ¼ cup molasses
- 1 egg
- 2 cups flour
- ¼ cup wheat germ
- ½ teaspoon salt
- ½ teaspoon cinnamon
- ½ teaspoon clove
- ¼ teaspoon nutmeg
- ¼ teaspoon ginger
- 1 teaspoon baking soda
- Sugar, for rolling
Equipment Needed
- Stand mixer or hand mixer
- Large mixing bowl
- Measuring cups and spoons
- Cookie sheets
- Parchment paper (optional)
- Cooling rack
Instructions
-
Begin by creaming together the butter and brown sugar in a large mixing bowl using a stand mixer or hand mixer. Beat on medium speed until the mixture is light and fluffy, about 5 minutes. This step is crucial for incorporating air into the dough, which contributes to the cookies’ soft texture.
-
Gently blend in the molasses and egg. Mix until just combined. Avoid overmixing at this stage, as it can lead to tough cookies.
-
In a separate bowl, whisk together all the dry ingredients: the flour, wheat germ, salt, cinnamon, clove, nutmeg, ginger, and baking soda. Make sure everything is evenly distributed to ensure proper leavening and flavor in each cookie.
-
Gradually add the dry ingredients to the creamed mixture in thirds, mixing on low speed until just combined after each addition. Be careful not to overmix; a powerful mixer can be quite effective at quickly bringing the dough together. Overmixing can develop the gluten in the flour, resulting in a tougher cookie.
-
Cover the bowl and refrigerate the dough for 1 hour. This chilling period is essential. It allows the gluten to relax, prevents the cookies from spreading too much during baking, and makes the dough much easier to handle when forming the balls.
-
Preheat your oven to 350°F (175°C). Line your cookie sheets with parchment paper, or lightly grease them. Parchment paper makes for easy cleanup and prevents the cookies from sticking.
-
Remove the dough from the refrigerator. Form the dough into balls a little smaller than a golf ball. Roll each ball in sugar until completely coated.
-
Place the sugared cookie dough balls on the prepared cookie sheets, leaving about 2 inches between each cookie to allow for spreading.
-
Bake for 12-13 minutes. Keep a close eye on them; baking times may vary slightly depending on your oven.
-
To determine when the cookies are done, look for a telltale sign: they will puff up in the center and develop cracks on the surface. However, don’t pull them out just yet! Wait until the inside of those cracks turns from a shiny dark brown (which indicates they are still undercooked) to a medium brown. This ensures they are perfectly baked.
-
Remove the cookie sheets from the oven and let the cookies cool on the sheets for a few minutes before transferring them to a wire cooling rack to cool completely.
Expert Tips & Tricks
- Room Temperature Butter is Key: Using softened butter is crucial for proper creaming with the sugar. If your butter is too cold, it won’t incorporate the air needed for a light and tender cookie.
- Don’t Skip the Wheat Germ: The wheat germ adds a subtle nutty flavor and a boost of nutrients to the cookies. If you don’t have it on hand, you can substitute it with an equal amount of ground flaxseed meal.
- Spice it Up (or Down): Adjust the spices to your liking. If you prefer a stronger ginger flavor, add an extra 1/4 teaspoon. If you’re not a fan of cloves, reduce the amount slightly.
- Make-Ahead Dough: The cookie dough can be made ahead of time and stored in the refrigerator for up to 3 days. Let it sit at room temperature for about 15 minutes before scooping and baking. You can also freeze the dough for up to 2 months. Thaw overnight in the refrigerator before baking.
- Preventing Over-Browning: If your cookies are browning too quickly, lower the oven temperature by 25 degrees and bake for a few extra minutes.
Serving & Storage Suggestions
Grandma’s chewy molasses cookies are perfect enjoyed warm, straight from the oven, with a cold glass of milk or a steaming cup of coffee or tea. They also make a wonderful addition to a cookie platter for holiday gatherings or as a thoughtful homemade gift.
To store, place the completely cooled cookies in an airtight container at room temperature. They will stay fresh for up to 5 days. For longer storage, you can freeze the cookies for up to 2 months. Thaw at room temperature before serving.
Nutritional Information
| Nutrient | Amount per Serving | % Daily Value |
|---|---|---|
| Calories | 149 kcal | N/A |
| Calories from Fat | 46 kcal | N/A |
| Total Fat | 5.1 g | 7% |
| Saturated Fat | 3 g | 15% |
| Cholesterol | 22.8 mg | 7% |
| Sodium | 163.7 mg | 6% |
| Total Carbohydrate | 24.3 g | 8% |
| Dietary Fiber | 0.6 g | 2% |
| Sugars | 13 g | N/A |
| Protein | 2 g | 4% |
Note: Percent Daily Values are based on a 2,000 calorie diet.
Variations & Substitutions
- Gluten-Free: Substitute the all-purpose flour with a gluten-free blend. Add 1/2 teaspoon of xanthan gum to the dry ingredients to help bind the dough.
- Vegan: Replace the butter with a vegan butter substitute and the egg with a flax egg (1 tablespoon of ground flaxseed mixed with 3 tablespoons of water, let sit for 5 minutes to thicken).
- Spice Variations: Experiment with different spices like cardamom, allspice, or even a pinch of black pepper for a unique flavor twist.
- Nutty Addition: Add chopped walnuts or pecans to the dough for extra crunch and flavor.
- Citrus Zest: Add the zest of an orange or lemon for a bright, fresh flavor.
FAQs (Frequently Asked Questions)
Q: Why are my cookies flat?
A: Your butter may have been too soft or melted, or you may have overmixed the dough. Make sure your butter is softened but not melted, and avoid overmixing. Chilling the dough is also essential to prevent excessive spreading.
Q: Can I use dark molasses instead of light molasses?
A: Yes, you can use dark molasses, but it will result in a slightly stronger, more robust flavor. The cookies will also be a bit darker in color.
Q: How do I keep my cookies soft?
A: Store the cooled cookies in an airtight container with a slice of bread. The bread will help absorb moisture and keep the cookies soft.
Q: Can I freeze the baked cookies?
A: Yes, you can freeze the baked cookies. Wrap them individually in plastic wrap and then place them in a freezer-safe container. They will keep for up to 2 months.
Q: What if I don’t have wheat germ?
A: If you don’t have wheat germ, you can simply omit it. The cookies will still be delicious, but the wheat germ adds a subtle nutty flavor and a boost of nutrients. You could also substitute with ground flaxseed or oat bran.
Final Thoughts
These chewy molasses cookies are more than just a recipe; they’re a connection to the past, a reminder of simpler times, and a delicious way to share love with family and friends. Don’t be afraid to experiment with the spices and make them your own. I hope you enjoy baking these cookies as much as I do, and that they bring a little bit of Grandma’s warmth to your kitchen. I encourage you to try baking these cookies and sharing the delightful results with loved ones. Consider pairing them with a cozy cup of hot chocolate or a scoop of vanilla ice cream for an extra special treat. Your feedback is invaluable—please share your experiences and any creative twists you’ve added in the comments below!