
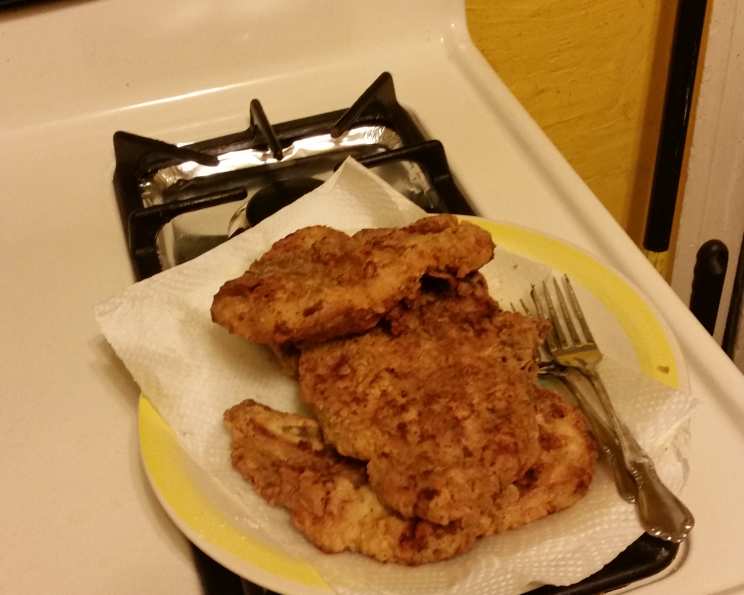
Granny’s Buttermilk Fried Pork Chops: A Southern Classic
The scent of fried pork chops always takes me back to Sunday afternoons at my great-aunt Clara’s house. Her kitchen, a haven of warmth and seasoned cast iron, would be filled with the happy sizzle of chops crisping in a generous slick of oil. More than just a meal, those pork chops represented family, comfort, and the simple joys of a well-cooked, soul-satisfying dish. While my own version isn’t exactly Aunt Clara’s secret recipe, it captures the same essence of tender, flavorful goodness.
Recipe Overview
- Prep Time: 15 minutes
- Cook Time: 30 minutes
- Total Time: 45 minutes
- Servings: 4
- Yield: 4 pork chops
- Dietary Type: Not specified
Ingredients
- 4 center-cut pork chops (standard cut, approximately 1/2 inch thick)
- 1/2 cup buttermilk
- 1 1/2 cups flour
- Cooking oil (vegetable, canola, or peanut oil recommended)
- Seasoning salt (such as Garlic & Pepper, Lawry’s, or Old Bay)
- Black pepper
Equipment Needed
- Ziplock bag
- Pie plate (or shallow dish)
- Large, heavy frying pan
- Tongs
- Aluminum foil
Instructions
- Prepare the pork chops: Sprinkle both sides of the pork chops lightly with seasoning salt. Feel free to use your favorite brand; Garlic & Pepper seasoning salt, Lawry’s, and Old Bay all work well.
- Marinate the pork chops: Place the seasoned chops into a ziplock bag and pour in the buttermilk. Squeeze any excess air out of the bag before sealing it. Gently massage the buttermilk around to ensure that all chops are well-coated. Let the chops marinate in the refrigerator for several hours to tenderize the meat.
- Prepare the flour mixture: In a pie plate or shallow dish, combine the flour, 1/8 teaspoon of black pepper, and 1/2 teaspoon of seasoning salt. Adjust the amount of pepper and salt according to your taste preferences.
- Heat the oil: Pour cooking oil into a large, heavy frying pan, enough to reach slightly less than 1/2 inch deep. Heat the oil over medium-high heat until it shimmers and a small piece of flour sizzles gently when dropped in.
- Coat the pork chops: Remove the buttermilk-soaked chops from the bag, allowing any excess to drip off. Dip each chop into the flour mixture, pressing gently to ensure it’s completely coated on both sides. Repeat with all chops.
- Fry the pork chops (first side): Once the oil is hot, carefully add the pork chops to the frying pan. Do not overcrowd the pan; cook in batches if necessary. Let the chops cook, uncovered, for about 2 minutes, or until golden brown on the bottom.
- Fry the pork chops (second side): Reduce the heat to medium-low. Continue to cook the chops uncovered until the bottoms are browned and red juices start to accumulate over the bones. This indicates that the first side is nearly cooked through.
- Finish cooking the pork chops: Turn the chops over using tongs. Cover the pan with a lid, reduce the heat slightly, and let the chops cook until browned on the bottoms and cooked through. The internal temperature should reach 145°F (63°C). Using a meat thermometer is highly recommended for accuracy.
- Rest the pork chops: Transfer the cooked chops to a sheet of crinkled aluminum foil. Wrap the foil loosely around the chops and let them rest for about 5 minutes. This allows the juices to redistribute, resulting in a more tender and flavorful chop.
Expert Tips & Tricks
- Buttermilk Marinade Time: For the most tender pork chops, marinate them in buttermilk overnight or for at least 4 hours.
- Even Cooking: Ensure even cooking by using a heavy-bottomed frying pan that distributes heat evenly.
- Oil Temperature: Maintaining the correct oil temperature is crucial. If the oil is not hot enough, the pork chops will absorb too much oil and become greasy. If it’s too hot, the outside will burn before the inside is cooked.
- Don’t Overcrowd: Overcrowding the pan will lower the oil temperature and result in soggy chops. Cook in batches, if necessary, to maintain the heat.
- Crispy Coating: For an extra crispy coating, double-dip the pork chops in the flour mixture. Dip them in the flour, then back into the buttermilk, and then back into the flour again.
- Spice it Up: Add a pinch of cayenne pepper or smoked paprika to the flour mixture for a touch of heat and smokiness.
- Pan Drippings Gravy: After frying the pork chops, you can create a delicious pan gravy using the leftover pan drippings. Simply whisk in a couple of tablespoons of flour and cook for a minute or two, then slowly add chicken broth or milk, stirring constantly until the gravy thickens. Season with salt and pepper to taste.
Serving & Storage Suggestions
Serve Granny’s Buttermilk Fried Pork Chops hot and fresh from the pan for the best flavor and texture. They pair perfectly with classic Southern sides like mashed potatoes, collard greens, mac and cheese, or coleslaw. A simple green salad also provides a refreshing contrast to the richness of the pork chops.
To store leftovers, let the pork chops cool completely before placing them in an airtight container. They can be stored in the refrigerator for up to 3-4 days. To reheat, bake them in a preheated oven at 350°F (175°C) for about 10-15 minutes, or until heated through. You can also reheat them in a skillet over medium heat, but be careful not to overcook them, or they may become dry. Reheating in the microwave is also an option, but the coating may not stay as crispy.
Nutritional Information
| Nutrient | Amount per Serving | % Daily Value |
|---|---|---|
| Calories | 388 kcal | – |
| Calories from Fat | 112 | – |
| Total Fat | 12.5 g | 19% |
| Saturated Fat | 4.7 g | 23% |
| Cholesterol | 72.6 mg | 24% |
| Sodium | 82.1 mg | 3% |
| Total Carbohydrate | 37.2 g | 12% |
| Dietary Fiber | 1.3 g | 5% |
| Sugars | 1.6 g | – |
| Protein | 29.1 g | 58% |
Note: Nutritional information is an estimate and may vary based on specific ingredients and cooking methods.
Variations & Substitutions
- Gluten-Free: Substitute the all-purpose flour with a gluten-free flour blend for a gluten-free version. You may need to add a binder like xanthan gum to help with the texture.
- Dairy-Free: Replace the buttermilk with a mixture of almond milk or soy milk and 1 tablespoon of lemon juice or apple cider vinegar per cup. Let it sit for 5 minutes to curdle before using.
- Spicy: Add a pinch of cayenne pepper or a dash of your favorite hot sauce to the buttermilk marinade for a spicy kick.
- Herbed: Mix in some dried herbs like thyme, rosemary, or oregano to the flour mixture for added flavor.
- Sweet and Savory: Drizzle a bit of honey or maple syrup over the cooked pork chops for a sweet and savory flavor combination.
FAQs (Frequently Asked Questions)
Q: Can I use bone-in pork chops for this recipe?
A: Yes, you can use bone-in pork chops. Bone-in chops may take slightly longer to cook, so adjust the cooking time accordingly.
Q: Can I freeze leftover fried pork chops?
A: While you can freeze them, the texture of the coating may change upon thawing. Wrap them individually in plastic wrap and then place them in a freezer bag for best results.
Q: How do I keep the pork chops warm if I’m cooking in batches?
A: Place the cooked pork chops on a baking sheet in a preheated oven at 200°F (95°C) to keep them warm while you finish cooking the remaining chops.
Q: What’s the best way to check if the pork chops are cooked through?
A: The best way is to use a meat thermometer. Insert it into the thickest part of the chop, avoiding the bone. The internal temperature should reach 145°F (63°C).
Q: Can I use a different type of oil for frying?
A: Yes, you can use other high-heat cooking oils like canola oil, peanut oil, or sunflower oil. Avoid using olive oil, as it has a lower smoke point.
Final Thoughts
Granny’s Buttermilk Fried Pork Chops are a timeless classic that’s sure to please. Whether you’re looking for a comforting weeknight meal or a special dish to share with family and friends, this recipe is a winner. So, gather your ingredients, fire up the skillet, and prepare to enjoy a taste of Southern hospitality. Don’t hesitate to experiment with different seasonings and variations to make it your own! And please, share your experience and feedback – cooking is a journey best shared with others!