
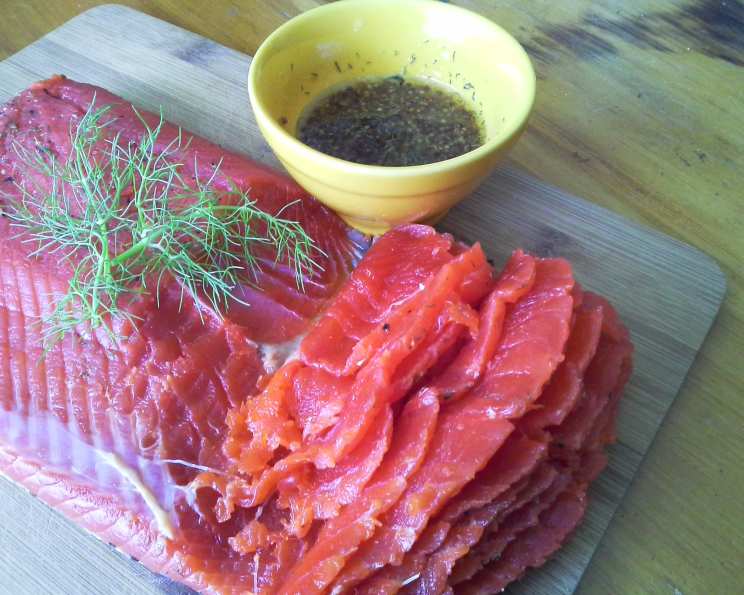
Gravlax: The Art of Curing Salmon at Home
The first time I tasted gravlax was at a small Christmas market in Stockholm. Snow was falling, the air was crisp and filled with the scent of pine and woodsmoke, and I was bundled in layers, trying to keep warm. Then, I spotted a small stall piled high with glistening slices of rosy salmon, draped artfully over dark rye bread. The vendor offered me a taste, and the explosion of salty, sweet, and dill-infused flavor was an epiphany. It was a revelation: salmon transformed into something intensely flavorful and uniquely textured. Since then, I’ve been obsessed with recreating that perfect bite, experimenting with different variations, and sharing the magic of gravlax with friends and family.
Recipe Overview
- Prep Time: 30 minutes
- Cook Time: 96 hours (curing time)
- Total Time: 96 hours 30 minutes
- Servings: Approximately 72 slices
- Yield: About 4 pounds of gravlax
- Dietary Type: Dairy-Free, Gluten-Free (if served without rye bread)
Ingredients
- 2 skin-on salmon fillets (about 2 pounds each)
- 1/4 cup coarse salt (kosher) or 1/4 cup salt
- 1/4 cup sugar
- 1 tablespoon peppercorns (white or black) or 1 tablespoon peppercorn (white or black)
- 1/4 cup coarsely-chopped fresh dill
Optional:
- Rye bread or dark rye, cocktail bread slices
- Dry dill weed (for garnish)
For the Mustard Dill Sauce:
- 2 tablespoons stone-ground sweet mustard, sweet-hot mustard or 2 tablespoons country-style dijon mustard
- 1 tablespoon white wine vinegar
- 2 teaspoons sugar (3 to 4 teaspoons if using Dijon mustard)
- 1/3 cup vegetable oil
- 1 tablespoon finely-chopped fresh dill weed
Equipment Needed
- Tweezers or needle-nose pliers
- Small bowl
- Large plastic bag
- Platter
- Cutting board or baking sheet
- 3 x 1- to 2-pound cans of food
- Small bowl (for sauce)
- Whisk
- Serving platter
Instructions
- Prepare the Mustard Dill Sauce: In a small bowl, whisk together the mustard, vinegar, and sugar. If using Dijon mustard, taste and add the additional 1-2 teaspoons of sugar as needed to balance the acidity.
- Emulsify the Sauce: Slowly and gradually whisk in the vegetable oil until the sauce is smooth and emulsified.
- Incorporate the Dill: Stir in the fresh dill weed. Taste and adjust seasonings as needed. More dill can be added for a bolder flavor.
- Chill the Sauce: Refrigerate the sauce, tightly covered, for up to three days. Be sure to whisk it again before serving, as the ingredients may separate slightly. The sauce should be served slightly chilled.
- Prepare the Salmon: Run your fingers down the flesh side of each salmon fillet to locate any small pin bones. Remove these carefully with tweezers or needle-nose pliers. This step is crucial for a pleasant eating experience.
- Clean the Fillets: Wipe the flesh of the fillets with a damp paper towel to remove any excess moisture. This helps the curing mixture adhere properly.
- Create the Curing Mixture: In a small bowl, combine the salt, sugar, and peppercorns. Mix thoroughly to ensure the ingredients are evenly distributed.
- Apply the Curing Mixture: Rub the salt mixture generously onto the flesh side of both salmon fillets, ensuring that all surfaces are coated.
- Add the Dill: Sprinkle the coarsely-chopped fresh dill evenly over one fillet.
- Combine the Fillets: Lay the other fillet flesh-side down on top of the dill-covered fillet, placing the thin end of one over the thick end of the other. This ensures a more even cure.
- Seal and Weigh Down: Place the combined salmon fillets in a large plastic bag, press out any excess air, and seal the bag tightly. This creates an anaerobic environment for the curing process.
- Apply Pressure: Place the salmon in the bag on a platter. Lay a cutting board or baking sheet on top of the bag and weight it down with three 1- to 2-pound cans of food. The pressure helps to draw out moisture and facilitate the curing process.
- Cure the Salmon: Refrigerate the salmon for 36 to 48 hours, turning the bag of fillets over every 12 hours. This ensures even curing on both sides. The longer curing time will result in a firmer, saltier gravlax.
- Remove from Bag and Discard Liquid: After the curing time, lift the fillets from the bag and discard the bag and accumulated liquid. This liquid is a byproduct of the curing process.
- Prepare to Slice: Scrape the seasonings off the fish and pat dry with a paper towel. The fillets can be wrapped in plastic and stored in the refrigerator for up to 10 days before serving.
- Slice the Gravlax: Place one fillet, skin side down, on a large serving platter. For right-handed individuals, position the head end to the left.
- Create Thin Slices: Hold a sharp knife at a 45-degree angle to the fillet, rather than straight up and down. Slice down through the fillet, creating 1/8-inch-thick slices.
- Separate the Slices: At the bottom of each slice, gently turn the knife blade to separate the slice from the skin.
- Arrange the Slices: Using the knife, turn each slice over to the left, as if turning the page of a book. Position each slice so that it partially overlaps the previous one, creating an attractive presentation.
- Repeat: Continue slicing at an angle, separating each from the skin and turning each slice to partially overlap the previous one. Repeat with the remaining fillet.
- Garnish and Serve: Garnish the gravlax with fresh dill and serve with Mustard Dill Sauce and rye or dark bread.
Expert Tips & Tricks
- Use High-Quality Salmon: The quality of the salmon directly impacts the final flavor of the gravlax. Opt for sustainably sourced, fresh salmon for the best results. Pre-frozen salmon is also a safe and acceptable choice.
- Even Distribution of Cure: Ensure the salt, sugar, and peppercorn mixture is evenly distributed over the salmon fillets. This will prevent some areas from being overly salty or sweet.
- Weighting is Key: Don’t skimp on the weight! Proper weighting ensures that moisture is drawn out of the salmon effectively, leading to a firmer, more flavorful gravlax.
- Adjust Sweetness: Taste the Mustard Dill Sauce and adjust the sugar to your preference. If you prefer a tangier sauce, reduce the sugar slightly.
- Freeze for Safety: It is highly recommended to use previously frozen salmon or freeze the fish at 0 degrees Fahrenheit for 48 hours to kill any parasites that may be present. This is a crucial step for food safety.
Serving & Storage Suggestions
Gravlax is best served chilled or at room temperature, never warm. Arrange the thinly sliced gravlax artfully on a platter and garnish with fresh dill sprigs. Serve with dark rye bread or crackers, and a generous dollop of Mustard Dill Sauce. Capers, red onion, and lemon wedges are also excellent accompaniments.
To store leftover gravlax, wrap it tightly in plastic wrap and keep it in the coldest part of your refrigerator. Sliced or unsliced gravlax will keep for up to 10 days after curing. Gravlax is not suitable for freezing, as freezing will affect the texture.
Nutritional Information
| Nutrient | Amount per Serving | % Daily Value |
|---|---|---|
| Calories | 23.6 kcal | N/A |
| Calories from Fat | 12 g | 53% |
| Total Fat | 1.4 g | 2% |
| Saturated Fat | 0.2 g | 1% |
| Cholesterol | 4.1 mg | 1% |
| Sodium | 399.6 mg | 16% |
| Total Carbohydrate | 0.9 g | 0% |
| Dietary Fiber | 0 g | 0% |
| Sugars | 0.8 g | 3% |
| Protein | 1.8 g | 3% |
Note: Nutritional information is an estimate and may vary based on specific ingredients and portion sizes.
Variations & Substitutions
- Spice it Up: Add a pinch of red pepper flakes to the curing mixture for a subtle kick.
- Citrus Zest: Incorporate lemon or orange zest into the curing mixture for a bright, citrusy flavor.
- Beet-Cured Gravlax: Add grated beet to the curing mixture for a beautiful pink hue and a slightly earthy flavor.
- Aquavit Gravlax: Add a splash of aquavit to the curing mixture for an authentic Scandinavian twist.
- Vodka Gravlax: Substitute aquavit with vodka.
- Different Herbs: Experiment with other herbs besides dill. Try using tarragon, parsley, or chives.
FAQs (Frequently Asked Questions)
Q: Is it safe to eat raw salmon in gravlax?
A: Yes, when prepared properly, gravlax is safe to eat. The salt, sugar, and curing process inhibit the growth of harmful bacteria. However, it’s crucial to use high-quality, fresh salmon that has been previously frozen to kill any parasites.
Q: Can I use frozen salmon for gravlax?
A: Absolutely. In fact, using previously frozen salmon is recommended to ensure that any potential parasites are killed. Make sure to thaw the salmon completely in the refrigerator before starting the curing process.
Q: How long does gravlax last in the refrigerator?
A: Gravlax can be stored in the refrigerator for up to 10 days after curing, as long as it is wrapped tightly in plastic wrap and stored in the coldest part of your refrigerator.
Q: Can I freeze gravlax?
A: Freezing gravlax is not recommended, as it can significantly alter the texture of the salmon, making it mushy and less desirable.
Q: What can I serve with gravlax besides rye bread?
A: Gravlax is versatile and pairs well with many accompaniments. Try serving it with crackers, cream cheese, capers, red onion, lemon wedges, or a simple salad.
Final Thoughts
Gravlax is more than just a cured salmon dish; it’s a culinary experience that connects you to Scandinavian traditions and flavors. Don’t be intimidated by the curing process – it’s surprisingly simple and incredibly rewarding. The satisfaction of creating your own perfectly cured salmon, infused with dill and subtle spices, is unmatched. So, gather your ingredients, embrace the process, and prepare to be amazed by the magic of gravlax. I encourage you to experiment with different variations, share your creations with loved ones, and let the flavors transport you to a Scandinavian Christmas market, even if just in your mind. Skål!