
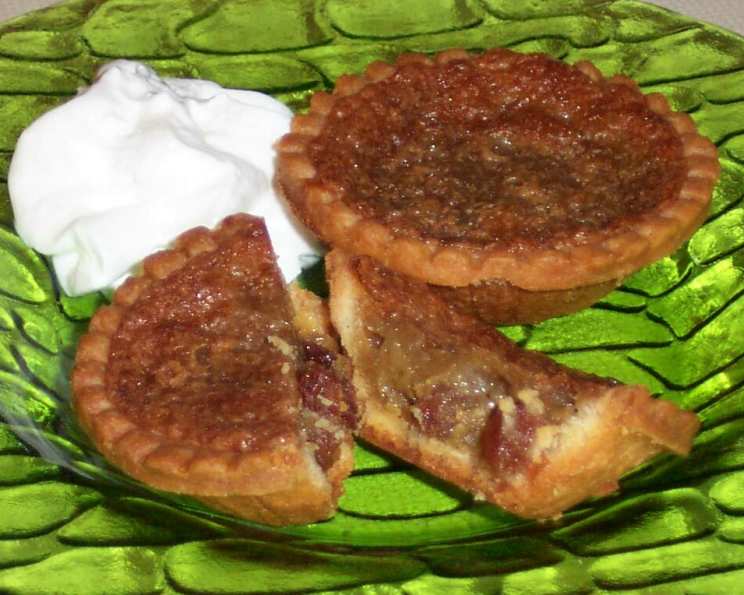
Great Canadian Butter Tarts: A Taste of Home
The first time I tried a butter tart, I was at a church bake sale in rural Ontario. I remember the crinkled paper cups, the slightly sticky sweetness, and the burst of raisin-y goodness with every bite. Even then, with my fledgling chef’s palate, I knew I was experiencing something truly special, a quintessential taste of Canada that warmed you from the inside out. These weren’t just tarts; they were edible memories, and I’ve been chasing that perfect butter tart ever since.
Recipe Overview
- Prep Time: 15 minutes
- Cook Time: 20-25 minutes
- Total Time: 35-40 minutes
- Servings: 16
- Yield: 16 tarts
- Dietary Type: Not specified (contains dairy, eggs)
Ingredients
- 16 store-bought prepared tart shells (or your own homemade)
- 2 large eggs
- 1 cup seedless raisins
- 1 cup packed brown sugar
- ¼ cup melted butter (not margarine)
- 1 teaspoon vanilla extract
- 1 cup chopped nuts (optional)
- 2 teaspoons cream
Equipment Needed
- Mixing bowl
- Whisk or fork
- Muffin tin (if tart shells do not have their own individual cups)
- Measuring cups and spoons
- Oven
Instructions
-
Begin by preheating your oven to 350 degrees F (175 degrees C). This is crucial for achieving the perfect golden-brown crust and a deliciously gooey filling.
-
Next, place the tart shells in a muffin tin if they aren’t already in individual foil or paper cups. This helps to maintain their shape during baking and prevents the filling from spilling.
-
In a mixing bowl, beat the eggs until they are light and frothy. This will help to create a smooth and evenly textured filling.
-
Add the remaining ingredients to the bowl: the raisins, brown sugar, melted butter, vanilla extract, and chopped nuts (if using).
-
Pour in the cream.
-
Mix all ingredients together well until everything is evenly distributed and the brown sugar is dissolved.
-
Now comes the fun part: spooning the filling into the tart shells. Put approximately 1 tablespoon of the mixture into each shell. Don’t worry if it looks like a small amount; the filling will “swell” up during cooking. Overfilling can lead to messy tarts and uneven baking.
-
Bake for 20-25 minutes, or until the tart shells are golden brown and the filling is bubbling and set around the edges. Keep a close eye on them during the last few minutes of baking to prevent burning. Different ovens can vary in temperature, so adjust the baking time as needed.
-
Once baked, remove the tarts from the oven and let them cool completely in the muffin tin before serving. This will allow the filling to set properly and prevent them from falling apart.
-
(Optional) If desired, top with a dollop of whipped cream just before serving for an extra touch of decadence.
Expert Tips & Tricks
-
Melt the butter slowly: Ensure the butter is melted but not hot before adding it to the other ingredients. Hot butter can start to cook the eggs, resulting in a lumpy filling.
-
Raisin Prep: For extra plump and juicy raisins, soak them in hot water or rum for 15-20 minutes before adding them to the filling. Drain them well before mixing.
-
Nutty Alternatives: If you’re not a fan of nuts, feel free to omit them altogether or substitute with other additions like chocolate chips, dried cranberries, or shredded coconut.
-
Crust Concerns: To prevent the tart shells from becoming soggy, you can blind bake them for a few minutes before adding the filling. This will help to create a crispier base.
-
Doneness Test: The tarts are done when the filling is set around the edges but still slightly soft in the center. They will continue to firm up as they cool.
-
Preventing Overflow: If you find that the filling is bubbling over during baking, try lowering the oven temperature slightly or placing a baking sheet underneath the muffin tin to catch any drips.
Serving & Storage Suggestions
These butter tarts are best served at room temperature, allowing the flavors to fully develop. They make a delightful addition to any dessert table, potluck, or afternoon tea.
To store leftover butter tarts, place them in an airtight container at room temperature for up to 2 days. For longer storage, refrigerate them for up to 5 days or freeze them for up to 2 months. To reheat frozen tarts, thaw them in the refrigerator overnight and then warm them in a low oven (300 degrees F) for a few minutes before serving.
Nutritional Information
| Nutrient | Amount per Serving | % Daily Value* |
|---|---|---|
| Calories | 116.1 kcal | N/A |
| Calories from Fat | 33 g | 29% |
| Total Fat | 3.7 g | 5% |
| Saturated Fat | 0.8 g | 4% |
| Cholesterol | 27.1 mg | 9% |
| Sodium | 48.6 mg | 2% |
| Total Carbohydrate | 20.7 g | 6% |
| Dietary Fiber | 0.3 g | 1% |
| Sugars | 18.7 g | 74% |
| Protein | 1.1 g | 2% |
*Percent Daily Values are based on a 2000 calorie diet. Your daily values may be higher or lower depending on your calorie needs.
Variations & Substitutions
- Gluten-Free Butter Tarts: Use gluten-free tart shells and ensure that all other ingredients are also gluten-free.
- Vegan Butter Tarts: Substitute the butter with a vegan butter alternative, the eggs with an egg replacer, and the cream with a plant-based cream alternative like coconut cream or cashew cream.
- Maple Butter Tarts: Replace some of the brown sugar with maple syrup for a more intensely Canadian flavor.
- Pecan Butter Tarts: Substitute the walnuts with pecans for a richer, nuttier flavor.
- Chocolate Chip Butter Tarts: Add a handful of chocolate chips to the filling for a chocolatey twist.
- Fruit Variations: Experiment with different dried fruits such as cranberries, cherries, or apricots in place of the raisins.
FAQs (Frequently Asked Questions)
Q: Can I use margarine instead of butter?
A: While margarine can be used, butter is highly recommended for its superior flavor and texture. It contributes significantly to the rich, buttery taste that is characteristic of these tarts.
Q: Can I make my own tart shells?
A: Absolutely! Homemade tart shells will elevate the quality of your butter tarts. Use your favorite pastry recipe, or find a reliable one online.
Q: How do I prevent the tart shells from burning?
A: Keep a close eye on the tarts during baking, especially in the last few minutes. If the shells are browning too quickly, you can loosely cover them with foil.
Q: Can I freeze the butter tarts?
A: Yes, butter tarts freeze very well. Allow them to cool completely, then wrap them individually or in small batches before placing them in a freezer-safe container.
Q: What if my filling is too runny?
A: If the filling seems too runny, you may need to bake the tarts for a few more minutes. The filling should be set around the edges and slightly soft in the center.
Final Thoughts
These Great Canadian Butter Tarts are more than just a dessert; they’re a symbol of home, comfort, and tradition. Whether you’re baking them for a special occasion or simply craving a sweet treat, I encourage you to give this recipe a try. Don’t be afraid to experiment with different variations and make them your own. And most importantly, share them with loved ones and enjoy the delicious taste of Canada. Let me know in the comments how your tarts turned out, and happy baking!