
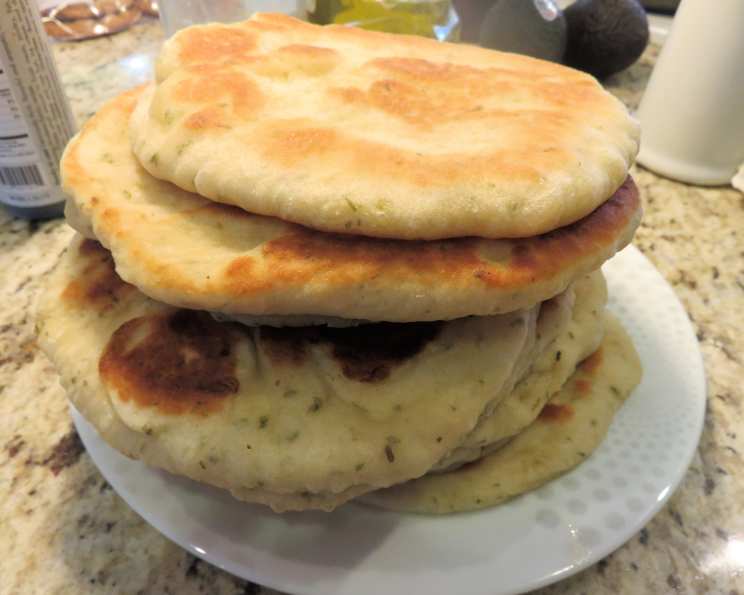
Greek Yogurt Turkish Flatbread (Bazlama)
The aroma of freshly baked bread has always been my weakness. I remember being a child, trailing behind my grandmother in her bustling Istanbul kitchen, the air thick with the scent of yeast and warm dough. She’d always be making bazlama – a simple, satisfying flatbread. We’d tear off pieces straight from the pan, the steam fogging our glasses as we dipped it into her homemade tomato soup. This recipe is an attempt to capture that memory, that feeling of warmth and connection, with a little added twist of tangy Greek yogurt for extra softness.
Recipe Overview:
- Prep Time: 20 minutes
- Cook Time: 15 minutes
- Total Time: 35 minutes
- Servings: 10
- Yield: 10 (7-inch) rounds
- Dietary Type: Vegetarian
Ingredients:
- 1 ¼ cups warm water
- 2 ¼ teaspoons dry active yeast (1 packet)
- 1 tablespoon sugar
- ¾ cup Greek yogurt
- 2 tablespoons extra virgin olive oil
- 1 tablespoon kosher salt
- 3 ¾ cups all-purpose flour, plus more for dusting
- ¼ cup finely chopped flat-leaf parsley
Equipment Needed:
- Medium-large bowl
- Wooden spoon or sturdy spatula
- Well-floured work surface
- Clean kitchen towel
- Medium saucepan
- Rolling pin
- Ziplock bag (for storage)
Instructions:
-
In a medium-large bowl, combine the warm water, sugar, and dry active yeast. Stir well to dissolve the sugar and yeast. Allow the mixture to sit in a warm place for 5-10 minutes to activate the yeast. You’ll know it’s ready when the surface is foamy and bubbly. This step is crucial for a light and airy flatbread.
-
Once the yeast is activated, whisk in the Greek yogurt, olive oil, and salt until well combined. The yogurt adds a subtle tang and contributes to the bread’s incredibly soft texture.
-
Add the flour and parsley to the wet ingredients. Stir with a wooden spoon or sturdy spatula until the dough begins to come together. It will initially appear shaggy, but keep stirring – it will form a cohesive mass.
-
Turn the dough out onto a well-floured counter. Turn it over to coat it lightly with flour. Begin to knead the dough for 3-4 minutes, or until it is no longer sticky and springs back when lightly pressed. If the dough is too sticky during kneading, sprinkle a little more flour onto the counter, a tablespoon at a time, until it reaches the right consistency. The dough should be smooth and elastic.
-
Divide the dough into 10 equal pieces. A kitchen scale can help ensure even portions. Sprinkle the dough pieces lightly with flour, and then cover them with a clean kitchen towel. Allow the dough to rest for 15 minutes. This resting period allows the gluten to relax, making the dough easier to roll out.
-
While the dough is resting, preheat a medium saucepan over medium-low heat. It’s important that the pan is properly heated for even cooking.
-
While the pan is heating, roll one of the dough portions into an approximately 7-inch circle. Use a rolling pin to achieve an even thickness.
-
Brush the top surface of the rolled-out dough lightly with extra virgin olive oil. This will help create a beautiful golden color and add flavor.
-
When the pan is hot, carefully pick up the first circle of dough and place it in the pan, oiled side down. Lightly brush the top surface with oil as well.
-
Allow the flatbread to cook for about 1 to 1 ½ minutes, until the top surface is covered with bubbles and the underside is golden brown around the edges and in spots. The bubbles are a good indicator that the bread is cooking properly.
-
Flip the flatbread to the opposite side and cook for another 60-90 seconds, until a few small golden spots appear. Be careful not to overcook the second side, as this can make the flatbread tough.
-
Repeat the rolling, oiling, and cooking process with the remaining portions of dough.
-
Sprinkle the cooked flatbreads with a bit more chopped parsley when finished, if desired, for added freshness and visual appeal.
-
Stack the flatbreads in a clean kitchen towel after cooking. The steam trapped inside the towel will help them retain their softness and pliability.
-
Once the flatbreads have cooled, store them in a ziplock bag to prevent them from drying out.
-
To reheat, warm in a pan without oil for a minute or two on each side, or wrap the flatbreads in paper toweling and heat in the microwave on low power until warm.
Expert Tips & Tricks:
- Yeast Activation is Key: Make sure your yeast is fresh and activates properly. If the yeast doesn’t foam, it’s likely expired and your flatbread won’t rise well.
- Don’t Over Knead: Over-kneading can result in tough flatbreads. Knead until the dough is smooth and elastic, but not overly so.
- Control the Heat: Keeping the heat at medium-low ensures the flatbread cooks through without burning. Adjust as needed based on your stovetop.
- Resting Time Matters: Allowing the dough to rest is crucial for gluten relaxation, resulting in a more tender flatbread. Don’t skip this step!
- Batch Cook & Freeze: These flatbreads freeze beautifully. Allow them to cool completely, then stack them with parchment paper in between to prevent sticking. Store in a freezer-safe bag for up to 2 months. Reheat directly from frozen.
Serving & Storage Suggestions:
These Greek yogurt Turkish flatbreads are incredibly versatile. They’re fantastic served warm with dips like hummus, tzatziki, or baba ghanoush. Use them as wraps for gyros, falafel, or grilled vegetables. They also make delicious substitutes for pizza crusts or quesadillas.
Store cooled flatbreads in a ziplock bag at room temperature for up to 2 days, or in the refrigerator for up to 5 days. For longer storage, freeze them for up to 2 months. Reheat in a dry skillet, microwave, or toaster oven.
Nutritional Information:
| Nutrient | Amount per Serving | % Daily Value |
|---|---|---|
| Calories | 202.8 kcal | N/A |
| Calories from Fat | N/A | N/A |
| Total Fat | 3.2 g | 4% |
| Saturated Fat | 0.5 g | 2% |
| Cholesterol | 0 mg | 0% |
| Sodium | 700.8 mg | 29% |
| Total Carbohydrate | 37.5 g | 12% |
| Dietary Fiber | 1.6 g | 6% |
| Sugars | 1.4 g | N/A |
| Protein | 5.2 g | 10% |
Note: Nutritional information is an estimate and may vary based on specific ingredients and preparation methods.
Variations & Substitutions:
- Gluten-Free: Substitute all-purpose flour with a gluten-free blend specifically designed for bread making. You may need to adjust the amount of liquid depending on the blend.
- Whole Wheat: Replace half of the all-purpose flour with whole wheat flour for a nuttier flavor and added fiber.
- Herb Variations: Experiment with different herbs like dill, oregano, or mint instead of parsley.
- Spice It Up: Add a pinch of red pepper flakes or a dash of smoked paprika to the dough for a touch of heat.
- Garlic Infusion: Mix minced garlic into the olive oil before brushing it onto the flatbreads for an extra layer of flavor.
FAQs (Frequently Asked Questions):
Q: Why is my dough sticky?
A: Dough stickiness can be due to humidity or inaccurate flour measurements. Add flour gradually, a tablespoon at a time, until the dough becomes manageable.
Q: Can I use plain yogurt instead of Greek yogurt?
A: Greek yogurt is preferred for its thicker consistency, which adds moisture without making the dough too wet. If using plain yogurt, drain off excess liquid first.
Q: How can I prevent the flatbread from becoming too hard?
A: Avoid overcooking and stack the cooked flatbreads in a clean kitchen towel to trap steam and keep them soft. Proper storage in a ziplock bag is also crucial.
Q: Can I bake these flatbreads in the oven?
A: While traditionally cooked in a pan, you can bake them in a preheated oven at 450°F (232°C) for 8-10 minutes, or until golden brown.
Q: How do I reheat frozen flatbreads?
A: Reheat frozen flatbreads directly from the freezer in a dry skillet, microwave, or toaster oven until warmed through.
Final Thoughts:
This Greek yogurt Turkish flatbread recipe is more than just a set of instructions; it’s an invitation to connect with tradition, to experience the simple joy of creating something delicious with your own hands. Don’t be afraid to experiment with different flavors and toppings, making it your own. Gather your loved ones, share this bread, and create your own memories around its warmth and flavor. I encourage you to try this recipe and share your feedback. It pairs wonderfully with a hearty lentil soup or a simple green salad. Afiyet olsun! (Bon appétit!)