
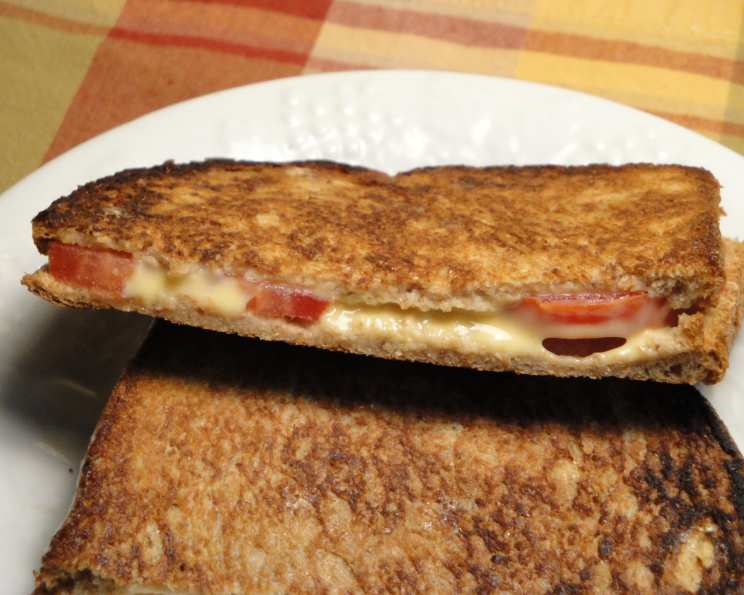
Grilled Cheese & Tomato Panini: A Simple Comfort Classic
There’s something deeply nostalgic about a grilled cheese sandwich. It’s a taste that transports me back to childhood, standing in my grandmother’s sunny kitchen, watching her patiently melt cheese between slices of buttered bread. But even the classics deserve a little elevation, don’t they? That’s why I adore this Grilled Cheese & Tomato Panini – it takes that fundamental comfort and adds a layer of juicy, tangy freshness that makes it feel both familiar and excitingly new.
Recipe Overview
- Prep Time: 5 minutes
- Cook Time: 6 minutes
- Total Time: 11 minutes
- Servings: 4
- Dietary Type: Vegetarian
Ingredients
- 8 slices whole-grain bread
- 8 slices cheddar cheese
- 1 medium tomato, sliced
Equipment Needed
- Stovetop ridged grill pan or large nonstick skillet
- Nonstick cooking spray
- Spatula
Instructions
-
Begin by preparing your cooking surface. Coat a stovetop ridged grill pan or a large nonstick skillet generously with nonstick cooking spray. Place the pan over medium-high heat to warm up. This ensures the panini cooks evenly and releases easily.
-
While the pan is heating, assemble the paninis. Lay all 8 slices of whole-grain bread on a cutting board.
-
Top each slice of bread with a slice of cheddar cheese. Make sure the cheese is evenly distributed to ensure melty goodness in every bite.
-
Take four of the cheese-topped bread slices and arrange slices of tomato on top of the cheddar cheese. Don’t overcrowd them; a few slices per sandwich are perfect.
-
Carefully assemble the paninis by placing the remaining cheese-topped bread slices on top of the tomato slices, creating four complete sandwiches.
-
Now it’s time to cook! Place the assembled paninis onto the preheated grill pan or skillet.
-
Cook the paninis for approximately 3-4 minutes per side, turning them once halfway through the cooking time. The key is to achieve a golden-brown color on the bread and ensure the cheese is completely melted and gooey.
-
While the paninis are cooking, use a spatula to gently press down on them. This helps to flatten the sandwich, evenly distribute the heat, and create those beautiful grill marks if you are using a ridged pan. Continue pressing until the cheese is fully melted and the bread is nicely toasted.
-
Once the cheese is fully melted and the bread is golden brown, remove the paninis from the pan and serve immediately.
Expert Tips & Tricks
- Cheese Selection: While cheddar is a classic choice, don’t be afraid to experiment! Gruyere, provolone, or even a sharp white cheddar can add a delicious twist.
- Bread Matters: The type of bread you use can significantly impact the final result. A sturdy whole-grain bread holds up well to grilling, but sourdough or even brioche can be delicious alternatives.
- Tomato Preparation: For an even more intense tomato flavor, consider roasting the tomato slices beforehand. Toss them with a little olive oil, salt, and pepper, and roast at 400°F (200°C) for about 15 minutes before adding them to the panini.
- Preventing Soggy Bread: If your tomatoes are particularly juicy, lightly salt them before adding them to the sandwich. This will help draw out some of the excess moisture. You can also add a thin layer of pesto or mayonnaise to the bread to create a moisture barrier.
- Perfectly Melted Cheese: To ensure the cheese melts evenly, make sure your pan is not too hot. Cooking at a lower temperature for a longer time allows the cheese to melt completely without burning the bread.
- Crispy Bread Hack: If your bread isn’t getting as crispy as you’d like, try brushing the outside of the bread with a little melted butter or olive oil before grilling. This will help it brown beautifully.
Serving & Storage Suggestions
Serve your Grilled Cheese & Tomato Panini immediately while it’s warm and the cheese is delightfully melty. They pair perfectly with a simple side salad, a bowl of tomato soup, or even just a handful of potato chips.
If you happen to have any leftovers (though I doubt you will!), store them in an airtight container in the refrigerator. They will keep for up to 2 days. To reheat, you can use a skillet, panini press, or even a toaster oven. Reheating in a skillet will help retain the crispy texture of the bread. Avoid microwaving, as it can make the bread soggy.
Nutritional Information
| Nutrient | Amount per Serving | % Daily Value |
|---|---|---|
| Calories | 182.1 kcal | N/A |
| Calories from Fat | 91 g | 50% |
| Total Fat | 10.1 g | 15% |
| Saturated Fat | 6.1 g | 30% |
| Cholesterol | 29.4 mg | 9% |
| Sodium | 302.4 mg | 12% |
| Total Carbohydrate | 13.6 g | 4% |
| Dietary Fiber | 0.8 g | 3% |
| Sugars | 1.6 g | 6% |
| Protein | 9 g | 18% |
Variations & Substitutions
- Vegan Option: Substitute the cheddar cheese with your favorite vegan cheese alternative. There are many great options available that melt beautifully. You can also use a vegan butter or oil to coat the pan instead of cooking spray.
- Gluten-Free: Simply use gluten-free bread slices to make this panini gluten-free.
- Different Cheeses: Experiment with different cheese combinations! Try mozzarella and pesto, provolone and roasted red peppers, or even a spicy pepper jack.
- Add Protein: Add sliced deli meat such as ham, turkey, or salami for a heartier panini.
- Spice it Up: Add a pinch of red pepper flakes to the tomato slices or spread a thin layer of sriracha mayo on the bread for a little heat.
- Herby Goodness: Sprinkle some fresh herbs, such as basil or oregano, over the tomato slices for added flavor.
FAQs (Frequently Asked Questions)
Q: Can I make these ahead of time?
A: While best served immediately, you can assemble the paninis ahead of time and store them in the refrigerator for a few hours before cooking.
Q: Can I use a panini press instead of a skillet?
A: Absolutely! A panini press will give you even more defined grill marks and evenly distribute the pressure for perfectly melted cheese.
Q: What if I don’t have whole-grain bread?
A: Any sturdy bread will work, such as sourdough, Italian bread, or even white bread. Just be mindful of the cooking time as different breads may brown at different rates.
Q: Can I add other vegetables?
A: Of course! Sliced onions, bell peppers, or even spinach can be a delicious addition.
Q: My cheese isn’t melting evenly. What can I do?
A: Try lowering the heat and cooking the panini for a longer time. You can also cover the pan with a lid to trap heat and help melt the cheese.
Final Thoughts
This Grilled Cheese & Tomato Panini is a testament to the fact that simple ingredients, when combined with care, can create something truly extraordinary. It’s a dish that’s both comforting and satisfying, perfect for a quick lunch, a light dinner, or even a late-night snack. So, go ahead, gather your ingredients, and give this recipe a try. I promise you won’t be disappointed. Feel free to experiment with your favorite cheese and bread combinations and let me know what you come up with!