
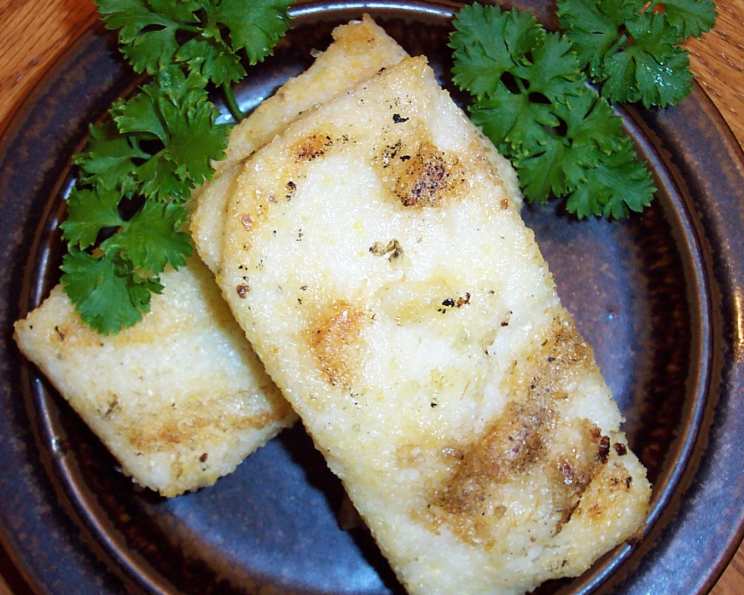
Grilled Garlic Cheese Grits: A Southern Comfort Classic Gets a Smoky Twist
I can still smell the smoky aroma wafting from my grandmother’s backyard grill. Every summer, alongside the ribs and corn, she’d always make her famous cheese grits. But one year, she decided to grill them, too! The slight char, combined with the creamy, garlicky cheese, transformed this classic Southern dish into something truly unforgettable – a delightful marriage of comfort and smoky outdoor flavors that I’ve been recreating ever since.
Recipe Overview
- Prep Time: 15 minutes
- Cook Time: 55 minutes
- Total Time: 1 hour 10 minutes (plus 2-2.5 hours refrigeration)
- Servings: 8
- Dietary Type: Vegetarian
Ingredients
- 4 cups water
- 1 cup uncooked old fashioned grits
- 1 teaspoon salt
- 4 ounces shredded cheddar cheese
- 1-2 cloves garlic, minced
- 1 tablespoon olive oil
Equipment Needed
- Saucepan
- Whisk
- 9-inch baking dish
- Grill
- Nonstick cooking spray
Instructions
- In a medium saucepan, bring the water to a rolling boil over high heat.
- Slowly add the grits and salt, stirring constantly with a whisk to prevent lumps from forming. This is crucial for achieving a smooth and creamy texture.
- Reduce the heat to low. Simmer, uncovered, for 40-45 minutes, or until the grits have thickened significantly and are creamy. Stir occasionally to prevent sticking to the bottom of the pan.
- Remove the grits from the heat. Add the shredded cheddar cheese and minced garlic. Stir until the cheese is completely melted and evenly distributed throughout the grits. The residual heat from the grits will melt the cheese beautifully.
- Spray a 9-inch baking dish generously with nonstick cooking spray. This will prevent the grits from sticking and make it easier to remove the squares later for grilling.
- Pour the cheese grits mixture into the prepared baking dish, spreading it evenly.
- Cover the baking dish tightly with plastic wrap or a lid. Refrigerate for 2 to 2 1/2 hours, or until the grits are firm enough to slice. This chilling period is essential for them to hold their shape on the grill.
- Before starting the grill, make sure the grates are clean. Coat the grill rack generously with nonstick cooking spray. This will prevent the grits from sticking and ensure beautiful grill marks.
- Once the grits are firm, remove them from the refrigerator. Cut the chilled grits into approximately 3-inch squares. You should get about 8 squares from a 9-inch dish.
- Brush both sides of each grits square with olive oil. This will help them crisp up on the grill and prevent them from drying out.
- Preheat your grill to medium heat.
- Place the grits squares directly on the preheated grill. Grill, covered, over medium heat for 4 to 6 minutes on each side, or until the grits are lightly browned and have developed attractive grill marks. Watch them carefully to prevent burning.
- Remove the grilled garlic cheese grits from the grill and serve immediately.
Expert Tips & Tricks
- For extra creamy grits: Use milk or half-and-half instead of water for a richer flavor and texture. You can also add a tablespoon of butter at the end.
- Spice it up: Add a pinch of red pepper flakes or a dash of hot sauce to the grits mixture for a little heat.
- Grill marks: To get those perfect grill marks, don’t move the grits squares around too much while they’re grilling. Let them sit undisturbed for a few minutes on each side.
- Cheese variations: Experiment with different types of cheese. Gruyere, pepper jack, or even a smoked cheddar would be delicious.
- Make ahead: The grits can be made and refrigerated up to 24 hours in advance. This is a great time-saver if you’re entertaining.
- Prevent sticking: Be sure to grease the baking dish well and use a thin, flexible spatula to release the grits squares.
- If your grits aren’t firm enough: Add a tablespoon of cornstarch to the grits mixture while it’s simmering to help it thicken up.
Serving & Storage Suggestions
Serve the grilled garlic cheese grits hot off the grill as a side dish to grilled steak, chicken, pork, or fish. They are also fantastic on their own with a fried egg on top for a satisfying brunch. For an elegant presentation, arrange the grilled squares on a platter and garnish with chopped fresh herbs, such as chives or parsley.
Leftover grilled grits can be stored in an airtight container in the refrigerator for up to 3 days. Reheat them in a skillet over medium heat or in the microwave until heated through. You can also re-grill them for a few minutes to crisp them up again. I do not recommend freezing as the texture will change.
Nutritional Information
| Nutrient | Amount per Serving | % Daily Value |
|---|---|---|
| Calories | 144.8 kcal | N/A |
| Calories from Fat | N/A | 42% |
| Total Fat | 6.7 g | 10% |
| Saturated Fat | 3.3 g | 16% |
| Cholesterol | 14.9 mg | 4% |
| Sodium | 382.7 mg | 15% |
| Total Carbohydrate | 15.7 g | 5% |
| Dietary Fiber | 0.9 g | 3% |
| Sugars | 0.2 g | 0% |
| Protein | 5 g | 10% |
Note: Nutritional information is an estimate and may vary depending on specific ingredients and preparation methods.
Variations & Substitutions
- Gluten-free: This recipe is naturally gluten-free as long as you use certified gluten-free grits.
- Dairy-free/Vegan: Substitute the cheddar cheese with a vegan cheese alternative. Nutritional yeast can also add a cheesy flavor. Ensure the brand you use melts well.
- Herbaceous: Add chopped fresh herbs like rosemary, thyme, or sage to the grits mixture for a more complex flavor profile.
- Jalapeño cheddar: Use jalapeño cheddar cheese for a spicy kick.
- Smoked paprika: Add a teaspoon of smoked paprika to the grits for an extra smoky flavor.
- Vegetables: Add chopped cooked vegetables, such as bell peppers, onions, or mushrooms, to the grits mixture.
FAQs (Frequently Asked Questions)
Q: Can I use instant grits for this recipe?
A: While I recommend using old-fashioned grits for the best texture and flavor, you can use instant grits in a pinch. Follow the package directions for cooking the grits, then add the cheese and garlic. However, the final product may not be as firm or flavorful.
Q: How can I prevent the grits from sticking to the grill?
A: Make sure your grill grates are clean and well-oiled with nonstick cooking spray. Also, ensure the grits are firm before grilling.
Q: Can I make these ahead of time?
A: Yes! The grits can be made and refrigerated up to 24 hours in advance. This is a great time-saver if you’re entertaining.
Q: What’s the best way to reheat leftover grilled grits?
A: Reheat them in a skillet over medium heat with a little butter or oil, or in the microwave until heated through. You can also re-grill them for a few minutes to crisp them up again.
Q: What if my grits are too thick or too thin?
A: If your grits are too thick, add a little water or milk until you reach the desired consistency. If they’re too thin, simmer them for a few more minutes until they thicken up.
Final Thoughts
I hope you’ll try this Grilled Garlic Cheese Grits recipe! It’s a simple yet satisfying dish that’s perfect for any occasion. Feel free to experiment with different cheese and spice combinations to create your own unique version. Don’t be afraid to get creative and most importantly, have fun in the kitchen! I encourage you to share your creations and feedback. Consider serving with a cold glass of sweet tea for a truly southern experience.