
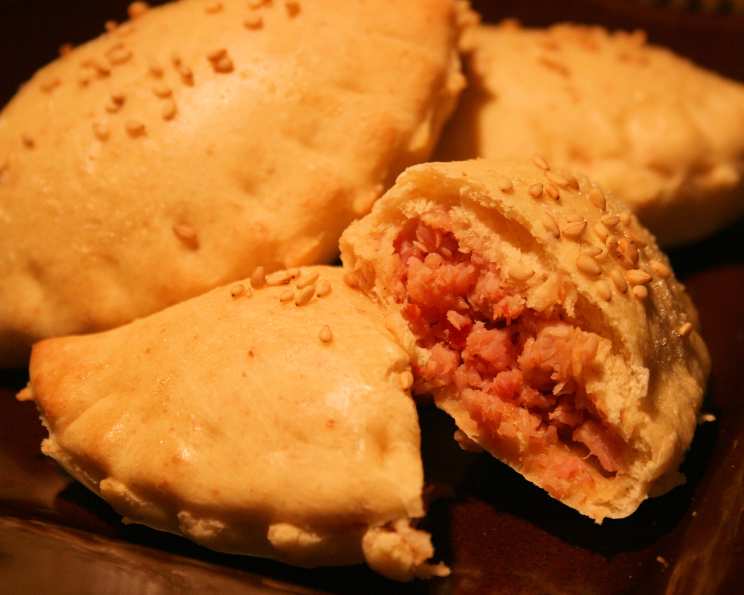
Ham Rolls: A Savory Comfort Food Classic
I remember the first time I tasted these ham rolls. It was at my Aunt Millie’s house, during one of our epic family gatherings. The aroma of warm, yeasty dough mingled with the savory scent of ham and onions, drawing everyone into the kitchen like moths to a flame. Aunt Millie, with flour dusting her apron, beamed as she pulled a tray of golden-brown rolls from the oven. Biting into one, I was met with a soft, pillowy dough and a burst of flavorful, salty ham. They were absolute perfection – simple, comforting, and utterly irresistible. I’ve been hooked ever since.
Recipe Overview
- Prep Time: 3 hours 15 minutes
- Cook Time: 10-15 minutes
- Total Time: 3 hours 30 minutes
- Servings: 30 (approximately)
- Yield: 30 (approximately)
- Dietary Type: Not specified (contains gluten, dairy, and eggs)
Ingredients
For the Dough:
- 3/4 cup milk, scalded, then cooled
- 1/2 cup margarine, softened
- 2 teaspoons salt
- 2 tablespoons sugar
- 1/4 ounce yeast (1 envelope)
- 1/4 cup warm water
- 1 egg
- 3 1/2 cups flour
For the Filling:
- 2 lbs ham, ground
- 1/2 cup onion, finely chopped
- Salt & pepper to taste
Optional:
- 1 egg, beaten (for egg wash)
Equipment Needed
- Large Mixing Bowl
- Measuring Cups and Spoons
- Small Bowl (for yeast)
- Greased Bowl
- Rolling Pin
- Baking Sheet
- Pastry Brush (optional, for egg wash)
Instructions
- In a large bowl, combine the softened margarine, sugar, and salt. Mix well until creamy.
- Add the egg to the bowl and mix until fully incorporated.
- In a separate small bowl, dissolve the yeast in warm water. Ensure the water isn’t too hot, as it can kill the yeast. A good temperature is around 105-115°F (40-46°C). Let it sit for about 5 minutes until it becomes foamy. This indicates that the yeast is active.
- Add the cooled, scalded milk to the margarine mixture in the large bowl. Mix well to combine.
- Gradually add the flour and the yeast mixture to the bowl. Mix well until a dough forms.
- Turn the dough out onto a lightly floured surface and knead it until it is smooth and elastic. This usually takes about 5-7 minutes. Kneading develops the gluten in the flour, which gives the rolls their structure.
- Place the kneaded dough in a greased bowl, turning to coat all sides.
- Cover the bowl with a clean kitchen towel or plastic wrap and let it rise in a warm place until it has doubled in size. This usually takes about 1-2 hours, depending on the temperature of your environment.
- While the dough is rising, prepare the ham filling. In a separate bowl, combine the ground ham and finely chopped onion. Season with salt and pepper to taste. Mix well to ensure the flavors are evenly distributed.
- Once the dough has risen, punch it down to release the air.
- Roll out small amounts of the dough on a lightly floured surface, creating small circles. The size of the circles will determine the size of your finished rolls.
- Place a spoonful of the ham filling in the center of each dough circle.
- Pinch the edges of the dough circles together to seal in the filling, forming a roll shape. Ensure the edges are tightly sealed to prevent the filling from leaking out during baking.
- Place the assembled rolls on a baking sheet, leaving some space between each roll.
- If desired, brush the tops of the rolls with an egg wash (beaten egg) to give them a golden-brown, glossy finish.
- Bake in a preheated oven at 375°F (190°C) for 10-15 minutes, or until the rolls are golden brown.
- Remove the baked ham rolls from the oven and let them cool slightly before serving.
Expert Tips & Tricks
- Don’t overheat the milk: When scalding the milk, be careful not to boil it. Scalding simply means heating it until small bubbles form around the edges. Overheating can change the flavor of the milk and affect the yeast’s activity.
- Use a stand mixer: If you have a stand mixer with a dough hook attachment, you can use it to make the dough. This will save you time and effort.
- Adjust the filling: Feel free to customize the filling to your liking. You can add other vegetables, such as bell peppers or celery, or use different types of cheese.
- Proof the yeast: To ensure your yeast is active, proof it by adding it to warm water with a pinch of sugar. If it foams up after a few minutes, it’s good to use.
- Freezing unbaked rolls: Prepare the rolls completely, up to the baking step. Then, place them on a baking sheet and freeze until solid. Once frozen, transfer them to a freezer bag. When ready to bake, place the frozen rolls on a baking sheet and bake as directed, adding a few extra minutes to the baking time.
Serving & Storage Suggestions
Serve these ham rolls warm as a comforting snack, a light lunch, or as part of a larger meal. They’re perfect for potlucks, parties, or family gatherings.
Storage:
- Room Temperature: Baked ham rolls can be stored at room temperature for up to 2 hours.
- Refrigerator: Store leftover ham rolls in an airtight container in the refrigerator for up to 3-4 days.
- Freezer: For longer storage, freeze the ham rolls in an airtight container or freezer bag for up to 2-3 months.
Reheating:
- Microwave: Reheat individual rolls in the microwave for 30-60 seconds.
- Oven: Reheat the rolls in a preheated oven at 350°F (175°C) for 5-10 minutes, or until heated through.
- From Frozen: Reheat frozen rolls in a preheated oven at 350°F (175°C) for 15-20 minutes, or until heated through.
Nutritional Information
(Estimated values, may vary based on specific ingredients and serving size)
| Nutrient | Amount per Serving | % Daily Value |
|---|---|---|
| Calories | 136 kcal | N/A |
| Calories from Fat | 47 g | 35% |
| Total Fat | 5.3 g | 8% |
| Saturated Fat | 1.3 g | 6% |
| Cholesterol | 23.6 mg | 7% |
| Sodium | 654.8 mg | 27% |
| Total Carbohydrate | 12.7 g | 4% |
| Dietary Fiber | 0.5 g | 1% |
| Sugars | 1 g | 4% |
| Protein | 8.8 g | 17% |
Variations & Substitutions
- Cheese Filling: Add shredded cheddar, Swiss, or provolone cheese to the ham filling for extra flavor.
- Spicy Kick: Add a pinch of red pepper flakes or a dash of hot sauce to the ham filling.
- Vegetarian Option: Replace the ham with sautéed mushrooms, spinach, or other vegetables.
- Gluten-Free: Use a gluten-free flour blend to make the dough. You may need to adjust the amount of liquid depending on the flour blend you use.
- Dairy-Free: Use a dairy-free milk alternative and margarine substitute.
FAQs (Frequently Asked Questions)
Q: Can I make the dough ahead of time?
A: Yes, you can make the dough ahead of time and store it in the refrigerator for up to 24 hours. Punch it down before using.
Q: Can I use pre-ground ham?
A: Yes, you can use pre-ground ham or grind your own ham using a food processor.
Q: How do I prevent the filling from leaking out?
A: Make sure to pinch the edges of the dough tightly to seal in the filling. You can also brush the edges with a little water before sealing to help them stick together.
Q: Can I add herbs to the dough or filling?
A: Absolutely! Fresh or dried herbs like thyme, rosemary, or parsley can add a delicious flavor to the dough or filling.
Q: What if my rolls are browning too quickly?
A: If the rolls are browning too quickly, you can tent them with aluminum foil to prevent them from burning.
Final Thoughts
These ham rolls are more than just a recipe; they’re a taste of home, a warm hug on a cold day, and a reminder of cherished family traditions. I encourage you to try this recipe and experience the joy of creating something delicious and comforting. Feel free to experiment with different fillings and variations to make it your own. And most importantly, don’t forget to share your creations with loved ones – food is always better when shared! Pair with a side of creamy coleslaw or a simple green salad for a complete and satisfying meal. Enjoy!