
The Guilt-Free Gourmet: Zero-Carb “Hamburger” Buns
My culinary journey has taken me through countless kitchens and flavor combinations, but some of the most memorable moments are born from necessity. I remember one particular summer, training for a marathon and meticulously tracking my macros, the longing for a juicy burger on a soft, comforting bun was almost unbearable. That’s when the challenge began: could I create a satisfying, bread-like experience without the carbs? After much experimenting, the answer was a resounding “yes!” These zero-carb “hamburger” buns aren’t just a diet hack; they’re a testament to the fact that deliciousness can thrive even within the strictest of parameters.
Recipe Overview
- Prep Time: 15 minutes
- Cook Time: 20 minutes
- Total Time: 35 minutes
- Servings: 5
- Yield: 2 halves/buns
- Dietary Type: Keto, Low-Carb, Gluten-Free, Sugar-Free, Dukan Diet
Ingredients
- 3 whole large eggs, separated
- 3 tablespoons low-fat cottage cheese (or fat-free cream cheese)
- 1/4 teaspoon cream of tartar
- 2 teaspoons Splenda sugar substitute, granulated (or preferred artificial sweetener)
Equipment Needed
- Two cookie sheets
- Pam or fat-free cooking spray
- Small bowl
- Large bowl
- Electric mixer
- Large spatula
- Wire rack
Instructions
-
Begin by preheating your oven to 350 degrees Fahrenheit (175 degrees Celsius). This is crucial for even baking and achieving the right texture.
-
Next, carefully separate the eggs, ensuring absolutely no yolk contaminates the whites. Even a tiny speck of yolk can prevent the egg whites from whipping properly.
-
In a small bowl, mix together the egg yolks, cottage cheese (or cream cheese), and Splenda (or your preferred sweetener) until the mixture is smooth and creamy. Set this aside. The sweetener adds a touch of flavor and helps balance the savory notes.
-
In a larger bowl, add the egg whites and cream of tartar. The cream of tartar is essential; it helps stabilize the egg whites and create a meringue-like structure. Using an electric mixer, beat the egg whites on high speed until stiff, fluffy peaks form. The mixture should be well-whipped and hold its shape when the beaters are lifted. Under-mixing will result in a runny batter and a flat final product, so don’t skimp on this step!
-
Gently fold the egg yolk mixture into the beaten egg whites using a large spatula. Be careful not to over-mix, as this will deflate the egg whites and compromise the airy texture. Fold until just combined, ensuring there are no streaks of yolk mixture remaining. The goal is to maintain as much of the “fluffiness” of the egg whites as possible.
-
Spray two cookie sheets with Pam (or fat-free cooking spray). This prevents the buns from sticking and allows for easy removal.
-
Using a large spoon, scoop the mixture into 10 even rounds onto the prepared cookie sheets. Aim for rounds that are about the size of the top half of a standard hamburger bun—approximately 3/4 inch thick and 4 to 5 inches across. Spacing is important to allow for even baking.
-
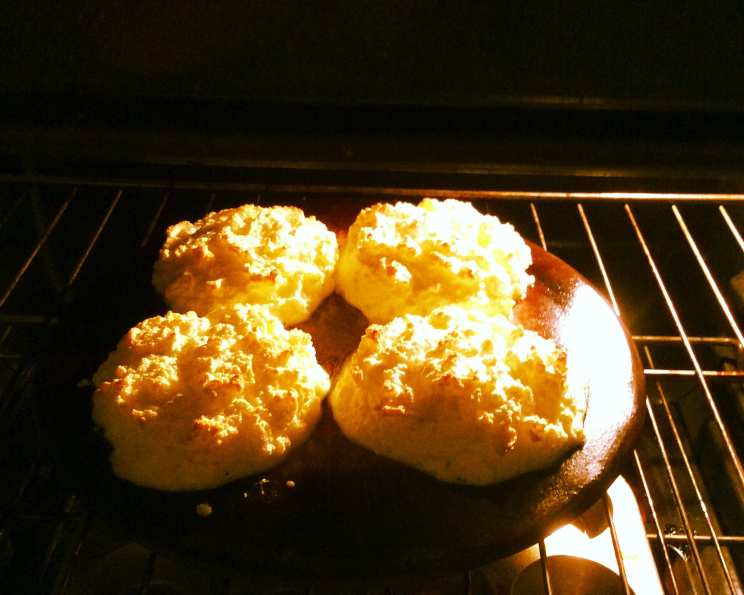
Place the cookie sheets on the middle rack of the preheated oven and set the timer for 20 minutes. Keep a close eye on the buns, as the cooking time can vary depending on your oven.
-
Bake until the buns are a nice, golden-brown color, resembling the shade of a McDonald’s bun. The tops should be firm to the touch, and the edges should be slightly crisp.
-
Remove the baking sheets from the oven and transfer the buns to a wire rack to cool completely. This allows air to circulate and prevents them from becoming soggy.
Expert Tips & Tricks
- For a smoother batter: If you prefer a smoother texture, use fat-free cream cheese instead of cottage cheese.
- Sweetener Alternatives: Feel free to experiment with different artificial sweeteners to find your preferred taste. Erythritol or stevia are excellent options.
- Flavor Boost: Add a pinch of garlic powder, onion powder, or dried herbs to the egg yolk mixture for added flavor complexity.
- Even Baking: Ensure your oven is properly calibrated to achieve consistent results. An oven thermometer is a useful tool.
- Overnight Transformation: Don’t be alarmed by the initial crumbly texture. As the buns cool completely and sit overnight in a sealed container, they will transform into a surprisingly bread-like consistency.
Serving & Storage Suggestions
These zero-carb buns are incredibly versatile. While warm, they will have a crumbly, meringue-like texture. But the magic happens overnight.
- Serving: Once cooled, slice the buns in half horizontally and use them for burgers, sandwiches, or as a base for open-faced creations. They’re also delicious toasted with a smear of cream cheese or avocado.
- Storage: Store completely cooled buns in a ziplock bag or airtight container in the refrigerator for up to 3 days.
- Freezing: For longer storage, freeze the buns in a single layer on a baking sheet until solid, then transfer them to a freezer bag. They can be frozen for up to 1 month. Thaw completely before using.
- Reheating: Reheat in a toaster oven or microwave for a few seconds to restore their soft texture.
Nutritional Information
Please note that these values are estimates and may vary based on specific ingredients and serving sizes.
| Nutrient | Amount per Serving | % Daily Value |
|---|---|---|
| Calories | 52 kcal | N/A |
| Fat | 3.1g | 4% |
| Saturated Fat | 1g | 5% |
| Cholesterol | 112.4mg | 37% |
| Sodium | 70.1mg | 2% |
| Total Carbohydrate | 1.1g | 0% |
| Dietary Fiber | 0g | 0% |
| Sugars | 0.8g | N/A |
| Protein | 4.8g | 9% |
Variations & Substitutions
- Dairy-Free: Substitute the cottage cheese or cream cheese with a dairy-free alternative such as cashew cream cheese or silken tofu (blended until smooth).
- Spice It Up: Add a pinch of red pepper flakes or a dash of hot sauce to the egg yolk mixture for a spicy kick.
- Herbaceous Delight: Incorporate finely chopped fresh herbs like rosemary, thyme, or chives for an aromatic twist.
- Seed Sensations: Sprinkle sesame seeds, poppy seeds, or sunflower seeds on top of the buns before baking for added texture and flavor.
FAQs (Frequently Asked Questions)
Q: Why are the buns crumbly when they first come out of the oven?
A: The initial texture is due to the high egg white content. Don’t worry; the texture will transform overnight as the proteins set and moisture redistributes.
Q: Can I use a different sweetener besides Splenda?
A: Absolutely! Erythritol, stevia, or monk fruit sweetener are all suitable alternatives. Adjust the amount to match the sweetness level of Splenda.
Q: What if my egg whites won’t whip into stiff peaks?
A: Make sure your bowl and beaters are completely clean and free of any grease or oil. Even a tiny amount of fat can inhibit the formation of stiff peaks. Also, ensure there is absolutely no egg yolk in the egg whites.
Q: How can I prevent the buns from sticking to the cookie sheet?
A: Generously coat the cookie sheet with Pam or another fat-free cooking spray. You can also line the cookie sheet with parchment paper for extra insurance.
Q: Can I make these buns ahead of time?
A: Yes! These buns are best made ahead of time. They require an overnight resting period in the refrigerator to achieve their optimal texture.
Final Thoughts
So, there you have it—a guilt-free way to enjoy your favorite burgers and sandwiches without sacrificing your dietary goals. I encourage you to give these zero-carb “hamburger” buns a try and experience the delightful transformation for yourself. Don’t be afraid to experiment with different flavors and variations to create your perfect bun. And most importantly, share your creations and feedback—I’m always eager to hear how you’ve made this recipe your own! Now go forth and enjoy a burger that fits your lifestyle!