
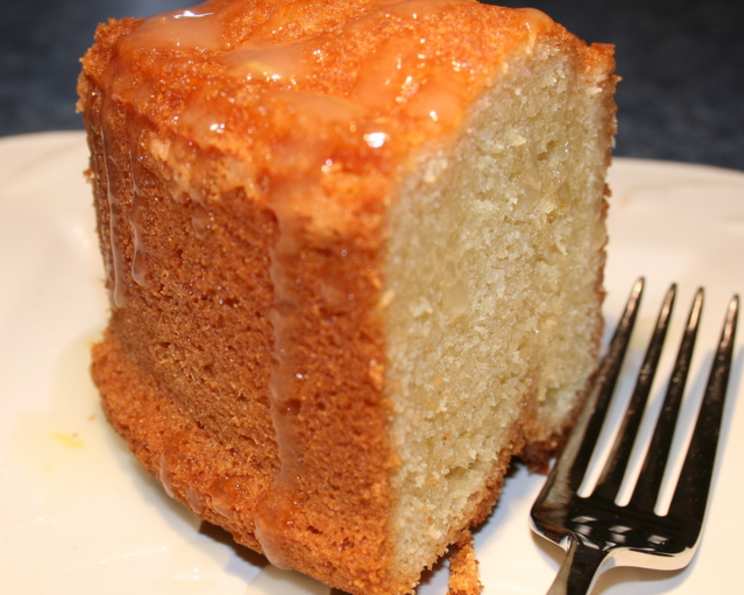
Happy Cake: A Slice of Sunshine
The memory is as vivid as if it happened yesterday: the scent of vanilla and butter filling Grandma’s kitchen, the rhythmic whir of her ancient stand mixer, and the golden-brown cake, still warm from the oven, sitting proudly on her floral-patterned cake stand. She always called it “Happy Cake,” because, as she’d say with a twinkle in her eye, “One bite of this and even your grumpiest day will be a little brighter.” To this day, a slice of this classic pound cake is pure comfort and joy.
Recipe Overview
- Prep Time: 20 minutes
- Cook Time: 1 hour 20 minutes
- Total Time: 1 hour 40 minutes
- Servings: 16
- Yield: 1 cake
- Dietary Type: Not Gluten-Free
Ingredients
- 709.77 ml cake flour
- 6 eggs
- 453.59 g butter
- 532.32 ml sugar
- 9.85 ml vanilla extract
- 2.46 ml salt
- 118.29 ml buttermilk
- 2.46 ml baking soda
- 2.46 ml baking powder
Equipment Needed
- 10-inch Bundt pan or tube pan
- Large mixing bowl
- Electric mixer (stand or hand-held)
- Measuring cups and spoons
- Sifter
- Cooling rack
- Rubber spatula
Instructions
-
Begin by preheating your oven to 325°F (163°C). This lower temperature is key to a moist and evenly baked cake.
-
Prepare your pan. Generously grease a 10-inch Bundt or tube pan with butter or baking spray. Next, lightly dust the inside of the pan with flour, ensuring every nook and cranny is coated. Tap out any excess flour; this will prevent the cake from sticking and give it a clean release.
-
In a large mixing bowl, using an electric mixer, beat the butter until it is light and creamy. This step is crucial for creating a tender crumb. Ensure your butter is at room temperature for optimal mixing.
-
Gradually add the sugar to the creamed butter, mixing well until the mixture is light and fluffy. The sugar should be fully incorporated into the butter, creating a smooth and airy base.
-
Add the vanilla extract and the eggs, one at a time, mixing well after each addition. Incorporating the eggs slowly prevents the mixture from curdling and ensures a smooth batter.
-
Add the buttermilk to the mixture and mix until just combined. The buttermilk adds moisture and a slight tang, contributing to the cake’s tender texture.
-
In a separate bowl, sift together the cake flour, salt, baking soda, and baking powder. Sifting these dry ingredients ensures they are evenly distributed and prevents lumps, resulting in a lighter and more uniform cake.
-
Gradually add the sifted dry ingredients to the wet ingredients, mixing slowly until just combined. Be careful not to overmix the batter, as this can develop the gluten in the flour and result in a tough cake. Use a rubber spatula to scrape down the sides and bottom of the bowl to ensure all ingredients are fully incorporated.
-
Pour the batter into the prepared Bundt pan or tube pan, spreading it evenly.
-
Bake in the preheated oven for 1 hour and 20 minutes, or until a wooden skewer inserted into the center comes out clean. Start checking for doneness around the 1 hour 10 minute mark, as oven temperatures can vary.
-
Once baked, remove the cake from the oven and let it cool in the pan for 15-20 minutes. This allows the cake to firm up slightly, making it easier to remove from the pan without breaking.
-
After the cooling period, invert the cake onto a platter or cooling rack. Allow it to cool completely before slicing and serving.
-
Resist the urge to cut into it right away! Allowing the cake to fully cool will prevent it from being crumbly and will enhance its flavor.
Expert Tips & Tricks
- Room Temperature is Key: Ensure your butter and eggs are at room temperature. This helps them emulsify properly, creating a smooth and stable batter.
- Don’t Overmix: Overmixing develops the gluten in the flour, leading to a tough cake. Mix until just combined, and no streaks of flour remain.
- Cake Flour is a Must: Cake flour has a lower protein content than all-purpose flour, resulting in a more tender crumb. If you don’t have cake flour, you can make a substitute by removing 2 tablespoons of all-purpose flour per cup and replacing it with cornstarch.
- Prevent Sticking: Thoroughly grease and flour your pan, paying special attention to intricate details in Bundt pans. Alternatively, use a baking spray with flour already mixed in.
- Oven Placement: Position the cake in the center of the oven for even baking.
- Toothpick Test: To ensure your cake is fully baked, insert a wooden skewer or toothpick into the center. If it comes out clean or with just a few moist crumbs attached, it’s done. If it comes out with wet batter, continue baking for a few more minutes and test again.
Serving & Storage Suggestions
Serve your Happy Cake sliced, either plain or with a dusting of powdered sugar. It pairs wonderfully with fresh fruit, whipped cream, or a dollop of lemon curd. For a touch of elegance, try drizzling it with a simple glaze made from powdered sugar and milk.
To store, wrap the cake tightly in plastic wrap or place it in an airtight container at room temperature for up to 3 days. For longer storage, you can refrigerate it for up to a week, but be aware that refrigeration can dry out the cake slightly.
To freeze, wrap the cake tightly in plastic wrap, then in aluminum foil. It can be frozen for up to 2 months. Thaw it overnight in the refrigerator before serving. You can also freeze individual slices for a quick and easy treat.
Nutritional Information
| Nutrient | Amount per Serving | % Daily Value |
|---|---|---|
| Calories | 437.5 kcal | N/A |
| Calories from Fat | N/A | 52% |
| Total Fat | 25.2 g | 38% |
| Saturated Fat | 15.2 g | 76% |
| Cholesterol | 140.6 mg | 46% |
| Sodium | 321.6 mg | 13% |
| Total Carbohydrate | 48.8 g | 16% |
| Dietary Fiber | 0.4 g | 1% |
| Sugars | 28.8 g | N/A |
| Protein | 5 g | 9% |
Note: Nutritional information is an estimate and can vary based on specific ingredients and portion sizes.
Variations & Substitutions
- Lemon Poppy Seed: Add the zest of one lemon and 2 tablespoons of poppy seeds to the batter for a citrusy twist.
- Chocolate Marble: Divide the batter in half. Add 1/4 cup of cocoa powder to one half. Swirl the two batters together in the pan before baking.
- Almond Extract: Substitute half of the vanilla extract with almond extract for a nutty flavor.
- Gluten-Free: Substitute the cake flour with a gluten-free all-purpose baking flour blend. You may need to add a binder such as xanthan gum to help with the structure.
- Dairy-Free: Substitute the butter with a dairy-free butter alternative and the buttermilk with a mixture of almond milk and lemon juice (let it sit for 5 minutes to curdle).
FAQs (Frequently Asked Questions)
Q: Why is my pound cake dry?
A: Overbaking is the most common cause of dry pound cake. Make sure to check for doneness with a toothpick and remove the cake from the oven as soon as it’s done. Also, ensure accurate measurements of ingredients are used.
Q: Can I use all-purpose flour instead of cake flour?
A: While you can, cake flour is recommended for a more tender crumb. If using all-purpose flour, reduce the amount by 2 tablespoons per cup and substitute with cornstarch.
Q: How do I prevent my cake from sticking to the pan?
A: Generously grease and flour your pan, ensuring every area is covered. Using baking spray with flour already mixed in is another effective method.
Q: Can I make this cake ahead of time?
A: Absolutely! Pound cake actually improves in flavor and texture after a day or two. Just store it properly wrapped at room temperature or in the refrigerator.
Q: My cake sank in the middle. What happened?
A: This can happen if the oven temperature is too low or if the cake batter was underbaked. Ensure your oven is properly preheated and bake until a toothpick inserted in the center comes out clean.
Final Thoughts
Now it’s your turn to create some happy memories with this delightful cake. Whether you bake it for a special occasion or simply to brighten a rainy afternoon, this recipe is sure to bring a smile to your face. Don’t be afraid to experiment with different flavor variations to make it your own. And most importantly, share your delicious creation with loved ones! I’d love to hear about your baking experiences and any creative twists you add. Happy baking!