
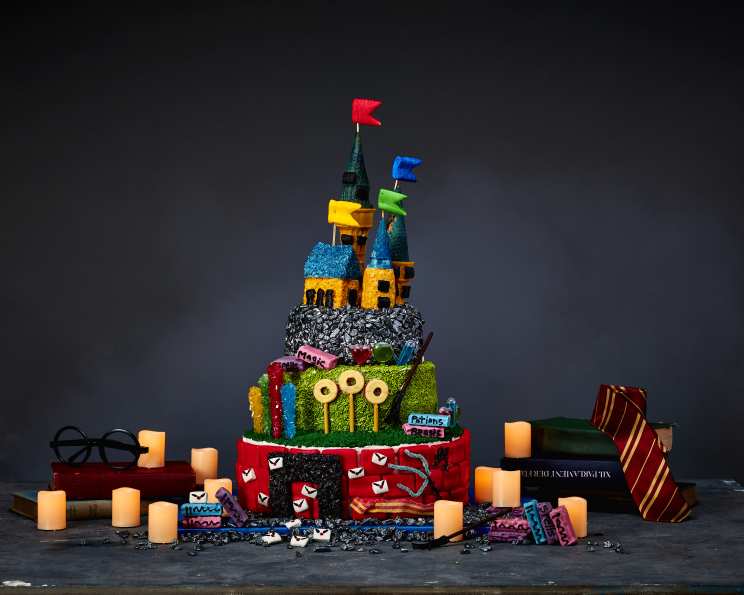
Harry Potter Birthday Castle Cake
The aroma of lemon always takes me back to my childhood summers. My grandmother, a true Anglophile, would always bake a lemon drizzle cake, declaring it was “Dumbledore’s favorite, you know!” And although I didn’t understand the reference back then, that bright, citrusy flavor became intrinsically linked with stories of magic and adventure. Recreating that lemon flavor, now imbued with house colors and towering castle walls, feels like sharing a slice of my past and passing on a little bit of magic to a new generation.
Recipe Overview
- Prep Time: 15 hours
- Cook Time: 30 minutes
- Total Time: 15 hours 30 minutes
- Servings: Varies (depending on cake size)
- Yield: 1 Cake
- Dietary Type: Not specified
Ingredients
For the Cake:
- Harry Potter Lemon Drop Confetti Cake (recipe required)
For the Filling:
- 3 cups blue buttercream frosting
- 2 cups yellow buttercream frosting
- 1 cup red buttercream frosting
For Spell Books:
- Harry Potter Spell Books (to decorate cake; recipe required)
For the Potions:
- ½ cup water
- ½ cup sugar
- Electric green gel food coloring
- Neon blue gel food coloring
- Super red gel food coloring
- Assorted pipettes (for decorating cake)
For Castles:
- Harry Potter Castles (to decorate cake; recipe required)
For the Broom Stick:
- 1 chocolate pocky stick
- 3 licorice strings
- Melted black candy melts (in piping bag, for decoration)
For the Letters:
- Harry Potter Letters (to decorate cake; recipe required)
For the House Points:
- 1 red rock candy stick
- 1 yellow rock candy stick
- 1 blue rock candy stick
- 1 green rock candy stick
For the Fireplace:
- 2 marshmallow treats (for cake)
- Edible black spray (for decoration)
For the Platform Numbers:
- Melted black candy melts (in piping bag, for decorating)
For the Wand:
- 1 licorice string (cut to about 4 inches)
- Melted black candy melts (in piping bag, for decoration)
For the Brick Wall:
- 1.5 (16 ounce) bags square marshmallows
- Edible red spray (for decorating cake)
Additional:
- 3 ½ lbs white buttercream frosting
- 1 lb silver candy rocks (spread evenly on a sheet tray, for decorating)
- Melted white candy melts (in piping bag, to decorate cake)
- 3 blue sour strings candies
- 1 red and yellow striped candy belt
- 9 bubble tea straws (to build cake)
- 1 lb lime green sprinkles (spread evenly on a sheet tray)
- 3 cups green frosting (in piping bag with grass tip)
- 3 peach ring candies
Equipment Needed
- Turntable
- Cake boards
- Plastic wrap
- Small saucepan
- Whisk
- Small bowls
- Assorted pipettes
- Parchment paper
- Piping bags
- Large blue cutting board or cake board
Instructions
-
Bake the Cakes: Prepare the Harry Potter Lemon Drop Confetti Cake according to its specific recipe. Ensure you have at least three cake layers of varying sizes for a tiered effect.
-
Prepare the Tiers: Unwrap the large cake layers. Place a cake board on a turntable and spread a little blue buttercream in the center. Place a cake layer on top.
-
First Tier (Blue): Add the blue buttercream on top of the cake and smooth over. Place the second cake layer on top. Gently press down on the top to sandwich it all together.
-
Chill the First Tier: Wrap the cake in plastic wrap and refrigerate for at least 2 hours. This helps stabilize the cake for frosting.
-
Second Tier (Yellow): Repeat the process with the remaining layers, using yellow buttercream for the middle tier. Wrap and chill.
-
Third Tier (Red): Repeat again using red buttercream for the top tier. Wrap and chill.
-
Make the Potions: Add sugar and water to a small saucepan over medium-low heat. Heat until sugar dissolves, whisking occasionally.
-
Color the Potions: Divide the mixture into three bowls. Color one bowl green, one bowl blue, and one bowl red using the gel food colorings.
-
Fill the Pipettes: Fill assorted pipettes with different colors and set aside. These will be used to decorate the cake with “potions”.
-
Make the Castles: (If not already pre-made according to their specific recipe)
-
Make the Broom Stick: Cut 6 short strings of licorice and attach together with black candy melts. Trim off non-chocolate part of Pocky stick and attach to bristle portion. Let set.
-
Make the Letters: (If not already pre-made according to their specific recipe)
-
Make the House Points: Cut off the wooden round tip on each rock candy stick. Leave one color as is. Carefully trim away parts of the other three candy colors so that you have four different heights.
-
Make the Fireplace: Shape and mold the marshmallow treats into a flat 4×4 inch square onto a parchment-lined baking sheet. Trim into the shape of a fireplace. Spray with edible black spray and let set.
-
Make the Platform Numbers: Using a printed template, pipe 9 ¾ with candy melts. Let set.
-
Make the Wand: Place licorice on a parchment-lined baking sheet. Pipe small dots onto licorice, equally spaced apart. Let set.
-
Prepare the Brick Wall: Arrange square marshmallows on a parchment-lined baking sheet. Spray with edible red spray and let set.
-
Assemble the Top Tier: Place the small tier (red) on a turntable. Frost the sides with a layer of white buttercream, leaving the top bare.
-
Add Candy Rocks to the Top Tier: Pick up the cake and roll in the silver candy rocks to coat the sides. Place the cake back on the turntable and frost the top.
-
Attach Castle Buildings: To attach the castle buildings, spread a little white buttercream over the placement area and pipe on a bit of white candy melts. Gently press in the castle buildings. Fill in bare areas with candy rocks and set aside.
-
Prepare the Bottom Tier: Place the large cake tier (blue) on a turntable. Frost the top and sides with a layer of white buttercream.
-
Create the Brick Wall: Press the red marshmallows into the sides of the cake in a brick pattern.
-
Decorate the Bottom Tier: Using the candy melts as glue and pressing to adhere, attach the fireplace, letters, wand and blue sour strings, red and yellow striped candy belt, and 9 3/4 numbers.
-
Add Straw Supports: Insert a straw in the back area of the top of the cake. Lift up and cut so that the straw matches the height of the cake. Repeat until you have inserted five straws total, spaced equally in the back of the cake. The tiers will be stacked up along the back of the cake instead of the center.
-
Assemble the Middle Tier: Place the middle cake tier (yellow) on a turntable. Frost the sides with a layer of white buttercream, leaving the top bare.
-
Add Sprinkles to the Middle Tier: Pick up the cake and roll in the lime green sprinkles to coat the sides. Place the cake back on the turntable and frost the top. Cover with sprinkles.
-
More Straw Supports: Insert a bubble tea straw in back area of the top of the cake. Lift up and cut so that the straw matches the height of the cake. Repeat until you have inserted four straws total, spaced equally in the back of the cake.
-
Final Assembly: Place the bottom tier on a large blue cutting board or cake board. Stack the middle tier on top where the straws are.
-
Add Grass: Pipe green frosting on the top of the bottom tier using the grass tip.
-
Add House Points and Broom: Push the wooden sticks of the colored rock candy in the top of the bottom tier so that’s it’s positioned in front, on the left side, of the middle tier. On the front of the middle tier and using the candy melts as glue, attach the three peach rings upside down so that the yellow side faces out. Trim the Pocky sticks to fit underneath the peach rings and attach. Attach the broom stick.
-
Stack the Top Tier: Stack the top tier on top where the straws are.
-
Final Touches: Decorate cake with spell books and potion pipettes. You can stack or lean the books against one another. The pipettes can be stuck directly into the cake.
Expert Tips & Tricks
- Chill time is crucial: Don’t skip the refrigeration steps. Chilling helps firm up the buttercream, making the cake easier to frost and decorate.
- Candy Melt Mastery: When using melted candy melts as glue, work quickly as they set fast. A warm water bath can keep your piping bag of candy melts fluid.
- Level Playing Field: Ensure your cake layers are level before frosting. Use a serrated knife to trim any unevenness.
- Edible Spray Caution: When using edible spray, hold the can at a distance and spray in short bursts to avoid oversaturation.
- Practice Piping: If you’re not confident with piping, practice on a plate before decorating the cake.
Serving & Storage Suggestions
Serve this magnificent cake as the centerpiece of your Harry Potter-themed birthday celebration! The cake is best enjoyed at room temperature. Store leftover cake in an airtight container in the refrigerator. It will last for up to 3-4 days. The decorated elements might soften in the fridge, so consider removing them before storing and reattaching them before serving. Freezing the cake is not recommended as it can affect the texture of the frosting and decorations.
Nutritional Information
Please note that this is an estimate and can vary based on specific ingredients used.
| Nutrient | Amount per Serving | % Daily Value |
|---|---|---|
| Calories | 500 kcal | 25% |
| Total Fat | 25g | 38% |
| Saturated Fat | 15g | 75% |
| Cholesterol | 50mg | 17% |
| Sodium | 200mg | 9% |
| Total Carbohydrate | 70g | 23% |
| Dietary Fiber | 1g | 4% |
| Sugars | 50g | – |
| Protein | 5g | 10% |
Variations & Substitutions
- Gluten-Free Version: Use a gluten-free Lemon Drop Confetti Cake recipe.
- Dairy-Free Version: Substitute dairy-free butter and milk alternatives in the buttercream frosting.
- Different Flavors: While this recipe emphasizes Lemon Drop, feel free to adapt it to other flavors that fit the Harry Potter theme, such as treacle tart or pumpkin pasty.
- House Colors: Customize the interior buttercream and decorations to represent specific Hogwarts houses.
FAQs (Frequently Asked Questions)
Q: Can I make the cake layers ahead of time?
A: Yes, you can bake the cake layers a day or two in advance. Wrap them tightly in plastic wrap and store them at room temperature or in the refrigerator.
Q: How do I prevent the cake from drying out?
A: Ensure the cake layers are properly wrapped while chilling. You can also brush the layers with simple syrup before frosting to add moisture.
Q: Can I use store-bought buttercream frosting?
A: Absolutely! Store-bought frosting is a great time-saver. Just make sure to choose a high-quality brand.
Q: What if I don’t have a turntable?
A: While a turntable is helpful, it’s not essential. You can frost and decorate the cake on a flat surface, rotating it as needed.
Q: How can I make the potions look more realistic?
A: Add a touch of shimmer dust or edible glitter to the colored water for a magical effect.
Final Thoughts
Creating this Harry Potter Birthday Castle Cake is more than just baking; it’s an adventure! Don’t be intimidated by the many steps; take it one component at a time and let your creativity shine. This cake is sure to be a showstopper and a memorable centerpiece for any Harry Potter celebration. I encourage you to try this recipe, share your creations, and maybe even pair it with a glass of butterbeer! Let the magic begin!