
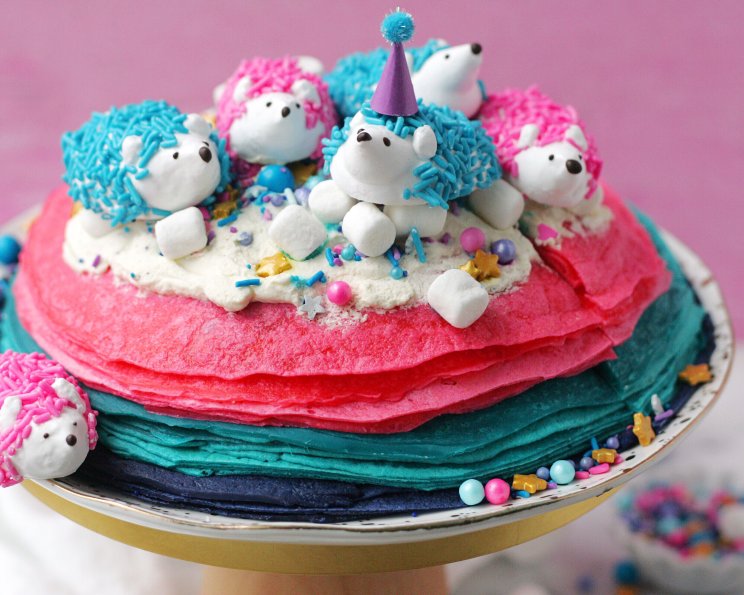
Hedgehog Crepe Cake: A Whimsical Culinary Adventure
The first time I saw a crepe cake, I was mesmerized. It wasn’t just a dessert; it was an edible tower of perfectly stacked delights. Now, imagine taking that elegant structure and transforming it into something utterly adorable: a hedgehog! The vibrant layers of crepes, the creamy filling, and those charming marshmallow hedgehogs perched on top…it’s a showstopper that brings a smile to everyone’s face, young or old. Every slice is a joyful celebration.
Recipe Overview
- Prep Time: 1 hour
- Cook Time: 30 minutes
- Total Time: 1 hour 30 minutes
- Yields: 1 8-inch cake
- Serves: 12
- Dietary Type: Not specified
Ingredients
Vanilla Crepe Cake
- 6 large eggs
- 2 1/2 cups whole milk
- 1 tablespoon vanilla extract
- 6 tablespoons granulated sugar
- 1/4 teaspoon salt
- 2 cups all-purpose flour
- 6 tablespoons unsalted butter, melted
Cookies and Cream Filling
- 2 cups heavy whipping cream
- 1 tablespoon vanilla extract
- 4 tablespoons granulated sugar
- 12 Oreo cookies
Marshmallow Coating Powder
- 1/4 cup cornstarch
- 1/2 cup powdered sugar
Hedgehog Marshmallows
- 1 envelope unflavored gelatin
- 1/3 cup cold water
- 1 cup granulated sugar
- 1 tablespoon light corn syrup
- 1/4 cup cold water
- 1/8 teaspoon salt
- 1 teaspoon vanilla extract
- 1/4 cup candy sprinkles, blue
- 1/4 cup candy sprinkles, pink
- 1/4 cup dark chocolate, melted
Equipment Needed
- High-speed blender
- Medium-sized bowl
- Airtight container
- Baking tray
- Wax paper
- 2 piping bags
- Large round piping tip
- Small round piping tip
- Pastry brush
- Offset spatula
- Toothpicks
- Candy thermometer
- Stand mixer
- Medium sized saucepan
- Large nonstick skillet or crepe press
- Cake plate or stand
Instructions
-
Before starting, gather all your supplies: a candy thermometer, pink and blue icing gel, 2 piping bags, a large round piping tip, a small round piping tip, wax paper, a pastry brush, an offset spatula, toothpicks, and sprinkle mix (if using) to decorate the top of the cake.
-
In a high-speed blender, combine the eggs, milk, and vanilla extract, and blend until foamy. Add the sugar, flour, and salt, and blend just until combined (with no visible lumps).
-
Transfer the crepe batter to a medium-sized bowl, cover, and refrigerate for at least 2 hours or overnight. This allows the gluten to relax, resulting in more tender crepes.
-
While the crepe batter rests, make the marshmallows! Begin by combining the marshmallow coating powder ingredients (cornstarch and powdered sugar) in an airtight container. Set aside.
-
Line a baking tray with wax paper and sift the coating powder over the top. This prevents the marshmallows from sticking. Fit 2 piping bags with the round piping tips. Set aside.
-
In the bowl of a stand mixer, add 1/3 cup cold water, sprinkle the unflavored gelatin on top, and stir to combine. Allow the gelatin to bloom while heating the sugar mixture. Blooming the gelatin ensures it dissolves properly.
-
Add the sugar, corn syrup, 1/4 cup cold water, and salt to a medium-sized saucepan. Cook on medium heat, stirring until the sugar dissolves. Then, add the candy thermometer and raise the heat to high. Cook on high (without stirring) until the temperature reaches 240°F. It is crucial to cook the sugar to the right temperature for proper marshmallow consistency.
-
With the mixer on low speed, VERY carefully and slowly pour the hot sugar into the softened gelatin. Gradually increase the speed to high, and continue to whip until soft peaks form and hold their shape (about 8-10 minutes). The mixture will become thick and glossy.
-
Add the vanilla extract and mix again just until combined. Transfer the marshmallow to the prepared piping bags.
-
Use the bag fitted with the large round piping tip to first pipe an oval shape onto the wax paper, pulling and releasing into a point for the hedgehog’s nose. You can use water to smooth any lumps or peaks. Just dip a clean finger into a bowl with a little water and smooth the marshmallow. Try to work fairly quickly as the marshmallow starts to set fast (I like to make 3 hedgehogs at a time).
-
Once you have 3 bodies piped, you can sprinkle on any color of jimmies that you’d like, for the spines. Then, use the piping bag fitted with the small round tip to pipe an ear onto each side of the face. I like to use a little water to flatten and mold it a bit into the right shape. Allow the marshmallows to set for at least 7 hours or overnight before handling. Once set, you can use the coating powder to dust any sticky spots.
-
When the crepe batter is ready, divide it evenly into 3 bowls. Use toothpicks to color each as vividly or softly as you would like with the icing gels, combining the pink and blue gels to make purple. A little gel food coloring goes a long way, so start with a small amount and add more until you achieve your desired shade.
-
Heat a large nonstick skillet, or crepe press, over medium-low heat. Lightly brush with the melted butter, and scoop about 1/3 cup of the crepe batter onto the middle of the skillet or press.
-
Swirl the batter around the pan to evenly coat the bottom (or follow the crepe press instructions). Cook until the bottom of the crepe feels set – about 1-2 minutes. Then, use chopsticks or a spatula to very carefully lift and flip the crepe. Cook for 45 seconds to 1 minute more until set. You will want to add a little more butter between every crepe to keep them from sticking. If the crepes are spreading too thin or tearing, lower the heat and cook a little longer. Make about 6-7 crepes in each color, working with one color at a time.
-
Once all crepes are cooked, transfer them to the refrigerator to cool while working on the filling.
-
Place your mixing bowl and whisk attachment in the freezer for 15 minutes. Once they are fully chilled, add all the heavy cream, sugar, and vanilla to the mixing bowl, and mix on low, slowly working your way up to high speed (so it doesn’t splatter). Then, continue to beat for about 5 minutes until the filling is light and fluffy.
-
Crush the Oreos and fold them into the whipped cream (you can reserve some whipped cream without cookies for the top of the cake if you would like).
-
Time to build the cake! Start with the purple crepes and place one onto your cake plate or stand. Use an offset spatula to apply a thin layer of the cookies & cream whipped cream on top (leaving a thin border around the edge). Continue to add the crepes, using all of one color at a time, while adding the cream in between each layer, working from purple to pink. When you get to the top crepe, cover and refrigerate for at least an hour.
-
While the cake chills, you can finish up those cute hedgehogs. Melt 1/4 cup chocolate chips and use a toothpick to dot the nose and eyes onto each marshmallow.
-
When you are ready to serve the cake, add the rest of the whipped cream and decorate the top with the hedgehog marshmallows and sprinkles (party hat optional), enjoy!
Expert Tips & Tricks
- Crepe Consistency: If your crepe batter seems too thick, add a tablespoon of milk at a time until it reaches a pourable, thin consistency. A thinner batter will result in delicate crepes.
- Preventing Tears: Ensure the skillet is properly heated and lightly greased before adding the crepe batter. If the crepes are still tearing, reduce the heat slightly.
- Marshmallow Molding: Use damp fingers to gently shape the marshmallow hedgehogs before they set. This will help you create smoother features.
- Even Layers: For a visually appealing cake, aim for evenly sized crepes and consistent layers of filling.
Serving & Storage Suggestions
Serve the Hedgehog Crepe Cake chilled for the best flavor and texture. To store leftovers, tightly cover the cake and refrigerate for up to 3 days. The marshmallows may become slightly sticky over time, but the cake will still taste delicious. Freezing is not recommended, as the crepes and filling may become soggy upon thawing.
Nutritional Information
| Nutrient | Amount per Serving | % Daily Value |
|---|---|---|
| Calories | 545.2 kcal | N/A |
| Calories from Fat | 255 g | 47% |
| Total Fat | 28.4 g | 43% |
| Saturated Fat | 16.2 g | 80% |
| Cholesterol | 167.7 mg | 55% |
| Sodium | 207.1 mg | 8% |
| Total Carbohydrate | 64.9 g | 21% |
| Dietary Fiber | 1.4 g | 5% |
| Sugars | 40.3 g | N/A |
| Protein | 8.8 g | 17% |
Note: Percent Daily Values are based on a 2,000 calorie diet. Your daily values may be higher or lower depending on your calorie needs.
Variations & Substitutions
- Gluten-Free: Substitute the all-purpose flour with a gluten-free blend for those with dietary restrictions.
- Vegan: Use a plant-based milk alternative, vegan butter, and an egg replacer in the crepe batter. You’ll also need vegan whipped cream and Oreo alternatives, plus a vegan marshmallow recipe.
- Different Flavors: Experiment with different extracts in the crepe batter, such as almond or lemon. You can also add cocoa powder for chocolate crepes.
- Fruit Filling: Replace the cookies and cream filling with a fruit compote or pastry cream for a lighter option.
FAQs (Frequently Asked Questions)
Q: Can I make the crepes ahead of time?
A: Yes! Crepes can be made a day or two in advance and stored in the refrigerator. Stack them between sheets of parchment paper to prevent sticking.
Q: How do I prevent my crepes from tearing?
A: Ensure your pan is properly heated and greased, and don’t flip the crepe until the bottom is set.
Q: Can I use a different type of cookie in the filling?
A: Absolutely! Feel free to substitute Oreos with your favorite type of cookie, such as chocolate chip or peanut butter.
Q: My marshmallows are too sticky. What can I do?
A: Coat them generously with the marshmallow coating powder to absorb excess moisture.
Q: How long will the cake last in the refrigerator?
A: The cake is best enjoyed within 2-3 days of assembly.
Final Thoughts
This Hedgehog Crepe Cake is more than just a dessert; it’s a delightful project that combines baking and artistry. Don’t be intimidated by the multiple components—each step is manageable, and the final result is well worth the effort. I encourage you to give it a try, customize it with your favorite flavors and colors, and share your creations with loved ones. Pair it with a scoop of vanilla ice cream or a glass of sparkling wine for an extra touch of indulgence. Happy baking!