
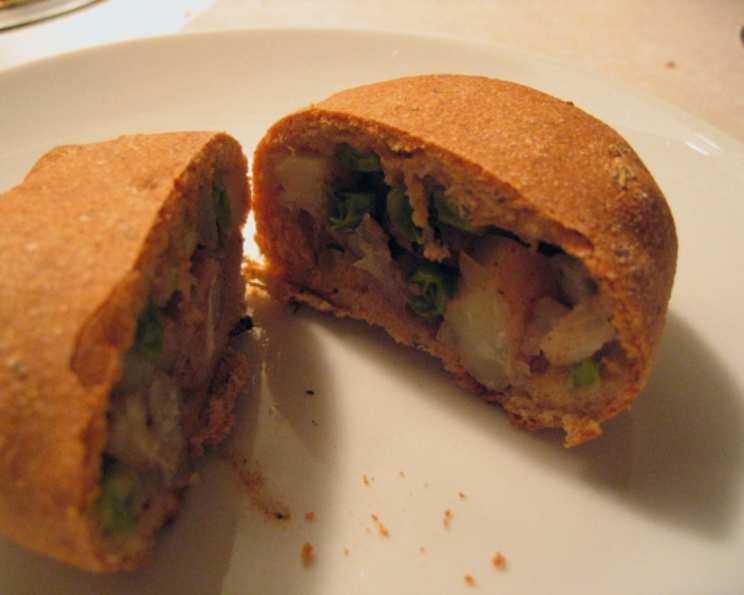
Herbed Potato Turnovers: A Rustic Delight
The aroma of baking bread always transports me back to my grandmother’s kitchen. She wasn’t a fancy cook, but her simple, hearty recipes were the heart of our family gatherings. One dish that stands out in my memory is her savory turnovers, often filled with whatever vegetables were abundant in her garden. These herbed potato turnovers are my tribute to her, a rustic and comforting dish that brings a touch of warmth to any table. While her version involved a lengthy process of kneading and proofing, I’ve adapted this recipe to be more accessible for the modern cook, without sacrificing any of the delicious homemade flavor.
Recipe Overview
- Prep Time: 45 minutes
- Cook Time: 30 minutes
- Total Time: 1 hour 15 minutes
- Servings: 8
- Yield: 8 turnovers
- Dietary Type: Vegetarian
Ingredients
For the Dough:
- 1 teaspoon dry yeast
- 2 1/4 cups bread flour
- 1 teaspoon dried thyme leaves
- 1 teaspoon dried rosemary
- 1/2 teaspoon salt
- 1/4 cup nonfat yogurt
- 3/4 cup water
For the Filling:
- 2 cups red potatoes, diced
- 1 (10 ounce) box frozen peas
- 1/2 onion, diced
- 1 1/2 tablespoons curry powder
- Salt and pepper to taste
- 2 cloves garlic, minced
Equipment Needed
- Bread machine (optional, but recommended)
- Floured board
- Rolling pin
- Baking sheet
- Nonstick baking spray or parchment paper
- Optional: Dough press
Instructions
- Begin by preparing the dough. If you have a bread machine, place all the dough ingredients—yeast, bread flour, thyme, rosemary, salt, yogurt, and water—into the machine’s pan. Select the dough setting and let the machine do its work. This usually takes about 1 hour and 30 minutes.
- Chef’s Tip: Ensure your yeast is fresh for the best rise. You can test it by dissolving a small amount in warm water with a pinch of sugar. If it foams within 5-10 minutes, it’s good to go.
- While the dough is being prepared (or if you are using pre-made dough), prepare the filling. Dice the red potatoes into small, even pieces. This will ensure they cook evenly within the turnovers.
- In a large bowl, combine the diced red potatoes, frozen peas, diced onion, curry powder, minced garlic, salt, and pepper. Mix well to ensure all the ingredients are evenly distributed.
- Chef’s Tip: Don’t thaw the peas beforehand. They will cook perfectly in the oven and help keep the filling moist.
- Once the dough cycle is complete, or if using store-bought dough, lightly flour a clean board and your hands. This will prevent the dough from sticking.
- Gently turn the dough out onto the floured surface. Divide the dough into 8 equal pieces.
- Using a rolling pin, flatten each piece of dough into a 6-inch circle, aiming for a thickness of about 1/4 to 1/8 inch.
- Chef’s Tip: Roll from the center outwards, rotating the dough regularly to maintain a circular shape and prevent sticking.
- Place several tablespoons of the potato and pea filling into the center of each dough circle. Be careful not to overfill, as this can make the turnovers difficult to seal.
- Carefully fold the dough over the filling to create a half-moon shape. Pinch the edges of the dough firmly together to seal the turnover. You can also use a fork to crimp the edges for a decorative touch and to ensure a tight seal.
- Chef’s Tip: If the dough is too dry and not sealing properly, lightly dampen the edges with a bit of water before pinching them together.
- If you have a dough press, you can use it to seal and shape the turnovers.
- Place the assembled turnovers, seam side down, on a nonstick baking sheet lined with parchment paper or sprayed with nonstick cooking spray.
- Lightly dust the tops of the turnovers with flour. This will give them a lovely golden-brown color when baked.
- Let the turnovers rise for 15 minutes in a warm place. This will help them become light and fluffy.
- Preheat your oven to 400°F (200°C).
- Bake the turnovers in the preheated oven for 30 minutes, or until they are golden brown.
- Chef’s Tip: Keep an eye on them during the last few minutes of baking to prevent them from burning. If they start to brown too quickly, you can tent them with foil.
- Remove the turnovers from the oven and let them cool slightly on the baking sheet before serving.
Expert Tips & Tricks
- For a richer flavor, sauté the diced onion and garlic in a little olive oil before adding them to the filling.
- If you don’t have nonfat yogurt, you can substitute it with plain yogurt or even a tablespoon of olive oil for moisture.
- To add some heat, include a pinch of red pepper flakes in the filling.
- Make-ahead Tip: Prepare the turnovers ahead of time and store them in the refrigerator until ready to bake. You may need to add a few minutes to the baking time.
- If your dough is too sticky to handle, add a tablespoon of flour at a time until it reaches a workable consistency.
- Brush the turnovers with a beaten egg or milk before baking for an extra golden and glossy finish.
Serving & Storage Suggestions
These herbed potato turnovers are delicious served warm as a main course or as a savory side dish. They pair well with a side salad or a simple soup. For a complete meal, consider serving them with a dollop of sour cream or a drizzle of your favorite sauce.
Leftover turnovers can be stored in an airtight container in the refrigerator for up to 3 days. To reheat, simply warm them in the oven or microwave until heated through. You can also freeze the baked turnovers for longer storage. Wrap them individually in plastic wrap and then place them in a freezer bag. They can be frozen for up to 2 months. To reheat from frozen, bake them in a preheated oven at 350°F (175°C) until heated through.
Nutritional Information
| Nutrient | Amount per Serving | % Daily Value |
|---|---|---|
| Calories | 250 kcal | 13% |
| Total Fat | 5g | 6% |
| Saturated Fat | 1g | 5% |
| Cholesterol | 2mg | 1% |
| Sodium | 300mg | 13% |
| Total Carbohydrate | 45g | 16% |
| Dietary Fiber | 5g | 18% |
| Sugars | 4g | – |
| Protein | 8g | 16% |
Note: Nutritional information is an estimate and may vary based on specific ingredients and portion sizes.
Variations & Substitutions
- Gluten-Free: Use a gluten-free all-purpose flour blend to make a gluten-free version of these turnovers. You may need to add a binder like xanthan gum to improve the texture.
- Vegan: Ensure your yogurt is plant-based. Also, brush the tops of the turnovers with plant-based milk before baking.
- Spicy: Add a pinch of cayenne pepper or some chopped jalapeños to the filling for a spicy kick.
- Cheese: Sprinkle some shredded cheddar cheese or Parmesan cheese over the filling before sealing the turnovers.
- Seasonal Vegetables: Feel free to substitute the frozen peas with other seasonal vegetables like diced carrots, green beans, or corn.
FAQs (Frequently Asked Questions)
Q: Can I use store-bought puff pastry instead of making the dough?
A: Yes, you can! Puff pastry will give the turnovers a flakier texture, but it’s a great shortcut if you’re short on time. Be sure to adjust the baking time accordingly.
Q: What can I do if my dough is too sticky to work with?
A: Add a tablespoon of flour at a time until the dough reaches a workable consistency. Be careful not to add too much flour, as this can make the dough tough.
Q: Can I freeze these turnovers after baking?
A: Yes, you can! Wrap them individually in plastic wrap and then place them in a freezer bag. They can be frozen for up to 2 months.
Q: What is the best way to reheat these turnovers?
A: You can reheat them in the oven or microwave. For best results, reheat them in a preheated oven at 350°F (175°C) until heated through.
Q: Can I make these turnovers ahead of time?
A: Yes! You can assemble the turnovers ahead of time and store them in the refrigerator until ready to bake. You may need to add a few minutes to the baking time.
Final Thoughts
These herbed potato turnovers are a delightful and comforting dish that’s perfect for any occasion. Whether you’re looking for a vegetarian main course, a savory snack, or a comforting addition to your next gathering, this recipe is sure to please. So, gather your ingredients, preheat your oven, and embark on a culinary adventure that’s as rewarding as it is delicious. Don’t hesitate to experiment with different fillings and herbs to create your own unique twist on this classic recipe. And be sure to share your creations and feedback – I’d love to hear how they turn out!