
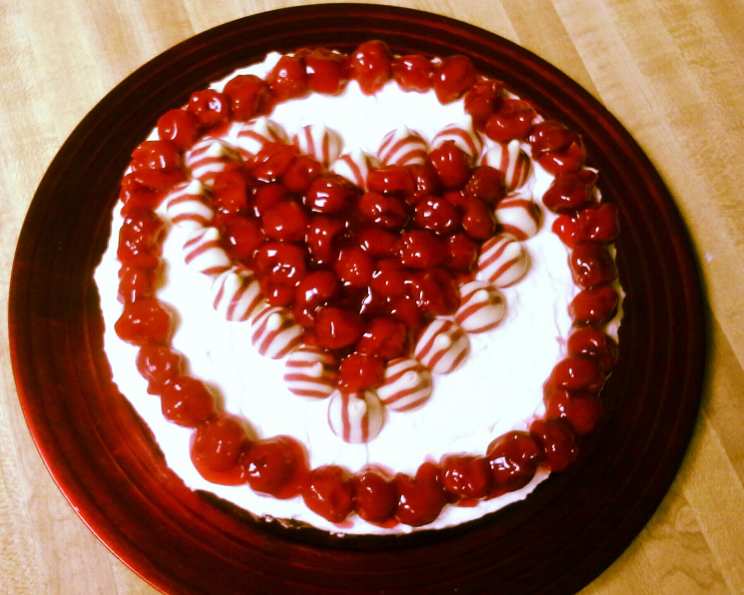
Hershey’s Cherry Cordial Creme “Cheesecake”
The first time I tasted this dessert, it was at a potluck family reunion. Aunt Carol, known for her experimental baking (sometimes with disastrous, but always hilarious, results), proudly presented this fudgy, cherry-topped creation. Skeptical at first glance, I took a bite, and all doubts vanished. The rich chocolate brownie base, the creamy, tangy filling, and the burst of cherry flavor combined in a symphony of textures and tastes. It was a surprisingly sophisticated treat, a far cry from Aunt Carol’s usual concoctions, and it immediately became a cherished family favorite. Little did I know it was hidden on the back of a Hershey’s Kisses bag!
Recipe Overview:
- Prep Time: 25 minutes
- Cook Time: 25 minutes
- Total Time: 1 hour 50 minutes (includes cooling and refrigeration)
- Servings: 8-10
- Yield: 1 cake
- Dietary Type: Not Gluten-Free
Ingredients:
- 1/2 cup butter or margarine, melted
- 1 1/4 cups granulated sugar
- 1 teaspoon vanilla extract
- 2 eggs
- 2/3 cup all-purpose flour
- 1/2 cup cocoa
- 1/4 teaspoon baking powder
- 1/4 teaspoon salt
- 1 (8 ounce) package cream cheese, softened
- 1 cup powdered sugar
- 1/2 cup whipping cream, chilled
- 1 (21 ounce) can cherry pie filling, drained
- 25 Hershey’s Cherry Cordial Kisses (regular Hershey’s Kisses may be substituted)
Equipment Needed:
- 9-inch round cake pan
- Aluminum foil
- Large bowl
- Medium bowl
- Electric mixer or whisk
- Spoon
- Wire rack
- Heart-shaped cookie cutter (optional)
Instructions:
-
Preheat your oven to 350°F (175°C).
-
Line a 9-inch round cake pan with foil, making sure the foil extends beyond the sides of the pan to create an easy lift-out method later. Thoroughly grease the foil with cooking spray or butter.
-
In a large bowl, stir together the melted butter (or margarine), granulated sugar, and vanilla extract.
-
Add the eggs to the mixture and beat well using a spoon until everything is well combined.
-
In a separate bowl, stir together the flour, cocoa, baking powder, and salt. This ensures the dry ingredients are evenly distributed, preventing lumps in the batter.
-
Gradually add the dry ingredients to the egg mixture, beating with a spoon until just well blended. Be careful not to overmix, as this can lead to a tough cake.
-
Spread the batter evenly into the prepared cake pan.
-
Bake for 25 minutes, or until the cake is set. Keep in mind that the cake is intended to be fudgy, so it will not test completely “done” with a toothpick. A slight jiggle in the center is okay.
-
Remove the pan from the oven and place it on a wire rack to cool completely in the pan. This step is crucial for the brownie base to set properly.
-
While the brownie base cools, prepare the cream cheese layer. In a medium bowl, beat the softened cream cheese and powdered sugar together until light and fluffy. Make sure the cream cheese is properly softened to avoid a lumpy filling.
-
In another bowl (or the same bowl, cleaned and dried), beat the chilled whipping cream until stiff peaks form. This will add a lovely lightness to the cream cheese layer.
-
Gently fold the whipped cream into the cream cheese mixture, blending well until smooth and homogenous.
-
Once the brownie layer is completely cool, spread the cream cheese mixture evenly over the brownie base.
-
Cover the cake and refrigerate it until serving time. This allows the cream cheese layer to set and the flavors to meld together. A minimum of 2 hours is recommended, but overnight is even better.
-
Just before serving, drain the cherry pie filling thoroughly.
-
If desired, use a heart-shaped cookie cutter to create a heart shape in the center of the dessert using the drained cherry pie filling. Otherwise, simply arrange the pie filling in a 5-inch wide heart shape in the center of the dessert.
-
Place the Hershey’s Cherry Cordial Kisses (or regular Hershey’s Kisses) around the edge of the cake.
-
Cut the cake into wedges and serve with any remaining cherry pie filling on the side.
-
Cover any leftover dessert and refrigerate.
Expert Tips & Tricks:
- Room Temperature Ingredients: Ensure your butter, cream cheese, and eggs are at room temperature for a smoother batter and filling.
- Don’t Overbake: Remember, the brownie base should be fudgy. Overbaking will result in a dry cake.
- Chill Time Matters: The refrigeration period is essential for the flavors to meld and the cream cheese layer to set properly. Don’t rush this step!
- Presentation is Key: For a more elegant presentation, dust the cream cheese layer with cocoa powder before adding the cherries and Kisses.
- Use Quality Cocoa: A good quality cocoa powder will enhance the chocolate flavor of the brownie base.
Serving & Storage Suggestions:
Serve this dessert chilled for the best flavor and texture. Garnish each slice with a dollop of whipped cream or a sprinkle of cocoa powder for an extra touch.
Store any leftovers in an airtight container in the refrigerator. It will keep well for up to 3 days. While freezing is not recommended due to the cream cheese layer, you can keep the brownie base frozen for 1-2 months, and make the cream cheese layer freshly when ready to assemble the cake. Reheating is not necessary; simply allow the dessert to sit at room temperature for a few minutes before serving.
Nutritional Information:
| Nutrient | Amount per Serving | % Daily Value |
|---|---|---|
| Calories | 668.6 kcal | N/A |
| Calories from Fat | 295 g | 44% |
| Total Fat | 32.8 g | 50% |
| Saturated Fat | 19.2 g | 96% |
| Cholesterol | 131.9 mg | 43% |
| Sodium | 325.4 mg | 13% |
| Total Carbohydrate | 88.2 g | 29% |
| Dietary Fiber | 2.2 g | 8% |
| Sugars | 54.3 g | 217% |
| Protein | 7.1 g | 14% |
Variations & Substitutions:
- Gluten-Free: Substitute the all-purpose flour with a gluten-free all-purpose flour blend.
- Dairy-Free: Use dairy-free cream cheese and whipped topping alternatives.
- Nut Allergy: Ensure all ingredients are manufactured in a nut-free facility, especially the Hershey’s Kisses.
- Seasonal Variation: Substitute the cherry pie filling with other fruit fillings like blueberry, raspberry, or apple pie filling.
FAQs (Frequently Asked Questions):
Q: Can I use regular Hershey’s Kisses instead of Cherry Cordial Kisses?
A: Yes, you can absolutely use regular Hershey’s Kisses. While the Cherry Cordial Kisses complement the cherry filling, the regular Kisses provide a classic chocolate flavor that works just as well.
Q: My brownie base came out too dry. What did I do wrong?
A: Overbaking is the most common cause of a dry brownie base. Make sure to bake for only 25 minutes, or until just set. Also, ensure your oven temperature is accurate.
Q: Can I make this cake ahead of time?
A: Absolutely! In fact, it’s recommended. The cake can be made up to 2 days in advance and stored in the refrigerator. Add the cherry pie filling and Hershey’s Kisses just before serving to prevent them from becoming soggy.
Q: How can I make the heart shape with the cherry pie filling look perfect?
A: The easiest way is to use a heart-shaped cookie cutter as a stencil. Place the cookie cutter in the center of the cake and carefully spoon the cherry pie filling inside.
Q: Can I freeze this dessert?
A: Freezing is not recommended for the entire assembled cake due to the texture of the cream cheese filling. However, you can freeze the brownie base separately.
Final Thoughts:
This Hershey’s Cherry Cordial Creme “Cheesecake” is a delightful twist on a classic dessert, perfect for any occasion. Don’t let the long ingredient list intimidate you – it’s surprisingly easy to make! This dessert is a guaranteed crowd-pleaser, with its rich chocolate base, creamy filling, and burst of cherry flavor. I encourage you to try this recipe and experience the magic for yourself. And be sure to share your creation and feedback—I’d love to hear your experiences! Pair it with a glass of chilled Moscato for the ultimate indulgence. Enjoy!