
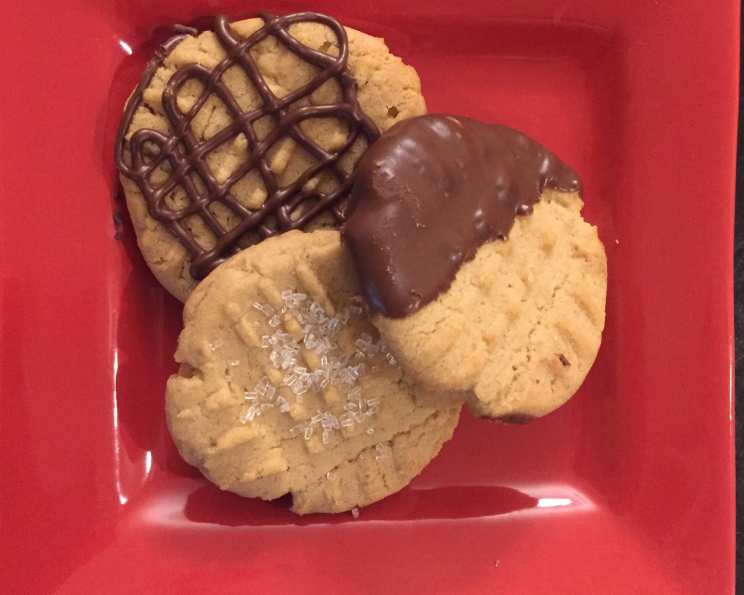
High Altitude Peanut Butter Dragonfly Cookies
I can still remember the slightly anxious, yet excited feeling, of pulling my first batch of cookies from the oven after moving to the mountains. The air was thin, the elevation was high, and my confidence in my baking skills was… well, a little shaky. Every recipe felt like an experiment, a delicate dance between ingredients and altitude. One of the first recipes I tackled was peanut butter cookies; a classic I couldn’t live without. After a few flat, dry, or crumbly attempts, I finally landed on this version. Now, the scent of peanut butter and vanilla wafting through my mountain kitchen always brings me back to those early, experimental baking days.
Recipe Overview
- Prep Time: 15 minutes
- Cook Time: 11-12 minutes
- Total Time: 26-27 minutes
- Servings: Varies
- Yield: 2-2.5 dozen cookies
- Dietary Type: Vegetarian
Ingredients
- 1/2 cup butter or 1/2 cup margarine, softened
- 1/2 cup granulated sugar (less 2 Tablespoons)
- 1/2 cup packed light brown sugar
- 1/2 cup creamy peanut butter
- 1 large egg
- 1 teaspoon vanilla
- 1 1/4 cups all-purpose flour
- 3/8 teaspoon baking powder
- 1/2 teaspoon baking soda
- 1/2 teaspoon salt
- 1 1/2 cups semi-sweet chocolate chips
- 1 1/2 teaspoons shortening
Equipment Needed
- Large Mixing Bowl
- Cookie Sheets
- Measuring Cups and Spoons
- Fork
- Wire Rack
- Double Boiler (or heatproof bowl and saucepan)
- Piping Bag or Small Baggie
Instructions
- Begin by preheating your oven to 375 degrees Fahrenheit (190 degrees Celsius). This is crucial for even baking, especially at high altitude where temperatures can fluctuate.
- In a large bowl, cream together the softened butter (or margarine), granulated sugar, and brown sugar. Use an electric mixer for best results, beating until the mixture is light and fluffy. This step incorporates air into the dough, which is vital for the cookies’ texture.
- Beat in the peanut butter, egg, and vanilla extract. Make sure the egg is fully incorporated for a smooth batter.
- In a separate bowl, whisk together the all-purpose flour, baking powder, baking soda, and salt. This ensures even distribution of the leavening agents and salt throughout the dough.
- Gradually add the dry ingredients to the wet ingredients, mixing until just combined. Be careful not to overmix, as this can lead to tough cookies. The dough should be well-mixed but not overworked.
- Roll heaping teaspoons of dough into 1 1/2-inch balls. If the dough is too soft to roll easily, refrigerate it for 30 minutes to firm it up. This makes handling the dough much easier.
- Place the dough balls 2 inches apart on ungreased cookie sheets. This spacing allows the cookies to spread evenly during baking without sticking together.
- Dip a fork into granulated sugar and press a crisscross indentation onto each ball, flattening it only slightly. The sugar helps to prevent the fork from sticking to the dough and adds a touch of sweetness to the top of the cookie.
- Bake for 11 to 12 minutes. The cookies should be lightly golden brown around the edges but still slightly soft in the center. Keep a close eye on them; high-altitude baking can be unpredictable, and they can burn quickly.
- Let the cookies stand on the cookie sheets for 2 minutes before transferring them to a wire rack to cool completely. This allows them to firm up slightly and prevents them from breaking when moved.
- Melt the semi-sweet chocolate chips with the shortening in the top of a double boiler over hot, not boiling, water. Alternatively, you can use a heatproof bowl set over a saucepan of simmering water. The shortening helps to thin the chocolate for easier drizzling.
- Place the melted chocolate in a baggie and snip off a tiny corner to create a small opening. This will act as your makeshift piping bag.
- Squeeze the baggie slowly to decorate the cookies with a dragonfly design or any design you prefer. Get creative!
- Let the chocolate set completely before serving or storing the cookies.
Expert Tips & Tricks
- High Altitude Adjustments: This recipe is already adjusted for high altitude (around 7,500 ft). If you live at a significantly lower altitude, you might need to reduce the baking powder slightly (by about 1/8 teaspoon) to prevent the cookies from becoming too puffy.
- Peanut Butter Consistency: Use a good quality, creamy peanut butter for the best results. Avoid peanut butter that is too oily or dry, as this can affect the texture of the cookies.
- Doneness Test: If you’re unsure if the cookies are done, gently press the edge of one with a spatula. If it feels firm and slightly golden, they’re ready. They will continue to firm up as they cool.
- Preventing Flat Cookies: To prevent the cookies from spreading too thin, make sure your butter isn’t too soft and your oven is at the correct temperature. Chilling the dough before baking can also help.
- Even Baking: Rotate the cookie sheets halfway through the baking time to ensure even browning.
Serving & Storage Suggestions
These peanut butter dragonfly cookies are delicious served with a glass of cold milk, a cup of hot coffee, or even a scoop of vanilla ice cream. They make a wonderful addition to any dessert platter or a thoughtful homemade gift.
Store the cooled cookies in an airtight container at room temperature for up to 5 days. For longer storage, freeze them for up to 2 months. To freeze, place the cookies in a single layer on a baking sheet and freeze until solid. Then, transfer them to a freezer-safe bag or container. Thaw them at room temperature before serving. The chocolate decoration might soften slightly upon thawing.
Nutritional Information
| Nutrient | Amount per Serving | % Daily Value* |
|---|---|---|
| Calories | 143 kcal | N/A |
| Calories from Fat | 73 kcal | N/A |
| Total Fat | 8.2 g | 12% |
| Saturated Fat | 4 g | 20% |
| Cholesterol | 14.3 mg | 4% |
| Sodium | 115.5 mg | 4% |
| Total Carbohydrate | 17.2 g | 5% |
| Dietary Fiber | 0.9 g | 3% |
| Sugars | 11.9 g | N/A |
| Protein | 2.2 g | 4% |
*Percent Daily Values are based on a 2,000 calorie diet.
Variations & Substitutions
- Gluten-Free: Substitute the all-purpose flour with a gluten-free all-purpose blend. You might need to add a teaspoon of xanthan gum for better binding.
- Dairy-Free: Use a dairy-free butter substitute or coconut oil in place of butter.
- Different Nut Butters: Experiment with other nut butters like almond butter, cashew butter, or even sunflower seed butter for a unique flavor twist.
- Chocolate Variations: Try using white chocolate chips, dark chocolate chips, or even peanut butter chips instead of semi-sweet chocolate.
- Add-Ins: Consider adding chopped peanuts, pretzels, or toffee bits to the dough for extra texture and flavor.
FAQs (Frequently Asked Questions)
Q: Why are my cookies flat?
A: Flat cookies can be caused by too much butter, not enough flour, or an oven that isn’t hot enough. Make sure your butter is properly creamed but not overly soft, and double-check your oven temperature.
Q: Can I make the dough ahead of time?
A: Yes, you can make the dough up to 24 hours in advance. Store it tightly wrapped in the refrigerator. Let it sit at room temperature for about 30 minutes before rolling and baking.
Q: How do I prevent the fork from sticking when making the crisscross pattern?
A: Dipping the fork in granulated sugar before each press will help prevent it from sticking to the dough.
Q: My cookies are too dry. What can I do?
A: Overbaking is a common cause of dry cookies. Try reducing the baking time by a minute or two. Adding a tablespoon of milk or oil to the dough can also help.
Q: Can I freeze the baked cookies?
A: Yes, baked cookies freeze well. Store them in an airtight container for up to 2 months. Thaw at room temperature before serving.
Final Thoughts
These high-altitude peanut butter dragonfly cookies are more than just a sweet treat; they are a testament to the joys of adapting and experimenting in the kitchen. Whether you’re baking at sea level or nestled in the mountains, I hope this recipe brings you the same warmth and satisfaction it has brought me over the years. Don’t be afraid to experiment with different designs or nut butters to make them your own. I encourage you to try this recipe and share your creations with loved ones. Happy baking!