
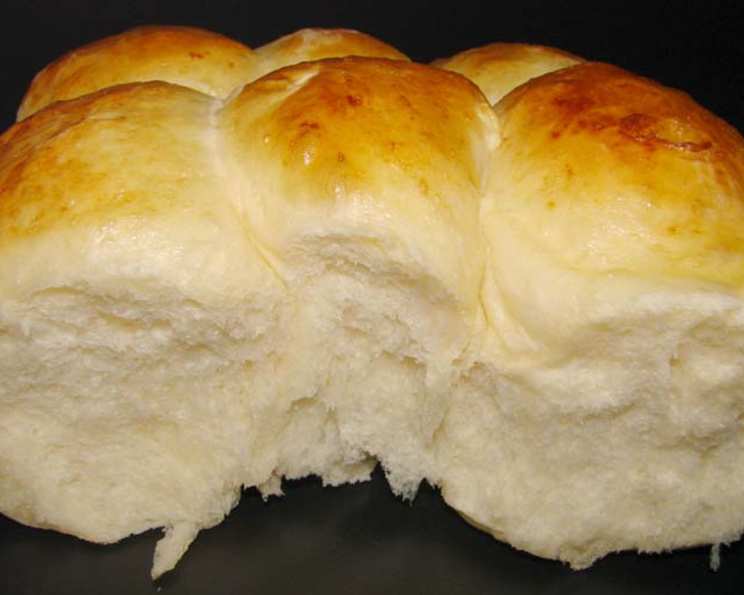
Holiday Dinner Rolls: Effortless Perfection from Your Bread Machine
The memory is etched in my mind like a perfect score on a pie crust: Thanksgiving at my grandmother’s. The aroma of roasting turkey and sage stuffing filled the air, but what I truly craved were her dinner rolls. Warm, soft, and impossibly buttery, they were the perfect vessel for sopping up every last drop of gravy. While her hands, gnarled with age, worked magic, I now rely on a trusty friend – my bread machine – to recreate that holiday nostalgia. And the secret is, they taste just as good.
Recipe Overview
- Prep Time: 15 minutes
- Cook Time: 12-14 minutes
- Total Time: Approximately 2 hours 15 minutes (including rising time)
- Servings: 24 rolls
- Yield: 24 rolls
- Dietary Type: Not specified (contains dairy and eggs)
Ingredients
- 1/2 cup water
- 1 tablespoon water (for egg wash)
- 1 teaspoon water (for egg wash)
- 3 large eggs
- 1/4 cup butter or margarine, cut up
- 1 teaspoon salt
- 3 1/2 cups bread flour (all-purpose flour can be substituted, but bread flour yields a slightly chewier texture)
- 3 tablespoons sugar
- 2 teaspoons yeast
- 1 large egg, lightly beaten (for egg wash)
- 1 tablespoon sugar (for egg wash)
Equipment Needed
- Bread machine
- Measuring cups and spoons
- Large bowl (optional, for rising if not using bread machine)
- Baking sheet
- Pastry brush or spoon
Instructions
-
Begin by adding the ingredients to your bread machine pan in the order recommended by the manufacturer. This order is crucial for optimal yeast activation. Generally, liquids go in first, followed by dry ingredients, with the yeast added last, usually nestled on top of the flour. So, add 1/2 cup water, the 3 large eggs, 1/4 cup of cut-up butter or margarine, 1 teaspoon salt, 3 1/2 cups bread flour, 3 tablespoons sugar, and finally, the 2 teaspoons of yeast.
-
Select the dough/manual cycle on your bread machine. This cycle will mix, knead, and perform the first rise of the dough.
-
Once the cycle is complete, carefully remove the dough from the bread machine to a lightly floured surface. This prevents sticking and makes the dough easier to handle.
-
If the dough seems too sticky, gently knead in just enough additional flour (a tablespoon at a time) to make it manageable and easy to shape. Avoid adding too much flour, as this can result in dry, dense rolls.
-
Now comes the fun part: shaping the rolls. There are many options here! You can roll the dough into a log and slice it into equal-sized portions, or pinch off pieces and shape them into round balls. Cloverleaf rolls are also a beautiful option: simply divide each portion into three smaller balls and place them in a muffin tin.
-
Place the shaped rolls onto a baking sheet lined with parchment paper or lightly greased.
-
Cover the baking sheet with a clean kitchen towel or plastic wrap (lightly oiled to prevent sticking) and let the rolls rise in a warm, draft-free place until they have almost doubled in size. This usually takes about 20-30 minutes. A slightly warm oven (turned off!) is a great place for this.
-
While the rolls are rising, preheat your oven to 375°F (190°C).
-
In a small bowl, combine the lightly beaten 1 large egg with 1 tablespoon sugar. This mixture creates a beautiful, glossy glaze for the rolls. Add 1 tablespoon and 1 teaspoon water for a smoother consistency.
-
Once the rolls have risen, gently brush the tops with the egg wash. Be careful not to deflate them!
-
Bake at 375°F (190°C) for 12-14 minutes, or until the rolls are golden brown on top. Keep a close eye on them to prevent burning.
-
Remove the rolls from the oven and let them cool slightly on the baking sheet before transferring them to a wire rack to cool completely (or, let’s be honest, just cool enough to handle!).
Expert Tips & Tricks
- For extra-soft rolls: Add a tablespoon of potato flakes to the dough mixture. Potato flakes help retain moisture and create an incredibly tender crumb.
- Enhance the flavor: Brush the baked rolls with melted butter immediately after removing them from the oven. This adds richness and shine. You can even infuse the melted butter with herbs like rosemary or thyme for a savory twist.
- Make-ahead magic: Prepare the dough through step 5, shape the rolls, and then refrigerate them (covered) overnight. Let them rise at room temperature for about an hour before baking.
- Perfect your proof: If your kitchen is cold, create a warm proofing environment by placing a bowl of hot water in the oven (turned off!) along with the rolls. The moisture and warmth will encourage rising.
- Golden-brown guarantee: If the rolls are browning too quickly, tent them with foil during the last few minutes of baking.
Serving & Storage Suggestions
These rolls are best served warm, either on their own or as an accompaniment to any meal. They are fantastic with soups, stews, salads, and, of course, holiday dinners! Store leftover rolls in an airtight container at room temperature for up to 2 days. For longer storage, freeze them for up to 2 months. To reheat, wrap the frozen rolls in foil and bake at 350°F (175°C) for about 10-15 minutes, or until heated through. You can also microwave them for a quicker option, but they may become slightly less soft.
Nutritional Information
| Nutrient | Amount per Serving | % Daily Value* |
|---|---|---|
| Calories | 104.4 kcal | N/A |
| Calories from Fat | N/A | N/A |
| Total Fat | 2.9 g | 4% |
| Saturated Fat | 1.5 g | 7% |
| Cholesterol | 36.1 mg | 12% |
| Sodium | 126.3 mg | 5% |
| Total Carbohydrate | 16.2 g | 5% |
| Dietary Fiber | 0.6 g | 2% |
| Sugars | 2.2 g | 8% |
| Protein | 3.1 g | 6% |
| *Percent Daily Values are based on a 2,000 calorie diet. Your daily values may be higher or lower depending on your calorie needs. N/A: Data Not Available. |
Variations & Substitutions
- Dairy-free: Substitute the butter with a vegan butter alternative like Miyoko’s Kitchen Cultured Vegan Butter.
- Sweet rolls: Add a teaspoon of cinnamon and 1/4 cup of raisins to the dough for a delicious sweet treat. Drizzle with a powdered sugar glaze after baking.
- Herbaceous delight: Mix chopped fresh herbs like rosemary, thyme, or chives into the dough for a savory, aromatic roll.
- Garlic Parmesan: Brush the rolls with garlic butter and sprinkle with grated Parmesan cheese before baking for a flavorful side dish.
- Gluten-free: While adapting bread recipes for gluten-free can be tricky, experiment with a gluten-free bread flour blend and add a binder like xanthan gum. The texture will be different, but you can still achieve delicious results!
FAQs (Frequently Asked Questions)
Q: Can I use active dry yeast instead of instant yeast?
A: Yes, but you’ll need to proof the active dry yeast in warm water with a teaspoon of sugar for about 5-10 minutes before adding it to the bread machine. Look for a foamy mixture to indicate that the yeast is active.
Q: My rolls are flat. What did I do wrong?
A: This could be due to several factors: the yeast may have been old or inactive, the dough may not have risen long enough, or the oven temperature might have been too low. Make sure your yeast is fresh, allow the dough to rise until almost doubled, and ensure your oven is properly preheated.
Q: Can I freeze the dough before baking?
A: Yes, you can freeze the shaped rolls before the second rise. Place them on a baking sheet lined with parchment paper and freeze until solid. Then, transfer them to a freezer bag. When ready to bake, let them thaw in the refrigerator overnight, then allow them to rise at room temperature for about an hour before baking.
Q: My bread machine doesn’t have a dough cycle. What should I do?
A: Check your bread machine manual for the closest setting to a dough cycle, often labeled ‘pizza dough’ or ‘manual’. If your machine lacks any dedicated cycle, you can combine the mixing/kneading instructions with a timer and stop it after the first kneading, then allow it to rise appropriately before proceeding with the recipe.
Q: Why are my rolls tough?
A: Over-kneading the dough or adding too much flour can result in tough rolls. Be careful not to overwork the dough, and add flour gradually until it reaches a smooth, elastic consistency.
Final Thoughts
There’s something truly special about the aroma of freshly baked bread filling your home, especially during the holidays. These bread machine dinner rolls are a simple yet impressive way to bring that warmth and comfort to your table. Don’t be afraid to experiment with different flavors and variations to create your own signature rolls. And most importantly, enjoy the process of creating something delicious to share with loved ones. Happy baking!