
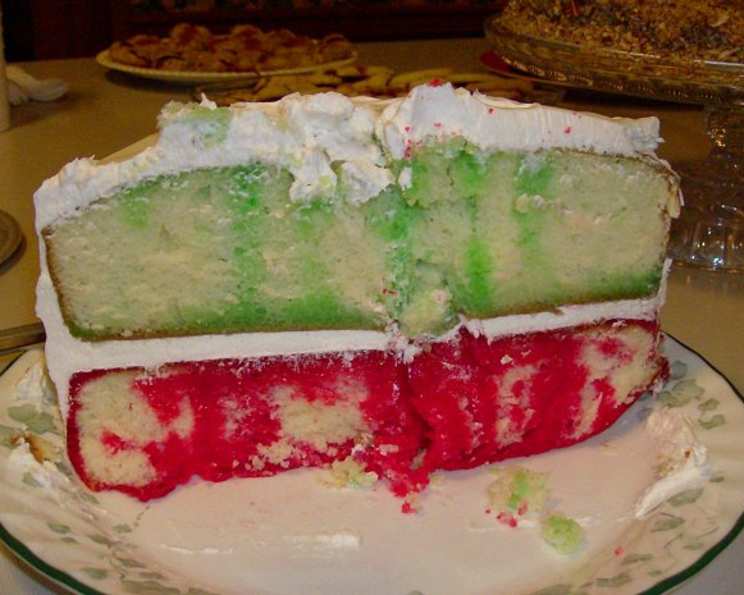
Holiday Poke Cake: A Retro Delight with a Festive Twist
There’s something undeniably comforting about poke cake. For me, it’s more than just dessert; it’s a vibrant echo of childhood holiday gatherings. I remember my Aunt Carol, always impeccably dressed, carefully carrying a wobbly, colorful creation into the dining room. It was a spectacle – bright red and green hues shimmering beneath a cloud of whipped cream. The best part was always the first bite, that burst of fruity, jiggly gelatin soaking into the tender cake. This Holiday Poke Cake brings back those joyful memories every single time.
Recipe Overview
- Prep Time: 15 minutes
- Cook Time: 0 minutes (plus cake baking time)
- Total Time: 3 hours 15 minutes (including chilling time)
- Servings: 12
- Yield: 1 poke cake
- Dietary Type: Not Gluten-Free
Ingredients
- 2 9-inch cake layers, cooled
- 2 cups boiling water
- 1 package red gelatin (such as strawberry or cherry)
- 1 package lime gelatin
- 12 ounces Cool Whip, thawed
Equipment Needed
- Two 9-inch round cake pans
- Large fork
- Two medium bowls
- Serving plate
Instructions
- Begin by placing the cooled cake layers, top side up, in two 9-inch round cake pans. These pans will help contain the gelatin as it soaks into the cake.
- Now, using a large fork, pierce each cake layer at approximately 1/2-inch intervals. This is crucial, as these pokes are what allow the gelatin to seep into the cake, creating that signature poke cake texture. Be generous with the poking!
- In two separate medium bowls, prepare the gelatin. Pour 1 cup of the boiling water into each bowl. Add the red gelatin to one bowl and the lime gelatin to the other. Stir vigorously for 2 minutes, or until the gelatin is completely dissolved. Ensure there are no lingering granules, as these will affect the final texture.
- Carefully pour the dissolved red gelatin over one cake layer and the lime gelatin over the other cake layer. Try to distribute the gelatin evenly to ensure consistent flavor and color throughout the cake.
- Cover the cake pans and refrigerate for at least 3 hours. This chilling time is essential for the gelatin to set properly and infuse the cake. Don’t rush this step!
- Once chilled, dip one cake pan briefly in warm water for about 10 seconds. This will help loosen the cake from the pan for easy unmolding.
- Invert the pan onto a serving plate to unmold the first cake layer.
- Spread approximately 1 cup of the thawed Cool Whip evenly over the unmolded cake layer. This layer of Cool Whip acts as a “glue” and adds a layer of creamy goodness.
- Repeat the warm water dip process with the second cake pan. Unmold the second cake layer and carefully place it on top of the first cake layer, Cool Whip side up.
- Finally, frost the entire cake with the remaining Cool Whip, ensuring it’s evenly distributed for a beautiful presentation.
- Refrigerate the assembled cake until ready to serve. This allows the flavors to meld and the Cool Whip to set properly.
Expert Tips & Tricks
- Even Gelatin Distribution: To guarantee the gelatin soaks into the cake evenly, consider using a squeeze bottle or a turkey baster to distribute the liquid into the pokes.
- Cake Pan Liner: Lining the cake pans with parchment paper before baking the cake layers can prevent sticking and make removal easier.
- Gelatin Strength: If you live in a hot climate or want an extra firm set, you can add an extra envelope of unflavored gelatin to each flavored gelatin mixture. Bloom the unflavored gelatin in cold water for a few minutes before adding the boiling water.
- Flavor Enhancement: Consider adding a teaspoon of vanilla extract to the Cool Whip for a richer flavor. You could also fold in some finely grated citrus zest.
- Preventing a Soggy Cake: Ensure your cake layers are completely cooled before adding the gelatin. Warm cake will absorb too much liquid and become soggy.
Serving & Storage Suggestions
This Holiday Poke Cake is best served chilled. Cut into slices and enjoy! For a festive touch, garnish with fresh berries or sprinkles before serving.
To store leftovers, cover the cake tightly with plastic wrap or place it in an airtight container and refrigerate. It will keep for up to 3 days. The Cool Whip may soften slightly over time, but the flavor will remain delicious. Freezing is not recommended, as the texture of the Cool Whip will change.
Nutritional Information
Please note that the following nutritional information is an estimate and may vary based on specific ingredient brands and measurements.
| Nutrient | Amount per Serving | % Daily Value |
|---|---|---|
| Calories | 117 kcal | 6% |
| Total Fat | 7.2g | 11% |
| Saturated Fat | 6.2g | 31% |
| Cholesterol | 0mg | 0% |
| Sodium | 40.9mg | 2% |
| Total Carbohydrate | 12.9g | 5% |
| Dietary Fiber | 0g | 0% |
| Sugars | 12.6g | N/A |
| Protein | 0.9g | 2% |
Variations & Substitutions
- Cake Flavor: Feel free to experiment with different cake flavors. A classic vanilla cake, a chocolate cake, or even a lemon cake would all work beautifully.
- Gelatin Flavors: Get creative with the gelatin flavors! Consider using blue raspberry and pineapple for a tropical twist, or orange and grape for a Halloween-themed cake.
- Dairy-Free Version: Use a dairy-free whipped topping alternative instead of Cool Whip. There are several good options available in most supermarkets. Ensure the cake layers themselves are also dairy-free.
- Gluten-Free Version: Use a gluten-free cake mix or recipe to create the cake layers. Ensure the gelatin is also gluten-free (most are, but always check the label).
- Add Fresh Fruit: Before frosting with Cool Whip, consider adding a layer of sliced strawberries, blueberries, or kiwi for added flavor and texture.
FAQs (Frequently Asked Questions)
Q: Can I make this cake ahead of time?
A: Yes, you can assemble the cake a day in advance and refrigerate it. This allows the flavors to meld even further. Just keep in mind that the Cool Whip may soften slightly over time.
Q: What if I don’t have 9-inch round cake pans?
A: You can use a 9×13 inch baking pan instead. Bake the cake as one layer and adjust the gelatin amounts accordingly. You may need to increase the gelatin slightly to ensure it adequately soaks into the larger cake.
Q: Can I use sugar-free gelatin?
A: Yes, you can substitute sugar-free gelatin to reduce the sugar content of the cake. The taste and texture will be slightly different, but it will still be delicious.
Q: How can I prevent the Cool Whip from sliding off the cake?
A: Make sure the cake layers are completely cooled before adding the Cool Whip. You can also chill the cake layers for a short time before frosting to help the Cool Whip adhere better.
Q: My gelatin didn’t set properly. What went wrong?
A: Ensure you used boiling water to dissolve the gelatin and that you stirred it thoroughly until completely dissolved. Also, make sure you chilled the cake for at least 3 hours. If the gelatin still doesn’t set, you may need to add an extra envelope of unflavored gelatin next time.
Final Thoughts
This Holiday Poke Cake is a delightful treat that’s sure to bring joy to any gathering. Its vibrant colors, playful texture, and delicious flavor make it a crowd-pleaser for all ages. Don’t be afraid to experiment with different flavors and variations to create your own signature version. So gather your ingredients, bake with love, and create some sweet memories with this retro dessert. Happy baking!