
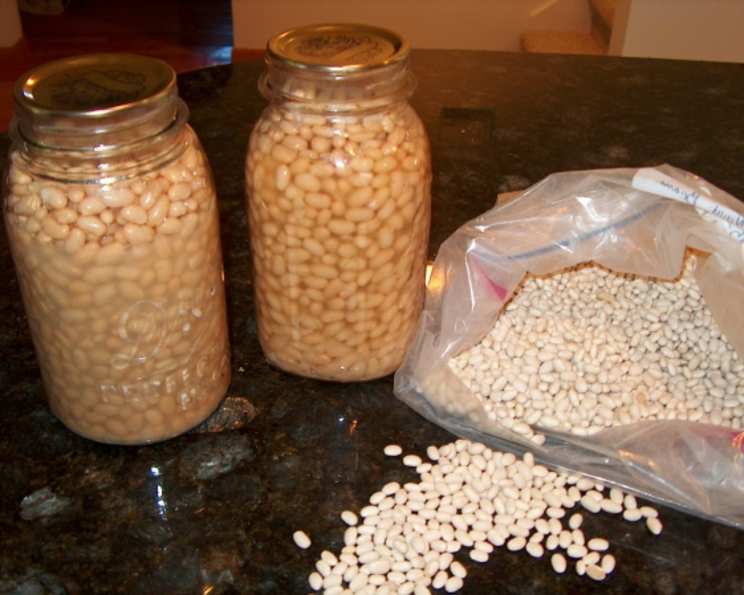
Canning Dry Beans: A Taste of Self-Sufficiency
I remember the first time I helped my grandmother can beans. I was probably eight years old, perched on a stool in her sweltering kitchen, mesmerized by the bubbling water bath and the rhythmic clink of the jars. The scent of earthy beans filled the air, a promise of hearty meals to come during the long winter months. It wasn’t just about preserving food; it was about preserving a tradition, a connection to the land, and a sense of self-reliance that I still cherish today. Today, I share with you my trusted method for canning dry beans, a method passed down through generations.
Recipe Overview
- Prep Time: 12-18 hours (soaking) + 45 minutes
- Cook Time: 75-90 minutes (processing)
- Total Time: 13-19 hours
- Yield: Varies, approx. 7 quarts from 5 lbs beans
- Dietary Type: Vegan, Gluten-Free, Dairy-Free
Ingredients
- 5 lbs dried beans (or dried peas)
- ½ teaspoon salt per pint jar (optional)
Equipment Needed
- Large pot for soaking and boiling
- Pressure canner
- Canning jars (pint or quart)
- Canning lids and rings
- Jar lifter
- Ladle
- Clean kitchen towels
Instructions
- Select and Sort: Begin with mature, dry beans or peas. Carefully sort through them, discarding any discolored, damaged, or shriveled seeds, as well as any debris like small stones or twigs. Quality ingredients are the foundation of any good recipe, especially when it comes to canning.
- Soak the Beans: Place the sorted beans or peas in a large pot. Cover them generously with cool water. The water level should be well above the beans, as they will expand significantly during soaking. Soak for 12 to 18 hours in a cool place, such as the refrigerator or a cool pantry. This step is crucial for rehydrating the beans and ensuring even cooking during the canning process.
- Drain and Rinse: After soaking, drain the water from the beans and rinse them thoroughly under cold running water. This helps to remove any lingering impurities and ensures a clean flavor.
- Boil the Beans: Return the drained beans to the large pot. Cover them with fresh water, ensuring the water level is several inches above the beans. Bring the water to a rolling boil and boil for 30 minutes. This pre-cooking step helps to soften the beans and further reduces the risk of spoilage during canning.
- Prepare the Jars: While the beans are boiling, prepare your canning jars. Ensure they are clean and free from any cracks or chips. You can sterilize the jars by boiling them in water for 10 minutes, or by running them through a sterilization cycle in your dishwasher. Keep the jars hot until ready to fill.
- Add Salt (Optional): If desired, add ½ teaspoon of salt to each pint jar (or 1 teaspoon to each quart jar). The salt enhances the flavor of the beans but is not necessary for preservation.
- Fill the Jars: Using a ladle, carefully fill the hot jars with the soaked and boiled beans and the cooking water. Leave a 1-inch headspace at the top of each jar. Headspace is the space between the top of the food and the lid, essential for creating a proper vacuum seal during processing.
- Remove Air Bubbles: Gently tap the jars on a towel-lined surface to release any trapped air bubbles. You can also use a non-metallic spatula or bubble remover to run along the inside of the jar to dislodge any stubborn bubbles. Removing air bubbles is vital for preventing spoilage.
- Wipe the Rims: Use a clean, damp kitchen towel to wipe the rims of the jars. This ensures a clean surface for the lids to seal properly.
- Apply Lids and Rings: Place the canning lids on the jars, ensuring the sealing compound is in contact with the jar rim. Screw on the canning rings fingertip-tight. Do not overtighten the rings, as this can prevent the lids from venting properly during processing.
- Load the Canner: Carefully load the filled jars into your pressure canner, following the manufacturer’s instructions. Make sure the jars are not touching each other or the sides of the canner, as this can cause them to break during processing.
- Process the Jars: Add the amount of water specified by your pressure canner’s instructions. Lock the lid of the canner securely. Turn the heat to high and allow the canner to vent steam for 10 minutes. Then, close the vent and allow the pressure to build to the required level (10 lbs for a dial-gauge canner).
- Process Times:
- Pints: Process for 75 minutes at 10 lbs pressure.
- Quarts: Process for 90 minutes at 10 lbs pressure.
Maintain the correct pressure throughout the entire processing time. Adjust processing time for altitude based on your canner’s instructions.
- Cool the Canner: Once the processing time is complete, turn off the heat and allow the canner to cool naturally until the pressure returns to zero. Do not attempt to speed up the cooling process, as this can cause the jars to break or the seals to fail.
- Remove the Jars: Once the canner is completely depressurized, carefully remove the lid and use a jar lifter to remove the jars from the canner. Place the jars on a towel-lined surface, leaving space between them for air circulation.
- Check the Seals: Allow the jars to cool completely for 12-24 hours. After cooling, check the seals by pressing down on the center of each lid. If the lid flexes or pops, it is not properly sealed and should be reprocessed with a new lid or refrigerated and used within a week.
- Store the Jars: Remove the canning rings (this prevents moisture from accumulating and rusting the lids), and store the sealed jars in a cool, dark, and dry place. Properly canned beans can be stored for up to a year or more.
Expert Tips & Tricks
- Bean Variety: Experiment with different types of beans or peas to find your favorites. Pinto beans, kidney beans, black beans, and great northern beans all can well.
- Soaking Time: While the recipe specifies 12-18 hours, you can also use a quick-soak method. Bring the beans and water to a boil for 2 minutes, then remove from heat and let them soak for 1 hour before proceeding with the recipe.
- Water Quality: Use filtered water for soaking and canning to avoid any mineral deposits or impurities that could affect the flavor or clarity of the beans.
- Canning Safety: Always follow the instructions for your specific pressure canner carefully. Improper canning techniques can lead to spoilage and potentially dangerous botulism.
Serving & Storage Suggestions
Home-canned beans are incredibly versatile. They can be used in soups, stews, chili, salads, or even mashed and spread on toast. They also make a fantastic base for homemade baked beans.
Once opened, store leftover canned beans in an airtight container in the refrigerator for up to 3-4 days. They can also be frozen for longer storage, although the texture may change slightly.
Nutritional Information
(Estimated per 1/2 cup serving – varies with bean type)
| Nutrient | Amount per Serving | % Daily Value |
|---|---|---|
| Calories | 110 kcal | 6% |
| Total Fat | 0.5g | 1% |
| Saturated Fat | 0g | 0% |
| Cholesterol | 0mg | 0% |
| Sodium | 10mg | 0% |
| Total Carbohydrate | 20g | 7% |
| Dietary Fiber | 7g | 25% |
| Sugars | 0g | |
| Protein | 7g | 14% |
Variations & Substitutions
- Spice It Up: Add a bay leaf, dried chili peppers, or smoked paprika to the jars for a smoky or spicy flavor.
- Herb Infusion: Include fresh herbs like rosemary, thyme, or oregano in the jars for an aromatic twist.
- Vegetarian Chili Starter: Add diced tomatoes, onions, and bell peppers to the jars along with the beans for a ready-to-go chili base.
- No Salt: Omit the salt entirely for a low-sodium option.
FAQs (Frequently Asked Questions)
Q: Why is it important to soak the beans before canning?
A: Soaking helps to rehydrate the beans, ensuring they cook evenly during the canning process. It also reduces the risk of spoilage and improves the overall texture.
Q: Can I use the water I soaked the beans in for canning?
A: No, it is not recommended to use the soaking water. Always drain and rinse the beans before boiling them in fresh water for canning.
Q: Is it safe to can beans without a pressure canner?
A: No, beans must be processed in a pressure canner to ensure they reach a safe temperature for killing botulism spores. Water bath canning is not suitable for low-acid foods like beans.
Q: How do I know if my canned beans have spoiled?
A: Look for signs of spoilage such as bulging lids, cloudy liquid, or an off-putting odor when you open the jar. If you suspect spoilage, discard the beans immediately.
Q: What happens if I don’t leave enough headspace in the jars?
A: Insufficient headspace can prevent the jars from sealing properly, leading to spoilage. It can also cause the contents to expand during processing, potentially breaking the jars.
Final Thoughts
Canning your own dry beans is a rewarding experience that connects you to a time-honored tradition of self-sufficiency. Not only will you have a pantry stocked with delicious and nutritious staples, but you’ll also have the satisfaction of knowing you created them yourself. So, gather your ingredients, dust off your pressure canner, and embark on this culinary adventure. Don’t hesitate to share your successes or any modifications you tried! Maybe you’ll discover a new family favorite along the way. These canned beans go wonderfully with my cornbread recipe!