
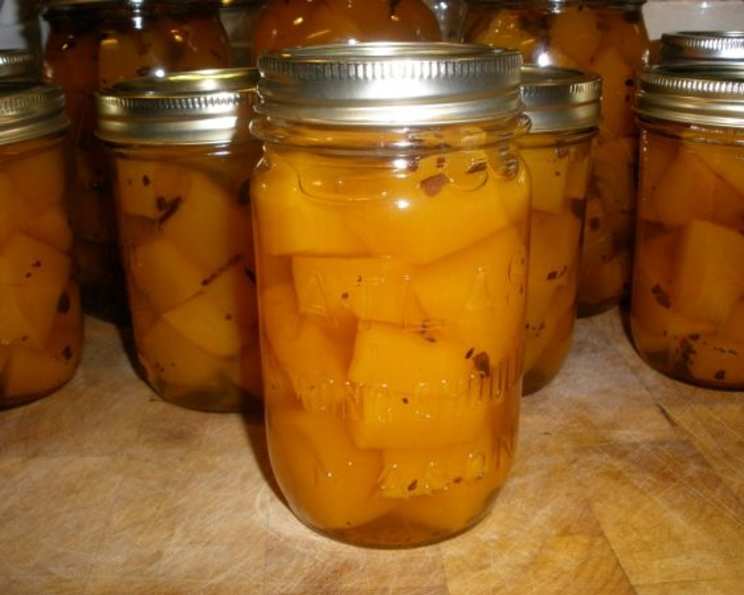
The Timeless Tradition: Canning Your Own Pumpkin
The scent of cinnamon, nutmeg, and cloves always evokes a particular memory for me: helping my grandmother in her sun-drenched kitchen, the air thick with steam, as she canned pumpkin every autumn. Jars lined the counters, glowing orange like captured sunlight, promising warmth and comfort during the cold winter months. It wasn’t just about preserving food; it was about preserving a piece of ourselves, a connection to the harvest, and a love passed down through generations. It’s a tradition I cherish, and I’m excited to share the magic of home-canned pumpkin with you.
Recipe Overview
- Prep Time: 30 minutes
- Cook Time: 2 hours
- Total Time: 2 hours 30 minutes
- Servings: Varies (Yield depends on the size and number of pumpkins)
- Yield: Varies (Determined by jar size and quantity)
- Dietary Type: Vegan, Gluten-Free, Dairy-Free
Ingredients
- 1 Pumpkin (Sugar pumpkin or other canning variety)
- 1 tablespoon Canning Salt (Optional)
Equipment Needed
- Large knife
- Spoon or ice cream scoop
- Vegetable peeler or paring knife
- Cutting board
- Large pot
- Clean canning jars (pint or quart size)
- New canning lids and rings
- Jar lifter
- Pressure canner
Instructions
-
Prepare the Pumpkin: Begin by thoroughly washing the pumpkin under cold, running water. This is crucial for removing any dirt or debris that could contaminate the canning process.
-
Open and Clean: Carefully cut the pumpkin open. A large, sturdy knife is essential for this step. Once open, use a spoon or ice cream scoop to remove the guts (seeds and stringy pulp). Save the seeds for roasting later – they make a delicious and healthy snack!
-
Remove the Skin: There are a few ways to remove the skin. You can use a vegetable peeler or paring knife to carefully peel the skin from the pumpkin. Alternatively, you can roast the pumpkin halves cut-side down in a preheated oven at 350°F (175°C) until the flesh is soft, about 45-60 minutes, and then scoop out the cooked flesh. The boiling method below is standard for canning.
-
Chop the Pumpkin: Once the skin is removed, chop the pumpkin flesh into cubes approximately 1-inch in size. This size ensures even cooking.
-
Boil the Pumpkin: Place the cubed pumpkin in a large pot and cover with water. Bring to a boil and boil for 2 minutes. This brief boiling helps to soften the pumpkin slightly and releases some of its natural sugars.
-
Pack the Jars: While the pumpkin is boiling, prepare your canning jars. Make sure they are clean and sterilized. Keep the pumpkin hot and carefully pack the hot pumpkin cubes into the clean canning jars, leaving 1-inch of headspace (the space between the top of the pumpkin and the lid). Use a clean utensil to gently press down on the pumpkin to eliminate air pockets.
-
Fill with Liquid: Fill the jars with the liquid from the pot in which the pumpkin was boiled, again maintaining 1-inch headspace. The liquid helps with heat distribution during processing.
-
Add Salt (Optional): If desired, add 1 tablespoon of canning salt per jar. Canning salt helps to preserve the color and flavor of the pumpkin, but it’s not strictly necessary.
-
Remove Air Bubbles: Use a non-metallic utensil, like a chopstick or plastic spatula, to run along the inside of the jar to release any trapped air bubbles. Adjust the headspace if necessary.
-
Wipe the Rims: Use a clean, damp cloth to wipe the rims of the jars. This ensures a proper seal.
-
Place Lids and Rings: Place new canning lids on the jars and screw on the rings finger-tight. Do not overtighten, as this can prevent proper sealing.
-
Process in Pressure Canner: Place the jars in a pressure canner following the manufacturer’s instructions. Ensure there is enough water in the canner. Process the jars at the recommended pressure for your altitude. For pint jars, process for 55 minutes, and for quart jars, process for 1 hour 30 minutes. It’s crucial to consult a canning guide that is specific to your altitude to ensure safe processing times and pressure. Altitude affects the boiling point of water, which in turn affects processing times.
-
Cool and Check Seals: Once the processing time is complete, turn off the heat and allow the pressure to release naturally. Do not force the release. Once the pressure is completely released, carefully remove the jars from the canner using a jar lifter. Place the jars on a towel-lined surface to cool for 12-24 hours. As the jars cool, you should hear a “pop” sound, indicating that the lids have sealed properly. After 24 hours, check the seals by pressing down on the center of each lid. If the lid doesn’t flex, it’s sealed. If the lid flexes, it’s not sealed, and the jar should be reprocessed with a new lid or stored in the refrigerator and used within a few days.
Expert Tips & Tricks
- Choose the Right Pumpkin: Not all pumpkins are created equal! Select sugar pumpkins or other varieties specifically bred for canning, such as Long Island Cheese pumpkins. These have denser flesh and a sweeter flavor.
- Don’t Overfill: Leaving the correct amount of headspace (1 inch) is essential for proper sealing. Overfilling can prevent the lids from sealing properly, leading to spoilage.
- Proper Headspace: After filling the jars, use a headspace tool (or a clean ruler) to ensure you have exactly 1 inch of space between the food and the top of the jar. Adjust as needed by adding or removing liquid.
- Jar Preparation is Key: Sterilize your jars by boiling them for 10 minutes before filling. This helps eliminate bacteria and ensures a safe canning process.
- Consistent Heat: Maintain a consistent pressure throughout the processing time. Fluctuations in pressure can affect the quality and safety of the canned pumpkin.
- Safety First: Always follow recommended canning guidelines and consult your local extension office for up-to-date information on safe canning practices.
Serving & Storage Suggestions
Home-canned pumpkin is incredibly versatile. Use it as a base for pumpkin pie, pumpkin bread, pumpkin soup, or even pumpkin smoothies.
- Storage: Store properly sealed jars in a cool, dark, and dry place. Canned pumpkin can last for up to a year or even longer if stored correctly.
- Unsealed Jars: If a jar doesn’t seal, store it in the refrigerator and use it within a week, or freeze the pumpkin in a freezer-safe container.
- Reheating: Reheat canned pumpkin gently on the stovetop or in the microwave.
Nutritional Information
Note: Nutritional information can vary based on the specific pumpkin variety and added salt.
| Nutrient | Amount per Serving (1 cup) | % Daily Value |
|---|---|---|
| Calories | 50 kcal | 3% |
| Total Fat | 0.2g | 0% |
| Saturated Fat | 0g | 0% |
| Cholesterol | 0mg | 0% |
| Sodium | 10mg | 0% |
| Total Carbohydrate | 12g | 4% |
| Dietary Fiber | 3g | 12% |
| Sugars | 5g | |
| Protein | 2g | 4% |
| Vitamin A | 245% | |
| Vitamin C | 19% | |
| Potassium | 564mg | 12% |
Variations & Substitutions
- Spiced Pumpkin: Add a pinch of cinnamon, nutmeg, or ginger to the pumpkin while boiling for a warm, spiced flavor.
- Sweetened Pumpkin: Add a small amount of brown sugar or maple syrup to the pumpkin before canning for a sweeter taste. (Note: this may affect processing times; consult a canning guide).
- Different Squashes: While this recipe is specifically for pumpkin, you can also use other winter squashes like butternut squash or acorn squash. The processing times will remain the same.
FAQs (Frequently Asked Questions)
Q: Why do I need to use a pressure canner for pumpkin?
A: Pumpkin is a low-acid food, which means it requires a pressure canner to reach the high temperatures necessary to kill harmful bacteria like botulism spores. Boiling water canning is not safe for low-acid foods.
Q: Can I use pumpkin puree instead of pumpkin cubes?
A: No, it is not recommended to can pumpkin puree at home. Pureed pumpkin is too dense for heat to penetrate evenly during processing, which can lead to unsafe canned goods. Cubed pumpkin is the recommended method.
Q: How do I know if my jars are sealed properly?
A: After processing and cooling, the lid should be concave (curved inwards) and should not flex when you press down on the center. If the lid pops up and down, it is not sealed.
Q: What if I don’t have canning salt?
A: Canning salt is optional. Regular table salt can be used, but it may contain additives that can cloud the liquid in the jars.
Q: Can I add spices or sugar before canning?
A: Adding spices is generally safe. But adding sugar or sweeteners can alter the density of the pumpkin and potentially affect heat penetration during processing. It’s best to add sweeteners when you use the canned pumpkin in your recipes.
Final Thoughts
There’s something deeply satisfying about creating something from scratch, especially when it involves preserving the bounty of the harvest. Home-canned pumpkin is not just a pantry staple; it’s a connection to the past, a taste of autumn, and a promise of delicious meals to come. So, gather your pumpkins, gather your courage, and embark on this rewarding journey. Don’t hesitate to share your experiences and variations. Happy canning!