
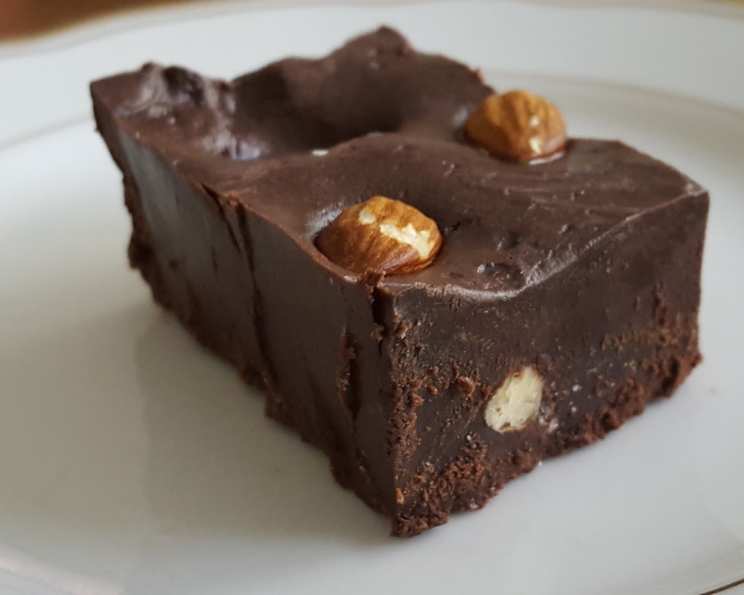
Home Made Soft Chocolate (Retro Romanian Recipe)
The scent of powdered milk and cocoa always takes me back to my childhood summers spent at my grandmother’s house in Romania. We’d spend hours concocting this “chocolate” – a simple mixture born out of necessity, during times when real chocolate was a rare luxury. The slightly grainy, melt-in-your-mouth texture wasn’t quite like the fancy Swiss chocolate bars I saw in magazines, but it was infinitely more precious because it was made with love and shared laughter. Every bite is a sweet reminder of resourcefulness and the joy of simple pleasures.
Recipe Overview
- Prep Time: 15 minutes
- Cook Time: 10 minutes
- Total Time: 8 hours 25 minutes (includes chilling time)
- Servings: 8
- Yield: Approximately 1.5 kg of chocolate
- Dietary Type: Vegetarian
Ingredients
- 500 g powdered milk
- 500 g caster sugar
- 250 g butter (unsalted)
- 100 g cocoa powder (unsweetened)
- 9 tablespoons water
- Nuts (optional, for garnish – walnuts, almonds, or hazelnuts work well)
Equipment Needed
- Saucepan
- Mixing bowl
- Wooden spoon or spatula
- Refrigerator
- Mold or container to shape the chocolate (baking dish, silicone molds, etc.)
Instructions
- In a saucepan, combine the caster sugar, cocoa powder, and water. Mix well to form a paste. Ensure there are no dry lumps of cocoa powder remaining.
- Place the saucepan over low heat. Cook the mixture, stirring occasionally, until the sugar completely melts. This is a crucial step. You’ll know the sugar has melted when you can no longer feel any sugar crystals when you rub a small amount of the syrup between your fingers. The paste should transform into a thick, glossy syrup. Avoid boiling the mixture.
- Add the butter to the saucepan. Stir continuously until the butter is fully melted and incorporated into the cocoa-sugar syrup. The mixture should be smooth and homogenous.
- In a large mixing bowl, place the powdered milk.
- Gradually add the cocoa-butter syrup to the powdered milk, mixing continuously. Initially, you can use a wooden spoon or spatula.
- As the mixture thickens, it will become difficult to stir with a spoon. At this point, switch to mixing by hand, as if you were kneading a dough. This is the most physically demanding part of the process!
- Continue kneading the mixture until it no longer sticks to the bowl. The consistency should be firm and pliable, similar to marzipan. If the mixture is too dry, add a tiny splash of water. If it’s too sticky, add a little more powdered milk.
- If using nuts, gently knead them into the chocolate mixture.
- Transfer the chocolate mixture to your chosen mold or container. Press it down firmly and evenly to create a smooth surface.
- If you’re adding nuts as a garnish on top, gently press them into the surface of the chocolate before chilling.
- Place the mold or container in the refrigerator to chill for at least 8 hours, or preferably overnight. This allows the chocolate to firm up and develop its characteristic texture.
- After chilling, remove the chocolate from the refrigerator. Turn it out of the mold or container and cut it into squares or desired shapes.
- Serve and enjoy!
Expert Tips & Tricks
- Sugar Melting: The key to smooth chocolate is ensuring the sugar is completely melted. Undissolved sugar crystals will result in a grainy texture. Take your time and stir patiently over low heat.
- Cocoa Powder Quality: Use high-quality, unsweetened cocoa powder for the best flavor. Dutch-processed cocoa powder will give a darker, richer flavor.
- Mixing Consistency: Pay close attention to the consistency as you add the syrup to the powdered milk. If the mixture seems too dry, add a tiny amount of warm water, a teaspoon at a time, until it comes together. Conversely, if it’s too sticky, add a tablespoon or two of powdered milk.
- Flavor Enhancements: Don’t be afraid to experiment with flavorings. A teaspoon of vanilla extract or a pinch of cinnamon can add a wonderful depth of flavor. Orange zest is another delightful addition.
- Texture Control: The longer you chill the chocolate, the firmer it will become. If you prefer a softer texture, you can reduce the chilling time slightly, but ensure it’s firm enough to hold its shape.
- Troubleshooting: If the chocolate is too hard after chilling, let it sit at room temperature for a few minutes before serving. If it’s too soft, return it to the refrigerator for longer.
Serving & Storage Suggestions
This homemade soft chocolate is best served at room temperature, allowing its slightly melt-in-your-mouth texture to be fully appreciated. Cut into small squares or bite-sized pieces. It pairs beautifully with a strong cup of coffee or tea.
To store, wrap the chocolate tightly in plastic wrap or place it in an airtight container. It can be stored at room temperature in a cool, dark place for up to 3 days. For longer storage, keep it in the refrigerator for up to a week. If you prefer a firmer texture, storing it in the fridge is recommended.
Freezing is not recommended as it can alter the texture of the chocolate.
Nutritional Information
Please note that these are estimated values and may vary based on specific ingredients and serving sizes.
| Nutrient | Amount per Serving | % Daily Value |
|---|---|---|
| Calories | 450 kcal | 23% |
| Total Fat | 25g | 38% |
| Saturated Fat | 15g | 75% |
| Cholesterol | 75mg | 25% |
| Sodium | 100mg | 4% |
| Total Carbohydrate | 50g | 17% |
| Dietary Fiber | 2g | 8% |
| Sugars | 45g | N/A |
| Protein | 10g | 20% |
Variations & Substitutions
- Dairy-Free Option: While traditionally made with powdered milk and butter, you could experiment with substituting these with plant-based alternatives. However, the texture and flavor will be significantly different. Consider using powdered coconut milk and a vegan butter alternative.
- Dark Chocolate Version: For a richer, more intense flavor, increase the amount of cocoa powder to 150g and reduce the powdered milk by 50g.
- Nutty Delight: Incorporate a variety of nuts, such as chopped walnuts, almonds, hazelnuts, or pecans, into the chocolate mixture. You can also add dried fruits like raisins or cranberries.
- Spiced Chocolate: Add a pinch of cinnamon, nutmeg, or cardamom to the mixture for a warm, festive flavor.
- Coffee Infusion: Dissolve a teaspoon of instant coffee in the water before adding it to the sugar and cocoa powder for a mocha-flavored chocolate.
- Orange Chocolate: Add the zest of one orange to the mixture for a citrusy twist.
FAQs (Frequently Asked Questions)
Q: Why is my chocolate grainy?
A: This is usually due to undissolved sugar crystals. Make sure to melt the sugar completely over low heat, stirring constantly, until it forms a smooth syrup.
Q: Can I use a different type of sugar?
A: Caster sugar is recommended because it dissolves easily. Granulated sugar can be used, but it may require more stirring to ensure it melts completely. Avoid using brown sugar, as it will alter the flavor and texture.
Q: My chocolate is too soft after chilling. What should I do?
A: Return it to the refrigerator and chill for a longer period, preferably overnight. You can also try reducing the amount of butter slightly in your next batch.
Q: Can I add chocolate chips to this recipe?
A: While you can add chocolate chips, it’s not traditionally done. This recipe is meant to be a soft, homemade “chocolate” that is different from commercially produced chocolate. Adding chocolate chips may make it too sweet or hard.
Q: How long does this chocolate last?
A: It can be stored at room temperature for up to 3 days or in the refrigerator for up to a week.
Final Thoughts
This retro Romanian soft chocolate recipe is more than just a dessert; it’s a taste of history and a celebration of simple ingredients. It’s a perfect project to share with family, especially children, teaching them the joy of creating something delicious from scratch. Don’t be afraid to experiment with flavors and make it your own! Share your creations and variations with friends and family, and remember, the best ingredient is always love. Enjoy!