
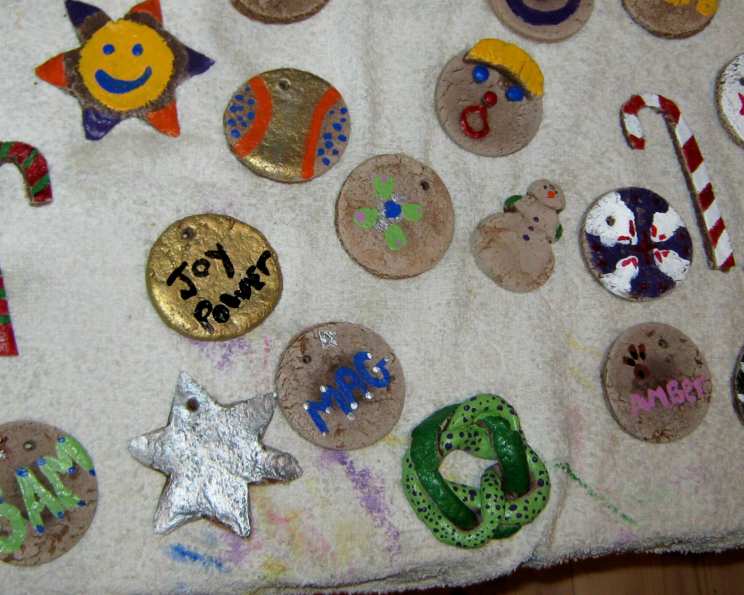
Crafting Memories: Homemade Christmas Ornaments
The scent of pine needles always transports me back to childhood Christmases. But it wasn’t just the tree that held the magic; it was the ornaments, each one a little story. I remember one particular year, snow swirling outside, we huddled around the kitchen table, flour dusting our noses as we crafted salt dough ornaments. The imperfections, the slightly wonky stars, and the fingerprints left behind – these were the details that made them so special, tangible reminders of our shared joy and laughter that adorned our tree for years to come.
Recipe Overview
- Prep Time: 20 minutes
- Cook Time: 2 hours
- Total Time: 2 hours 20 minutes
- Yields: Approximately 30 ornaments (depending on size)
- Serves: 30
- Dietary Type: Non-Edible Craft
Ingredients
- 4 cups all-purpose flour, plus extra for dusting
- 1 cup salt
- 1 1/2 cups hot water
Equipment Needed
- Large mixing bowl
- Measuring cups and spoons
- Rolling pin
- Cookie cutters (various Christmas shapes)
- Baking sheet
- Drinking straw or skewer
- Paints, glitter, and other decorating supplies (optional)
- Ribbon or twine for hanging
Instructions
-
Preheat your oven to a low 200 degrees Fahrenheit (93 degrees Celsius). This gentle heat ensures the ornaments dry thoroughly without browning or cracking.
-
In a large mixing bowl, combine the flour and salt. Whisk to ensure the salt is evenly distributed throughout the flour. This is crucial for a smooth, even dough.
-
Gradually add the hot water to the flour mixture, mixing with a spoon or your hands until a dough forms. Be cautious when adding the hot water – start with a smaller amount and add more as needed to avoid a sticky dough.
-
Knead the dough on a lightly floured surface for about 5-7 minutes until it becomes smooth and pliable. The dough should be easy to work with and not overly sticky. If the dough is too sticky, gradually add more flour, a tablespoon at a time, until the desired consistency is reached. The original recipe suggests adding an extra ½ to ¾ cup of flour, and this is a common adjustment.
-
Roll the dough out on a lightly floured surface to a thickness of about 1/4 inch or less. The thinner the ornaments, the quicker they will dry. Aim for an even thickness to prevent warping during baking.
-
Use your favorite cookie cutters to cut out individual ornament shapes from the rolled-out dough. Get creative with your shapes! Stars, angels, snowmen, and gingerbread men are all classic choices.
-
Carefully transfer the cut-out ornaments to a baking sheet.
-
Create a hole at the top of each ornament for hanging. Use a drinking straw or skewer to make a small hole before baking. Ensure the hole is large enough to accommodate your ribbon or twine.
-
Bake in the preheated oven for 2 hours. Do not turn the ornaments over during baking. The low temperature and long baking time allow the dough to dry thoroughly and harden.
-
Once the baking time is complete, remove the ornaments from the oven and let them cool completely on a wire rack.
-
(Optional) To ensure complete drying, especially in humid environments, turn the ornaments over on the cooling rack after they are removed from the oven. This allows the bottom side to air dry as well.
-
Once the ornaments are completely cool and dry, it’s time to decorate! Use paints, glitter, markers, and other embellishments to personalize your creations.
-
Finally, thread a piece of ribbon or twine through the hole at the top of each ornament and tie a knot to create a loop for hanging.
Expert Tips & Tricks
- Dough Consistency is Key: The dough should be pliable and easy to roll out, but not sticky. Adjust the amount of flour as needed to achieve the perfect consistency.
- Prevent Bubbling: To avoid air bubbles forming during baking, prick the surface of the dough with a fork before cutting out the ornament shapes.
- Even Drying: For thicker ornaments, consider baking them for a longer period or even flipping them over halfway through the baking time to ensure they dry completely.
- Enhance Decoration: After baking and cooling, lightly sand the edges of the ornaments with fine-grit sandpaper for a smoother surface before painting.
- Sealing: To protect your painted ornaments and make them more durable, consider sealing them with a clear varnish or sealant after decorating.
Serving & Storage Suggestions
These homemade Christmas ornaments are intended for decorative purposes only and are not edible. Once dried and decorated, they can be hung on your Christmas tree, used as gift tags, or incorporated into other holiday decorations.
Store the finished ornaments in a cool, dry place, away from direct sunlight and moisture. They can be stored in a box or container with padding to prevent breakage. When properly stored, these ornaments can last for many years, becoming cherished family heirlooms.
Nutritional Information
Since these ornaments are not edible, nutritional information is not applicable.
Variations & Substitutions
- Gluten-Free Ornaments: Substitute the all-purpose flour with a gluten-free all-purpose flour blend. Be sure to choose a blend that is formulated for baking and contains xanthan gum for binding.
- Colored Dough: Add food coloring to the dough while mixing to create ornaments with a colorful base before decorating.
- Scented Ornaments: Add a few drops of essential oil (such as cinnamon or pine) to the dough for a fragrant twist. Be mindful that essential oils can sometimes irritate the skin, so handle with care.
- Textured Ornaments: Before baking, press small items like beads, buttons, or dried flowers into the surface of the dough to create unique textures and designs.
FAQs (Frequently Asked Questions)
Q: Can I eat these ornaments?
A: No, these ornaments are made with a high salt content and are not intended for consumption. They are purely for decorative purposes.
Q: How long will these ornaments last?
A: When properly stored in a cool, dry place, these ornaments can last for many years. Avoid exposure to moisture, which can cause them to soften or crumble.
Q: Can I use different types of flour?
A: While all-purpose flour is recommended for its reliable results, you can experiment with other flours, such as whole wheat or gluten-free blends. Keep in mind that this may affect the texture and drying time of the ornaments.
Q: What if my dough is too sticky?
A: If your dough is too sticky, gradually add more flour, a tablespoon at a time, until it reaches a manageable consistency.
Q: Can I make these ornaments with young children?
A: Yes, this is a great craft project to do with children! Supervise them closely, especially when using cookie cutters and paints.
Final Thoughts
These homemade Christmas ornaments are more than just decorations; they are tangible expressions of creativity and love. Gather your family, roll up your sleeves, and spend an afternoon crafting these treasures together. Let the imperfections shine, knowing that each ornament tells a story and carries a memory. And as you hang them on your tree, remember the joy of creating something special, a gift from the heart that will bring smiles for years to come. Share your creations and experiences – happy crafting!