
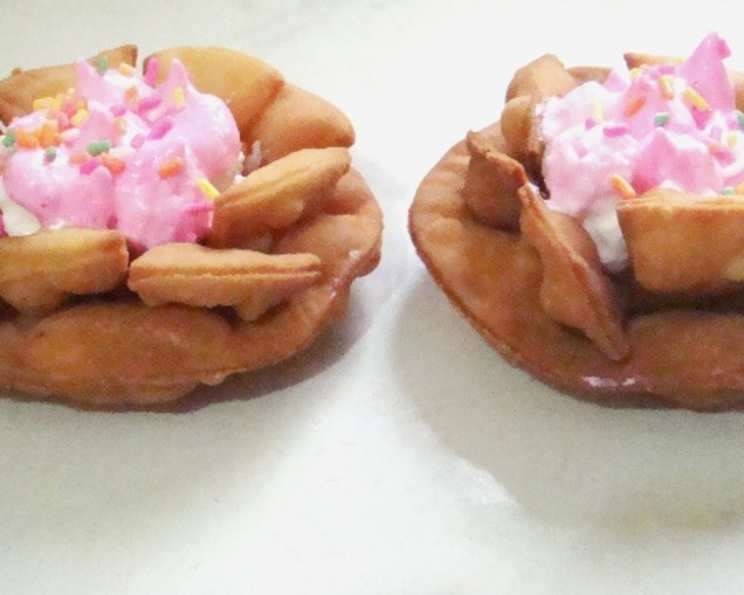
Homemade Fried Flower Shaped Appetizer: A Sweet Treat That Blossoms on Your Palate
There’s a particular corner bakery in my grandmother’s village that I still dream about. Every summer, we’d visit, and my grandmother would take me there for a special treat: these delicate, flower-shaped pastries, light as air and dusted with the brightest, happiest sprinkles. They looked like edible works of art, and the first bite was always pure bliss—crisp, slightly salty, and then, the sweetness of the meringue. This recipe is my attempt to recapture that childhood magic, to bring a little of that joyful memory into my own kitchen.
Recipe Overview
- Prep Time: 30 minutes
- Cook Time: 15 minutes
- Total Time: 45 minutes
- Servings: 6
- Yield: 6 flower-shaped pastries
- Dietary Type: Not Vegan
Ingredients
For the Dough:
- 100 g plain flour
- 1/4 teaspoon salt, to taste
- 50 g chilled butter
- 1/2 whole egg yolk, beaten
- 1 2/3 ounces cooled water
- 1 cup fresh coconut oil, plus 2/3 tablespoon coconut oil (for frying)
For the Meringue:
- 1 whole egg white
- 50 g sugar
- 1 drop food coloring, pink
- 1 tablespoon colored candy sprinkles
Equipment Needed
- Large bowl
- Plastic wrap
- Rolling pin
- Pastry cutter or cookie cutter (2-inch diameter)
- Sharp knife
- Deep frying pan or pot
- Absorbent paper
- Electric hand mixer
- Pastry bag with piping tip
Instructions
-
Prepare the Dough: Sift the plain flour into a large bowl. This ensures a lighter, flakier crust. Add the salt and mix well.
-
Incorporate the Butter: Cut the chilled butter into small cubes. Rub the butter into the flour mixture with your fingertips. The goal is to create a breadcrumb-like texture, ensuring the butter is evenly distributed throughout the flour. This is crucial for creating layers of flaky goodness. Work quickly to prevent the butter from melting.
-
Add the Wet Ingredients: Add approximately half of the beaten egg yolk and the cooled water to the flour mixture. Mix well with your hands, bringing the dough together. Try to work quickly to avoid overworking the gluten in the flour, which can result in a tough crust. Add more water, a teaspoon at a time, if the dough is too dry.
-
Chill the Dough: Wrap the dough tightly in plastic wrap and chill in the refrigerator for 10-15 minutes. This resting period allows the gluten to relax, making the dough easier to roll out.
-
Roll and Cut the Dough: After chilling, take the dough and roll it out on a lightly floured surface into a large square that is about 1/8 inch thick, using a rolling pin. Aim for an even thickness to ensure consistent cooking. Use a pastry cutter or cookie cutter with a 2-inch diameter to cut out 12 round shapes.
-
Create the Flower Petals: Take 6 of the round shapes and, using a sharp knife, make straight, little cuts in towards the center of the circle (don’t cut all the way through the circle – you are cutting about a half inch in towards the center, kind of like bicycle wheel spokes). These cuts will form the flower petals.
-
Assemble the Flowers: Take each of the 6 cut circles and place one on top of each of the uncut dough rounds (so you have a solid round underneath, and a bicycle wheel cut round on top). You can brush a little water in the center of the plain round first, in order to help the two pieces stick together. If needed, you can also place a wooden round stick through the center of the spoke round and the bottom one, to make them stay together. This will give the finished flower a more defined shape.
-
Heat the Oil: Heat the coconut oil in a deep frying pan or pot over medium heat. The oil should be hot enough to fry the pastries without burning them. Test the oil temperature by dropping a small piece of dough into it; it should sizzle immediately and turn golden brown within a minute or two.
-
Fry the Flowers: Carefully deep fry the flower-shaped pastries in the hot oil until they are golden brown. Turn them occasionally to ensure even cooking on both sides. This should take about 2-3 minutes per side. As they fry, the top round should puff up, resembling flower petals.
-
Drain and Cool: Remove the fried flowers from the oil and place them on absorbent paper to drain for a minute or two. This will remove excess oil and help them stay crisp. Allow them to cool completely before adding the meringue.
-
Prepare the Meringue: While the flowers are cooling, prepare the meringue. Place the egg white and sugar in a bowl and whip the mixture using an electric hand mixer. Start on low speed and gradually increase to high speed.
-
Whip to Stiff Peaks: After 5 minutes of whipping, add the food coloring. Continue to beat the mixture until stiff peaks form. The meringue is ready when it holds its shape and doesn’t droop when you lift the beaters.
-
Fill the Flowers: Once the flower-shaped pastries have cooled, get them ready to fill. Put the meringue in a pastry bag fitted with a piping tip.
-
Pipe and Garnish: Pipe the meringue filling into the center of each flower. Sprinkle some colored candy sprinkles on top, if desired, for a festive touch.
-
Serve Immediately: Serve the homemade fried flower-shaped appetizers immediately for the best taste and texture.
Expert Tips & Tricks
- For extra-crisp pastries, consider double-frying them. After the first frying, let them cool completely, then fry them again for a shorter period.
- Ensure the oil temperature is consistent to prevent the pastries from becoming greasy or burning. Use a thermometer for accurate temperature control. Aim for around 325°F (160°C).
- If you don’t have a pastry bag, you can use a Ziploc bag with a corner snipped off.
- Make the dough ahead of time and store it in the refrigerator for up to 24 hours.
- If the dough becomes too warm while rolling, return it to the refrigerator for a few minutes to firm up.
Serving & Storage Suggestions
Serve these flower-shaped pastries immediately after filling them with meringue for the best texture. The crisp pastry contrasts beautifully with the soft meringue.
- Room Temperature: The pastries are best enjoyed fresh. Storing them at room temperature will cause the pastry to soften and the meringue to weep. If you must store them, keep them in an airtight container for no more than a few hours.
- Refrigeration: Refrigerating the pastries is not recommended as the moisture will make them soggy.
- Freezing: Freezing is also not recommended, as it will affect the texture of both the pastry and the meringue.
Nutritional Information
| Nutrient | Amount per Serving | % Daily Value |
|---|---|---|
| Calories | 488 kcal | 24% |
| Total Fat | 44 g | 56% |
| Saturated Fat | 36 g | 180% |
| Cholesterol | 32 mg | 11% |
| Sodium | 167 mg | 7% |
| Total Carbohydrate | 24 g | 9% |
| Dietary Fiber | 1 g | 4% |
| Sugars | 8 g | 16% |
| Protein | 3 g | 6% |
Note: Nutritional information is an estimate and may vary based on specific ingredients and preparation methods.
Variations & Substitutions
- Gluten-Free: Substitute the plain flour with a gluten-free blend for a gluten-free version. Be sure to use a blend designed for baking to ensure the pastry holds its shape.
- Different Flavors: Experiment with different food colorings and extracts in the meringue for various flavor combinations. Consider adding a drop of vanilla, almond, or lemon extract.
- Fruit Filling: Instead of meringue, try filling the pastries with a fruit compote or pastry cream for a different flavor profile.
- Vegan: Substitute the butter with a vegan butter alternative and the egg with an aquafaba meringue (whipped chickpea brine).
- Savory: Omit the sugar in the dough and the meringue and fill them with a savory filling like herbed cream cheese or pesto.
FAQs (Frequently Asked Questions)
Q: Can I make the dough ahead of time?
A: Yes, you can make the dough up to 24 hours in advance. Wrap it tightly in plastic wrap and store it in the refrigerator.
Q: Why is it important to chill the dough?
A: Chilling the dough allows the gluten to relax, making it easier to roll out and preventing the pastry from becoming tough. It also helps the butter stay cold, which creates a flakier crust.
Q: Can I use a different type of oil for frying?
A: Yes, you can use other oils with a high smoke point, such as vegetable oil or canola oil. However, coconut oil imparts a unique flavor that complements the sweetness of the meringue.
Q: How do I prevent the pastries from becoming greasy?
A: Ensure the oil is hot enough before frying and don’t overcrowd the pan. Overcrowding lowers the oil temperature, causing the pastries to absorb more oil.
Q: Can I bake these instead of frying them?
A: While frying gives them a unique texture, you can bake them at 375°F (190°C) for about 10-12 minutes until golden brown. The texture will be different, but still enjoyable.
Final Thoughts
I hope this recipe inspires you to create your own little edible flowers, and perhaps even evoke a cherished memory of your own. Don’t be afraid to experiment with different flavors, colors, and garnishes to make them truly your own. Whether you’re making them for a special occasion or simply to brighten up your day, these homemade fried flower-shaped appetizers are sure to bring a smile to anyone who tries them. Share your creations and feedback, and enjoy the process of bringing a touch of floral delight to your kitchen! These pastries pair beautifully with a cup of herbal tea or a light dessert wine.