
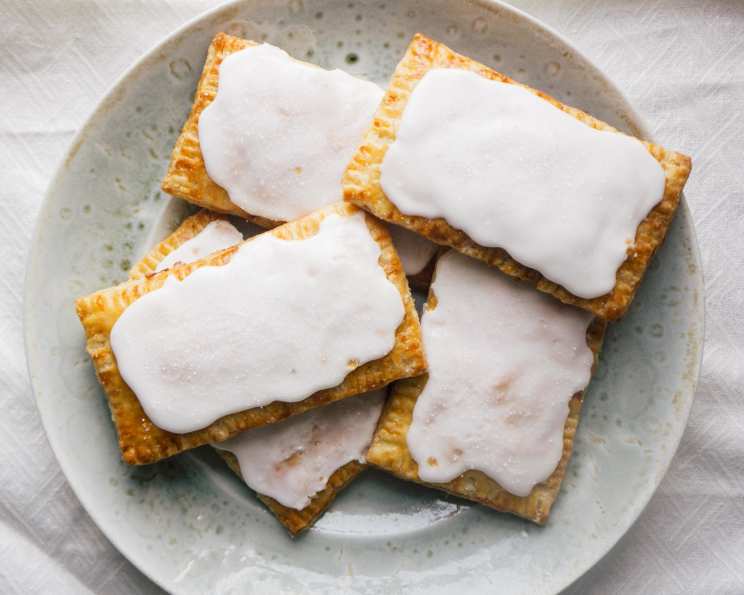
Homemade Pop Tarts: A Nostalgic Treat Elevated
I can still picture my grandmother’s kitchen, bathed in the warm glow of the afternoon sun. The scent of vanilla and baking dough hung in the air, a promise of something special. While she was known for her apple pies, it was her playful take on Pop-Tarts that truly captured my heart. They were far from the mass-produced rectangles of my childhood. Hers were gloriously imperfect, bursting with homemade jam, and topped with a glaze that crackled invitingly. Every bite was a taste of pure, unadulterated love.
Recipe Overview
- Prep Time: 30 minutes
- Cook Time: 24 minutes
- Total Time: 2 hours 54 minutes (includes chilling time)
- Servings: 8
- Yield: 8 tarts
- Dietary Type: Vegetarian
Ingredients
For the Crust:
- 2 cups all-purpose flour, plus more for the work surface
- 2 tablespoons granulated sugar
- 1 teaspoon coarse salt
- 1 cup (2 sticks) unsalted butter, cut into pieces
- 6-8 tablespoons ice water
For the Filling:
- 1 large egg, lightly beaten (for egg wash)
- 1/2 cup jam (your favorite flavor!)
For the Frosting:
- 1 cup powdered sugar
- 2 tablespoons whole milk, plus more if necessary
- 1 teaspoon vanilla extract
- Sanding sugar, for sprinkling
Equipment Needed
- Food processor
- Plastic wrap
- Rolling pin
- Baking sheet
- Parchment paper
- Fork
- Medium bowl
- Whisk
Instructions
-
Prepare the Dough: In the bowl of a food processor, combine the all-purpose flour, granulated sugar, and coarse salt. Pulse until the ingredients are evenly combined.
-
Incorporate the Butter: Add the cold butter pieces to the flour mixture. Pulse until the mixture resembles a coarse meal with some larger, pea-sized pieces of butter remaining. These small butter pockets are crucial for creating a flaky crust.
-
Add Ice Water: Gradually add 6 tablespoons of ice water to the mixture. Pulse just until the dough is evenly moistened. The dough should be able to be squeezed together and hold its shape. If needed, add up to 2 more tablespoons of ice water, one tablespoon at a time, but be careful not to over-wet the dough. Overworking the dough will result in a tough crust.
-
Divide and Chill: Divide the dough in half onto two separate pieces of plastic wrap. Shape each half into a square. Wrap each square tightly in plastic wrap and chill in the refrigerator for at least 2 hours. This chilling time allows the gluten to relax, making the dough easier to roll out and preventing it from shrinking during baking.
-
Roll Out the Dough: On a lightly floured surface, roll one of the dough squares into an 8 1/2-inch-by- 12 1/2 inch rectangle. Keeping the edges as straight as possible will make assembly easier.
-
Trim and Cut: Trim approximately 1/4 inch off each edge of the rectangle to create clean, even sides. Then, cut the dough into 8 rectangles of equal size.
-
Transfer and Repeat: Carefully transfer the 8 rectangles to a baking sheet. Repeat the rolling, trimming, and cutting process with the remaining dough square. You should now have a total of 16 rectangles.
-
Preheat Oven: Preheat your oven to 375°F (190°C). This temperature ensures the crust bakes evenly and becomes beautifully golden brown.
-
Prepare Egg Wash: In a small bowl, prepare the egg wash by beating the 1 large egg well.
-
Assemble the Tarts: Brush the edges of half of the dough rectangles with the egg wash. The egg wash acts as a glue, helping the top and bottom crusts adhere to each other.
-
Add the Jam: Place 1 tablespoon of your favorite jam in the center of each of the egg-washed rectangles. Spread the jam out, leaving a 1/2-inch border around the edges. Avoid overfilling the tarts, as the jam may ooze out during baking.
-
Top and Seal: Carefully top each jam-filled rectangle with one of the remaining dough rectangles. Use a fork to firmly seal the edges of each tart. Press the fork down all the way around to ensure a good seal and prevent the filling from leaking out.
-
Vent the Steam: Cut three small slits in the top of each tart using a sharp knife. These slits allow steam to escape during baking, preventing the tarts from puffing up and potentially bursting.
-
Bake: Transfer the assembled tarts to two baking sheets lined with parchment paper. Brush the tops of the tarts with the remaining egg wash for a glossy, golden-brown finish.
-
Baking Time: Bake in the preheated oven for 20 to 24 minutes, or until the tarts are deep golden brown. Keep a close eye on them during the last few minutes of baking to prevent burning.
-
Cool Completely: Transfer the baked tarts to a wire rack to cool completely. Cooling them completely before frosting will prevent the frosting from melting.
-
Prepare the Frosting: While the tarts are cooling, prepare the frosting. In a medium bowl, whisk together the powdered sugar, milk, and vanilla extract until smooth. Add a bit more milk, one teaspoon at a time, if you prefer a thinner glaze.
-
Frost and Decorate: Once the tarts are completely cool, use a spoon to spread a bit of frosting on the top of each tart. Immediately sprinkle with sanding sugar while the frosting is still wet.
-
Set and Serve: Serve the homemade Pop-Tarts immediately, or let them stand at room temperature until the glaze has set, about 2 hours.
Expert Tips & Tricks
- Keep it Cold: The key to a flaky crust is keeping the ingredients cold. Use ice water and cold butter, and don’t overwork the dough.
- Jam Choices: Experiment with different flavors of jam to create your own unique Pop-Tart creations. Raspberry, strawberry, apricot, and blueberry all work well.
- Blind Baking: If you’re using a particularly wet filling, consider blind baking the bottom crust for a few minutes before adding the filling. This will help prevent a soggy bottom.
- Preventing Leaks: Be sure to seal the edges of the tarts tightly with a fork to prevent the filling from leaking out during baking.
- Even Baking: Rotate the baking sheets halfway through baking to ensure even browning.
Serving & Storage Suggestions
Serve your homemade Pop-Tarts warm or at room temperature. They are delicious on their own or paired with a glass of milk or a cup of coffee. Store leftover Pop-Tarts in an airtight container at room temperature for up to 3 days, or in the refrigerator for up to 5 days. You can also freeze them for longer storage; wrap them individually in plastic wrap and then place them in a freezer-safe bag or container. Frozen Pop-Tarts can be reheated in the oven at 350°F (175°C) for about 10 minutes, or until warmed through.
Nutritional Information
| Nutrient | Amount per Serving | % Daily Value |
|---|---|---|
| Calories | 456 kcal | 23% |
| Total Fat | 24.1g | 37% |
| Saturated Fat | 14.9g | 74% |
| Cholesterol | 84.6mg | 28% |
| Sodium | 312mg | 13% |
| Total Carbohydrate | 56g | 18% |
| Dietary Fiber | 1.1g | 4% |
| Sugars | 27.9g | N/A |
| Protein | 4.5g | 8% |
Variations & Substitutions
- Gluten-Free: Use a gluten-free all-purpose flour blend to make gluten-free Pop-Tarts. You may need to add a bit more liquid to the dough to help it come together.
- Vegan: Substitute the butter with a vegan butter alternative. Replace the egg wash with a mixture of plant-based milk and maple syrup.
- Different Fillings: Get creative with your fillings! Try Nutella, peanut butter, apple pie filling, or even savory fillings like cheese and ham.
- Frosting Flavors: Add a drop or two of food coloring to the frosting for a festive touch. You can also add different extracts, such as almond or lemon, to change the flavor of the frosting.
- Seasonal Variations: Use seasonal fruits and jams to create unique Pop-Tart flavors throughout the year.
FAQs (Frequently Asked Questions)
Q: Can I make the dough ahead of time?
A: Yes, you can make the dough up to 2 days in advance. Store it wrapped tightly in plastic wrap in the refrigerator.
Q: Can I use a different type of flour?
A: While all-purpose flour is recommended for its balance of gluten, you can experiment with other flours like pastry flour for an even more tender crust.
Q: My filling is leaking out during baking. What am I doing wrong?
A: Make sure you’re not overfilling the tarts and that you’re sealing the edges tightly with a fork. Also, be sure to cut slits in the top of each tart to allow steam to escape.
Q: Can I freeze the baked Pop-Tarts?
A: Yes, you can freeze the baked Pop-Tarts. Let them cool completely, then wrap them individually in plastic wrap and place them in a freezer-safe bag or container.
Q: How do I reheat frozen Pop-Tarts?
A: You can reheat frozen Pop-Tarts in the oven at 350°F (175°C) for about 10 minutes, or until warmed through. You can also microwave them for a quicker option, but the crust may not be as crispy.
Final Thoughts
Homemade Pop-Tarts are a delightful way to relive childhood memories and create new ones. Don’t be intimidated by the process – it’s simpler than it looks, and the results are well worth the effort. Feel free to experiment with different fillings and frostings to create your own signature flavors. And don’t forget to share your creations with friends and family! A warm Pop-Tart and a good conversation make for a truly perfect moment.