
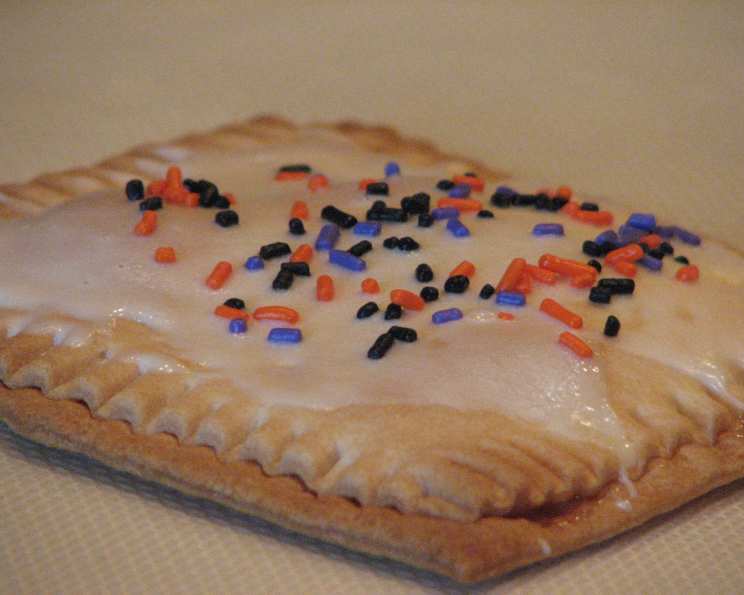
Homemade Pop-Tarts: A Nostalgic Treat Elevated
I remember being a kid and the sheer, unadulterated joy of tearing open that foil packet to reveal a Pop-Tart. The crackly frosting, the sweet, sticky filling… it was pure, processed magic. But as a chef, I always wondered if I could capture that same sense of childhood glee with something made from scratch, something a little less… artificial. After much experimentation, I’m excited to share this recipe for homemade Pop-Tarts that surpasses the original in flavor and satisfaction. Get ready to experience a nostalgic classic, reimagined!
Recipe Overview
- Prep Time: 20 minutes
- Cook Time: 15-20 minutes
- Total Time: 35-40 minutes
- Servings: 6
- Yield: 6 Pop-Tarts
- Dietary Type: Vegetarian (can be made vegan with substitutions)
Ingredients
- 1 refrigerated pie crust
- Jelly (strawberry, raspberry, etc.) or jam (strawberry, raspberry, etc.)
- Powdered sugar
- Milk (or non-dairy alternative for vegan option)
Equipment Needed
- Rolling pin
- Pizza cutter or sharp knife
- Fork
- Baking sheet
- Parchment paper (optional)
- Small bowl
Instructions
-
Begin by gently unrolling the refrigerated pie crust onto a lightly floured surface. Using a rolling pin, slightly flatten the crust to even it out. Don’t overwork the dough, as this can make it tough.
-
With a pizza cutter or sharp knife, cut the pie crust into equal-sized rectangles. Aim for about 3×4 inches. You should be able to get at least six rectangles from a standard pie crust. If needed, gently re-roll the scraps to create more rectangles, but be mindful that the more you re-roll, the tougher the pastry might become.
-
Take half of the rectangles and spread them evenly with your choice of jelly or jam. Leave a border of about ½ inch around the edges, free from any filling. This is crucial for sealing the Pop-Tarts properly. I love using homemade raspberry jam for an extra burst of flavor.
-
Carefully place the remaining pie crust rectangles on top of the jam-covered ones, aligning the edges as precisely as possible.
-
Now it’s time to seal the edges. Using a fork, firmly press along all four sides of each Pop-Tart. This creates a crimped edge that not only looks appealing but also helps to prevent the filling from leaking during baking.
-
Preheat your oven to the temperature specified on your pie crust package, usually around 375°F (190°C).
-
Place the assembled Pop-Tarts onto a baking sheet. For easier cleanup, you can line the baking sheet with parchment paper.
-
Bake for the time indicated on the pie crust packaging, typically 15-20 minutes, or until the pastry is golden brown and cooked through. Keep a close eye on them towards the end of baking to prevent burning. Oven temperatures can vary, so use your best judgment.
-
While the Pop-Tarts are baking, prepare the glaze. In a small bowl, whisk together powdered sugar and milk (or a non-dairy alternative) until you achieve a smooth, pourable consistency. Add the milk gradually, a tablespoon at a time, to avoid making the glaze too thin.
-
Once the Pop-Tarts are done baking, remove them from the oven and let them cool slightly on the baking sheet for a few minutes.
-
While the Pop-Tarts are still warm, but not too hot (to prevent the glaze from melting completely), generously drizzle the glaze over the top of each one.
-
Allow the glaze to set completely before serving. This usually takes about 15-20 minutes.
Expert Tips & Tricks
- Chill the Dough: For a flakier crust, chill the assembled Pop-Tarts in the refrigerator for 15-20 minutes before baking.
- Egg Wash: For a richer, golden-brown color, brush the tops of the Pop-Tarts with a beaten egg or egg yolk before baking. This will also add a slight sheen.
- Flavor Infusion: Add a drop or two of vanilla extract, almond extract, or lemon extract to the glaze for an extra layer of flavor.
- Prevent Soggy Bottoms: For extra crispiness, place a baking stone or pizza stone in the oven while preheating. This will provide a hot surface for the bottom of the Pop-Tarts to bake on.
- Forking Technique: When crimping the edges with a fork, ensure you’re pressing firmly enough to seal the layers together without cutting through the dough.
- Sprinkles and Decor: Get creative with decorations! Add sprinkles, chopped nuts, or a drizzle of melted chocolate to the glaze for a festive touch.
- Make Ahead: You can assemble the Pop-Tarts ahead of time and store them unbaked in the refrigerator for up to 24 hours. Add the glaze just before serving.
Serving & Storage Suggestions
Serve your homemade Pop-Tarts warm or at room temperature. They are delicious on their own as a breakfast treat, snack, or dessert.
To store leftovers, place them in an airtight container at room temperature for up to 2 days. For longer storage, refrigerate them for up to 5 days. Keep in mind that the glaze may become slightly sticky in the refrigerator.
To reheat, you can briefly microwave them (about 10-15 seconds), or warm them in a preheated oven at 350°F (175°C) for a few minutes until heated through. Avoid overheating, as this can dry out the pastry.
Freezing is not generally recommended, as the glaze can become icy and the pastry can lose its texture.
Nutritional Information
Estimated nutritional information per Pop-Tart:
| Nutrient | Amount per Serving | % Daily Value* |
|---|---|---|
| Calories | 250 kcal | 13% |
| Total Fat | 12g | 18% |
| Saturated Fat | 6g | 30% |
| Cholesterol | 0mg | 0% |
| Sodium | 200mg | 9% |
| Total Carbohydrate | 35g | 12% |
| Dietary Fiber | 1g | 4% |
| Sugars | 20g | – |
| Protein | 3g | 6% |
*Percent Daily Values are based on a 2,000 calorie diet. Your daily values may be higher or lower depending on your calorie needs. These values are estimates and will vary based on specific ingredients used.
Variations & Substitutions
- Gluten-Free: Use a gluten-free pie crust to make these Pop-Tarts gluten-free. There are many pre-made gluten-free pie crusts available in most grocery stores.
- Vegan: Use a vegan pie crust (many refrigerated pie crusts are already vegan) and non-dairy milk for the glaze. Ensure that your chosen jelly or jam is also vegan-friendly.
- Different Fillings: Experiment with different fillings such as chocolate hazelnut spread, apple butter, lemon curd, or even a savory filling like spinach and cheese.
- Homemade Crust: For an even more homemade touch, make your own pie crust from scratch.
- Seasonal Flavors: Adapt the fillings to the season. Use pumpkin puree and spices in the fall, or fresh berry jam in the summer.
- Savory Pop-Tarts: Skip the glaze and fill the Pop-Tarts with savory ingredients like cheese, ham, and herbs. Bake until golden brown and serve as a savory snack or appetizer.
- Mini Pop-Tarts: Cut the pie crust into smaller squares to create mini Pop-Tarts, perfect for parties or individual servings.
FAQs (Frequently Asked Questions)
Q: Can I use homemade pie crust instead of store-bought?
A: Absolutely! Homemade pie crust will add an even more personal touch to your Pop-Tarts. Just ensure that it’s rolled out thinly and evenly.
Q: What if my pie crust is sticking?
A: Sprinkle a little flour on your work surface and rolling pin to prevent sticking. You can also chill the dough for a few minutes to make it easier to handle.
Q: Can I freeze the Pop-Tarts before baking?
A: Yes, you can freeze the assembled, unbaked Pop-Tarts for up to 1 month. Thaw them in the refrigerator overnight before baking.
Q: My filling is leaking out during baking. What am I doing wrong?
A: Make sure you’re leaving a border around the edges of the filling and pressing firmly with the fork to seal the edges completely. You might also be overfilling the Pop-Tarts.
Q: Can I use a different type of glaze?
A: Of course! Feel free to use a chocolate glaze, a cream cheese glaze, or any other glaze that you enjoy.
Final Thoughts
These homemade Pop-Tarts are more than just a recipe; they’re a trip down memory lane, a chance to recreate a childhood favorite with a gourmet twist. The simple act of making them, filling them with your favorite flavors, and sharing them with loved ones is incredibly rewarding. So, gather your ingredients, preheat your oven, and get ready to bake some nostalgic magic. Don’t be afraid to experiment with different fillings and glazes to create your own signature Pop-Tart. And most importantly, have fun and enjoy the process! I’d love to hear about your creations and how they turned out. Happy baking!