
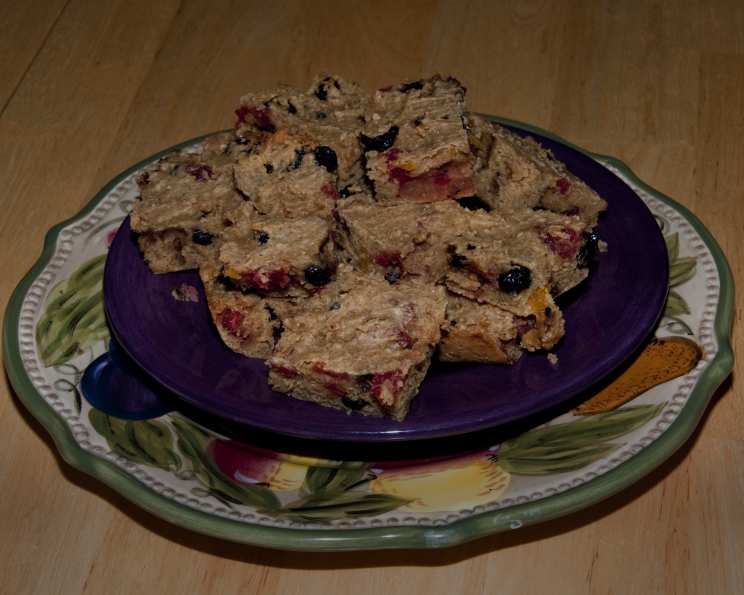
Homemade Power Bars: Fuel Your Day the Delicious Way
The aroma of warm, nutty goodness wafting through the kitchen always takes me back to my days as a struggling culinary student. Back then, time and money were scarce, but energy was essential. These power bars became my secret weapon—a portable, nutritious, and delicious way to stay fueled through long hours of classes and even longer nights in the kitchen. They were a constant in my backpack, a symbol of resilience, and a reminder that even on a tight budget, wholesome, homemade food was always within reach.
Recipe Overview
- Prep Time: 15 minutes
- Cook Time: 35 minutes
- Total Time: 50 minutes
- Yields: 24 2-inch squares
- Dietary Type: High-Protein
Ingredients
- 4 ounces soy protein powder (approximately 1 cup)
- 2 1/4 ounces oat bran (approximately 1/2 cup)
- 2 3/4 ounces whole wheat flour (approximately 1/2 cup)
- 3/4 ounce wheat germ (approximately 1/4 cup)
- 1/2 teaspoon kosher salt
- 12 ounces assorted dried fruits (approximately 2 cups), such as raisins, cranberries, apricots, and dates, coarsely chopped
- 1 (12 1/3 ounce) package soft silken tofu
- 1/2 cup unfiltered apple juice
- 4 ounces dark brown sugar (approximately 1/2 cup packed)
- 2 large eggs, beaten
- 2/3 cup natural-style peanut butter
- Canola oil, for pan
Equipment Needed
- 13 by 9-inch glass baking dish
- Parchment paper
- Large mixing bowls
- Small mixing bowl
- Whisk
- Measuring cups and spoons (or a kitchen scale for more accuracy)
Instructions
-
Begin by preparing your baking dish. Line the bottom of a 13 by 9-inch glass baking dish with parchment paper, leaving some overhang on the sides for easy removal later. Lightly coat the parchment paper and the sides of the dish with canola oil. Set aside.
-
Preheat your oven to 350 degrees F (175 degrees C). Make sure your oven rack is in the center position for even baking.
-
In a large mixing bowl, combine the dry ingredients: soy protein powder, oat bran, whole wheat flour, wheat germ, and kosher salt. Whisk them together to ensure they are evenly distributed. Set this bowl aside.
-
Coarsely chop the assorted dried fruits. Aim for a fairly uniform size to ensure even distribution throughout the bars. Place the chopped fruit in a small bowl and set aside.
-
In a third mixing bowl, prepare the wet ingredients. Whisk the soft silken tofu until it is smooth and free of any lumps. This may take a minute or two, but a smooth base is crucial for the right texture.
-
To the smooth tofu, add the unfiltered apple juice, dark brown sugar, and eggs, one at a time. Whisk well to combine after each addition, ensuring that the brown sugar is fully dissolved. This creates a cohesive, emulsified base.
-
Add the natural-style peanut butter to the wet ingredients. Whisk until the peanut butter is fully incorporated and the mixture is smooth. It may require a little extra effort to combine the peanut butter thoroughly.
-
Now, bring the wet and dry ingredients together. Add the wet ingredients to the bowl of dry ingredients. Stir well to combine, ensuring that all the dry ingredients are moistened and there are no pockets of flour.
-
Fold in the coarsely chopped dried fruit. Gently fold them in until they are evenly distributed throughout the batter. Avoid overmixing at this stage, as it can make the bars tough.
-
Spread the batter evenly into the prepared baking dish. Use a spatula or the back of a spoon to ensure an even layer, pressing down gently to compact the mixture slightly.
-
Bake in the preheated oven for 35 minutes. To ensure they’re done, you can check the internal temperature with a thermometer; it should reach 205 degrees F (96 degrees C). The top of the bars should be golden brown and slightly firm to the touch.
-
Remove the baking dish from the oven and cool completely before cutting into squares. This is crucial for clean cuts. Cooling can take 1-2 hours.
-
Once completely cooled, use the parchment paper overhang to lift the bars out of the baking dish. Place them on a cutting board and cut into squares. I recommend cutting them into 24 2-inch squares.
-
Store the cut squares in an airtight container for up to a week.
Expert Tips & Tricks
- Weighing is Key: While volume measurements are provided, weighing your ingredients using a kitchen scale offers significantly greater accuracy, especially for dry ingredients like protein powder and flour. This ensures consistency in your final product.
- Tofu Texture: Ensure your silken tofu is very soft and smooth. If it seems a bit lumpy, blend it briefly before whisking to ensure a creamy base.
- Fruit Variety: Feel free to experiment with different combinations of dried fruits based on your preferences and what you have on hand. Chopped nuts like almonds or walnuts can also be added for extra crunch and nutrition.
- Doneness Check: If you don’t have a thermometer, insert a toothpick into the center of the bars. If it comes out clean, they are done.
- Prevent Sticking: While parchment paper helps, lightly greasing the paper with cooking spray can prevent the bars from sticking.
Serving & Storage Suggestions
These power bars are perfect as a grab-and-go breakfast, a pre- or post-workout snack, or a mid-afternoon energy boost. They can be enjoyed straight from the container or paired with a glass of milk or a cup of coffee.
Store these homemade power bars in an airtight container at room temperature for up to a week. For longer storage, you can refrigerate them for up to two weeks or freeze them for up to two months. To freeze, wrap individual bars in plastic wrap before placing them in a freezer-safe container. Thaw overnight in the refrigerator before serving. They also pack well in lunchboxes or hiking backpacks.
Nutritional Information
| Nutrient | Amount per Serving | % Daily Value |
|---|---|---|
| Calories | 97.3 kcal | N/A |
| Calories from Fat | 42 g | 44% |
| Total Fat | 4.8 g | 7% |
| Saturated Fat | 1 g | 4% |
| Cholesterol | 17.6 mg | 5% |
| Sodium | 46.5 mg | 1% |
| Total Carbohydrate | 11.7 g | 3% |
| Dietary Fiber | 1.4 g | 5% |
| Sugars | 6 g | N/A |
| Protein | 4.1 g | 8% |
Note: Nutritional information is an estimate and can vary based on specific ingredients and portion sizes.
Variations & Substitutions
- Gluten-Free Option: Substitute the whole wheat flour with a gluten-free all-purpose flour blend. Ensure the oat bran is also certified gluten-free.
- Nut-Free: Replace the peanut butter with sunflower seed butter or tahini for a nut-free alternative.
- Sweetener Swap: Use honey or maple syrup instead of brown sugar, adjusting the amount to taste.
- Vegan: While this recipe is already close, you can substitute the eggs with flax eggs (1 tablespoon of ground flaxseed mixed with 3 tablespoons of water per egg) or a commercial egg replacer.
- Flavor Boost: Add a teaspoon of vanilla extract or a pinch of cinnamon to the wet ingredients for added flavor.
FAQs (Frequently Asked Questions)
Q: Can I use a different type of protein powder?
A: Yes, you can substitute the soy protein powder with whey protein, pea protein, or another protein powder of your choice. Keep in mind that different protein powders may have slightly different textures and flavors.
Q: Why is it important to use silken tofu?
A: Silken tofu provides moisture and a creamy texture to the bars without adding a strong flavor. Firm or extra-firm tofu will not blend as smoothly and will alter the texture of the finished product.
Q: Can I reduce the amount of sugar in the recipe?
A: Yes, you can reduce the amount of brown sugar, but keep in mind that it will affect the sweetness and moisture of the bars. You may need to add a little more apple juice to compensate for the reduced moisture.
Q: How do I prevent the dried fruit from sinking to the bottom of the bars?
A: Toss the chopped dried fruit with a tablespoon of flour before folding them into the batter. This will help them stay suspended throughout the bars.
Q: My bars are too dry. What did I do wrong?
A: Overbaking is a common cause of dry bars. Be sure to check the internal temperature and avoid baking them for too long. Using accurate measurements, especially for the wet ingredients, is also crucial.
Final Thoughts
These homemade power bars are more than just a recipe; they’re a testament to the fact that wholesome, delicious food can be accessible to everyone. I encourage you to give this recipe a try, experiment with your favorite ingredients, and create your own personalized power bars. Whether you’re a busy professional, a dedicated student, or simply someone looking for a healthy and convenient snack, these bars are sure to become a staple in your routine. Share your creations and feedback – I’d love to hear about your adventures in the kitchen!