
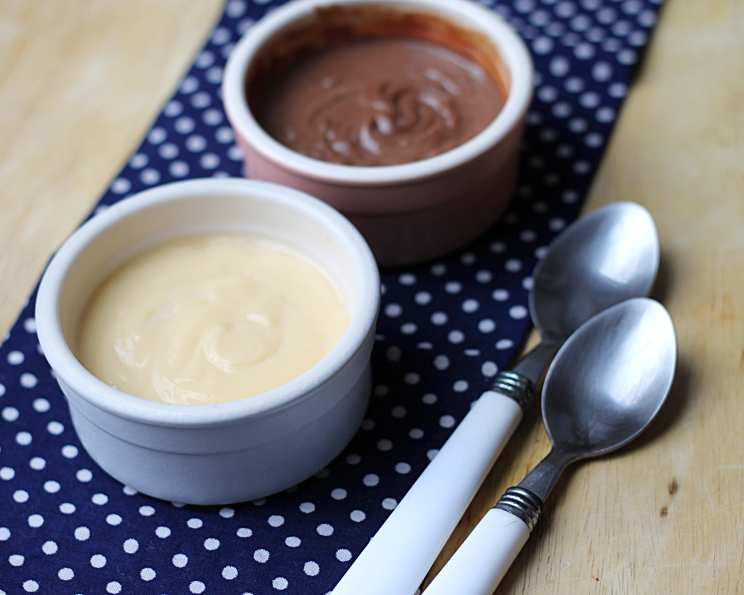
Homemade Pudding: A Taste of Nostalgia
The scent of warm vanilla still instantly transports me back to my grandmother’s kitchen. On chilly autumn afternoons, she would stand at her stove, stirring a pot with a worn wooden spoon, her brow furrowed in concentration. It wasn’t soup, or stew, or any of the other hearty fare she was known for; it was pudding. The simple act of transforming milk, sugar, and eggs into a creamy, comforting dessert was her way of showing love. Each spoonful felt like a warm hug, a tradition I am delighted to share with you.
Recipe Overview
- Prep Time: 5 minutes
- Cook Time: 9 minutes
- Total Time: 14 minutes
- Servings: 4-6
- Yield: About 4 cups
- Dietary Type: Not specified (can be adjusted with substitutions, see Variations)
Ingredients
- 3 cups milk
- 1 cup sugar
- 3 tablespoons butter
- 3 tablespoons cornstarch (use massive tablespoons)
- 4 egg yolks
- 1 1/2 teaspoons vanilla extract
- 1 pinch salt
- 1-6 tablespoons sifted cocoa powder (ONLY if you are making chocolate pudding)
Optional Garnish:
- Blueberries
- Candied orange
- Strawberry
- Raspberries
- Mint
- Butter cookie
- Whipped cream
Equipment Needed
- Pot (or microwave-safe bowl)
- Whisk
- Mixing bowl
- Measuring cups and spoons
- Sifter (if making chocolate pudding)
Instructions
- Begin by getting all 3 cups of milk scalding hot in a pot over medium heat. Alternatively, you can use a microwave-safe bowl and heat the milk in 1-minute intervals, stirring in between, until it is scalding. Watch carefully; you want it to be hot but not boiling over.
- While the milk is heating, separate the eggs. Discard the egg whites (or set them aside for an omelet or meringue – waste not, want not!).
- In a mixing bowl, combine the 4 egg yolks, 1 cup of sugar, and 3 tablespoons of cornstarch. Beat vigorously with a whisk. The mixture will initially resist coming together; it will be thick and somewhat lumpy. Don’t give up! Keep whisking, and eventually, it will become smoother.
- Once the milk is scalding hot, carefully pour the egg yolk mixture into the pot. Immediately begin beating the mixture vigorously with the whisk. This is crucial to prevent the eggs from scrambling. Continue whisking until the mixture seems completely liquified and homogeneous.
- Add a pinch of salt, 1 1/2 teaspoons of vanilla extract, and 3 tablespoons of butter to the pot. Keep whisking until the butter is fully incorporated and melted.
- Maintain the mixture at a warm temperature and stir continuously to prevent sticking and scorching. Continue stirring until the pudding thickens to your desired consistency. This may take a few minutes. The pudding is ready when it coats the back of a spoon.
- If you are making chocolate pudding, remove the pot from the heat once the pudding has thickened. Sift 1-6 tablespoons of cocoa powder (depending on how rich you want the chocolate flavor) into the pudding and stir until it is completely incorporated and the color is uniform.
- Serve the pudding warm, or refrigerate it for at least 2 hours (this is preferred) to allow it to set further.
- Serve the pudding with your choice of garnish, such as blueberries, candied orange, strawberries, raspberries, mint, a butter cookie, or a dollop of whipped cream.
Expert Tips & Tricks
- Preventing Scrambled Eggs: The key to avoiding scrambled eggs in your pudding is to temper the eggs. Slowly drizzle a small amount of the hot milk into the egg yolk mixture, whisking constantly, before adding the egg mixture to the pot. This will gradually raise the temperature of the eggs and prevent them from cooking too quickly.
- Lump-Free Pudding: To ensure a smooth, lump-free pudding, sift the cornstarch before adding it to the egg yolks and sugar. This will help to break up any clumps and prevent them from forming in the pudding.
- Adjusting Sweetness: Taste the pudding while it is cooking and adjust the amount of sugar to your liking. Keep in mind that the pudding will taste less sweet when it is cold.
- Making Ahead: The pudding can be made up to 2 days in advance and stored in the refrigerator. Cover the surface of the pudding with plastic wrap to prevent a skin from forming. Press the plastic wrap directly onto the surface of the pudding.
- Thickening Issues: If your pudding isn’t thickening as expected, make a slurry of 1 tablespoon of cornstarch with 2 tablespoons of cold milk. Whisk this into the pudding and continue cooking until it reaches the desired consistency.
- Flavor Enhancements: A pinch of cinnamon or nutmeg can add warmth and complexity to the pudding. You can also add a tablespoon of your favorite liqueur (such as amaretto or rum) after the pudding has been removed from the heat.
Serving & Storage Suggestions
Serve your homemade pudding warm or chilled. For an elegant presentation, layer the pudding in parfait glasses with crumbled cookies, fresh fruit, and whipped cream. Store leftover pudding in an airtight container in the refrigerator for up to 3 days. To reheat, gently warm the pudding in a saucepan over low heat, stirring frequently, or microwave in 30-second intervals, stirring in between. Pudding is best consumed fresh, but can be frozen. Thaw overnight in the refrigerator before serving. Freezing may slightly alter the texture.
Nutritional Information
| Nutrient | Amount per Serving | % Daily Value |
|---|---|---|
| Calories | 466.7 kcal | N/A |
| Calories from Fat | 176 kcal | N/A |
| Total Fat | 19.6 g | 30% |
| Saturated Fat | 11.2 g | 56% |
| Cholesterol | 214.5 mg | 71% |
| Sodium | 213.3 mg | 8% |
| Total Carbohydrate | 65.5 g | 21% |
| Dietary Fiber | 0.5 g | 2% |
| Sugars | 50.2 g | 200% |
| Protein | 8.8 g | 17% |
Note: Nutritional information is an estimate and may vary based on specific ingredients and portion sizes.
Variations & Substitutions
- Chocolate Pudding Deluxe: Use dark chocolate cocoa powder, and add a tablespoon of shaved dark chocolate at the end for extra decadence.
- Dairy-Free Pudding: Substitute the milk with your favorite plant-based milk, such as almond milk, soy milk, or oat milk. Be sure to use a plant-based butter alternative as well. The flavor profile will change slightly, but it will still be delicious.
- Vanilla Bean Pudding: For a more intense vanilla flavor, scrape the seeds from one vanilla bean into the milk while it is heating. Remove the pod before adding the egg mixture.
- Spice It Up: Add a pinch of cinnamon, nutmeg, or cardamom to the pudding for a warm, comforting flavor.
- Lemon Pudding: Add the zest of one lemon to the pudding while it is cooking for a bright, citrusy flavor.
- “Lite” Version: Use Splenda or another sugar substitute in place of the sugar to reduce the calorie count.
- Vegan Pudding: Substitute the milk with a plant-based milk and use a vegan butter. Replace the egg yolks with 2 tablespoons of cornstarch mixed with 2 tablespoons of water.
FAQs (Frequently Asked Questions)
Q: Why is my pudding lumpy?
A: Lumpy pudding is often caused by the cornstarch not being fully incorporated or by the eggs scrambling. Make sure to sift the cornstarch and whisk vigorously when adding the egg mixture to the hot milk.
Q: Can I use a different type of starch?
A: While cornstarch is the most common choice, you can substitute it with tapioca starch or arrowroot powder. Use the same amount as the recipe calls for.
Q: How do I store leftover pudding?
A: Store leftover pudding in an airtight container in the refrigerator for up to 3 days. Place a piece of plastic wrap directly on the surface to prevent a skin from forming.
Q: Can I freeze homemade pudding?
A: While possible, freezing can alter the texture of the pudding. It’s best enjoyed fresh, but if you must freeze it, thaw it slowly in the refrigerator overnight and whisk it well before serving.
Q: How do I know when the pudding is thick enough?
A: The pudding is thick enough when it coats the back of a spoon. Run your finger through the coating on the spoon; if the line remains and the pudding doesn’t immediately run back together, it’s ready.
Final Thoughts
Homemade pudding is more than just a dessert; it’s a connection to the past, a simple pleasure, and a testament to the magic of transforming humble ingredients into something truly special. I encourage you to try this recipe and experience the joy of creating a creamy, comforting treat from scratch. Don’t be afraid to experiment with different flavors and garnishes to make it your own. Share your creations and feedback, and perhaps even pair it with a warm cup of coffee or tea for the ultimate cozy experience. Happy cooking!