
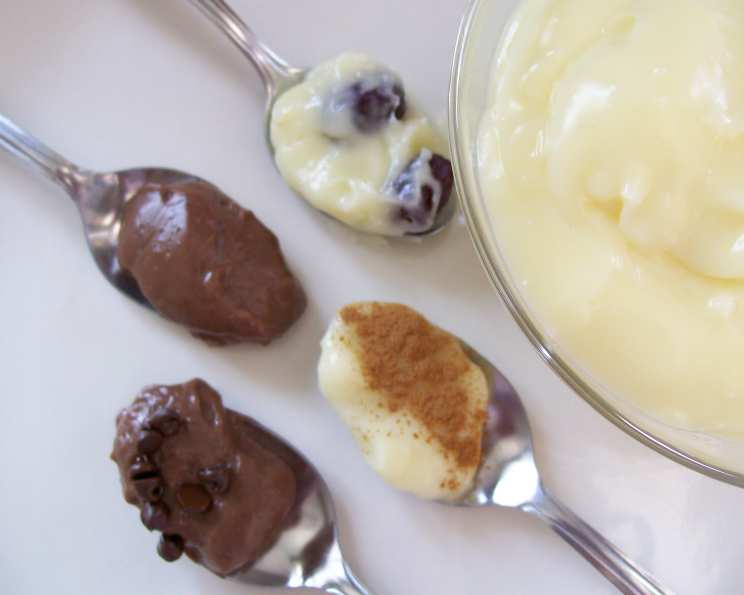
Indulge in Decadence: The Ultimate Guide to Homemade Pudding and Gourmet Variations
There’s something undeniably comforting about a bowl of creamy, homemade pudding. I remember as a child, my grandmother would always whip up a batch on rainy afternoons. The rich, velvety texture and sweet aroma filling her kitchen were pure magic. She never used a box mix – it was always from scratch, a skill she passed down to me. Today, I’m excited to share that same cherished recipe with you, along with some delicious gourmet twists to elevate this classic dessert.
Recipe Overview
- Prep Time: 10 minutes
- Cook Time: 10 minutes
- Total Time: 3 hours 20 minutes (includes chilling)
- Servings: 4
- Dietary Type: Vegetarian (can be adapted to dairy-free)
Ingredients
Basic Vanilla Pudding:
- ⅔ cup sugar
- ¼ cup cornstarch
- ⅛ teaspoon salt
- 2 ½ cups milk (whole milk recommended for richness, but lower fat milk or non-dairy alternatives can be used)
- 4 large egg yolks
- 2 tablespoons unsalted butter, cut into pieces
- 1 teaspoon vanilla extract
Variations:
- Chocolate Pudding: ⅓ cup cocoa powder
- Chai Cinnamon Pudding: 2 chai tea teabags, 2 teaspoons cinnamon
- Mocha Chip Pudding: 4-5 teaspoons espresso powder, 2 tablespoons boiling water, ¼ cup mini chocolate chips
- Rum Raisin Pudding: ¼ cup raisins, ⅓ cup rum
Equipment Needed
- Medium saucepan
- Whisk
- Fine-mesh sieve
- Medium bowl
- Saran wrap (plastic wrap)
Instructions
-
Prepare the Sieve: Place a fine-mesh sieve over a medium bowl and set it aside. This will ensure a silky-smooth pudding free of any lumps.
-
Combine Dry Ingredients: In the saucepan, whisk together the sugar, cornstarch, and salt. Make sure there are no lumps of cornstarch. This even distribution is key to preventing a grainy texture.
-
Add Milk and Egg Yolks: Gradually add the milk to the dry ingredients, whisking constantly to dissolve the cornstarch completely. Add the egg yolks and whisk until everything is thoroughly combined and a uniform color.
-
Cook the Pudding Base: Place the saucepan over medium heat. Stir constantly with a whisk or spatula. This is crucial to prevent the pudding from scorching on the bottom. Continue stirring until the mixture begins to thicken and the first large bubble forms and sputters.
-
Reduce Heat and Continue Cooking: Reduce the heat to low and continue to stir constantly for one minute more. This ensures the cornstarch is fully cooked and the pudding is properly thickened.
-
Strain the Pudding: Immediately pour the hot pudding mixture through the fine-mesh sieve into the bowl. This will remove any lumps or cooked egg particles, resulting in an exceptionally smooth texture. Use a spatula to press the pudding through the sieve.
-
Add Butter and Vanilla: Stir in the butter until it is completely melted and incorporated into the hot pudding. Then, stir in the vanilla extract.
-
Prevent Skin Formation: Place a layer of saran wrap directly over the surface of the pudding, pressing it gently to eliminate any air pockets. This will prevent an undesirable skin from forming as the pudding chills.
-
Chill the Pudding: Chill in the refrigerator for at least 3 hours, or up to 3 days. This allows the pudding to fully set and develop its flavor.
-
Whisk and Serve: Before serving, whisk the chilled pudding until smooth and creamy.
Variations Instructions:
-
Chocolate Pudding: Add the cocoa powder along with the sugar, cornstarch, and salt in step 2. Then, proceed with the rest of the recipe as directed.
-
Chai Cinnamon Pudding: Brew the two chai tea bags in 3 tablespoons of boiling water. Let it steep until the tea is cool. Squeeze out the tea bags, reserving the flavorful liquid. Mix the tea infusion into the pudding after step 8. Sprinkle cinnamon on top before serving.
-
Mocha Chip Pudding: Prepare the pudding with the chocolate variation (as described above). Then, dissolve the espresso powder in 2 tablespoons of boiling water and allow it to cool slightly. Mix the cooled espresso into the pudding after step 8. Sprinkle mini chocolate chips on top before serving.
-
Rum Raisin Pudding: Combine the raisins and rum in a small saucepan and bring to a boil. Remove from heat and let cool completely. Drain the raisins, reserving the rum. Mix the rum into the pudding after step 8 and sprinkle the raisins on top before serving.
Expert Tips & Tricks
- Tempering the Egg Yolks: For an even smoother pudding, temper the egg yolks before adding them to the hot milk mixture. Whisk a small amount of the hot milk into the yolks to gradually raise their temperature, preventing them from scrambling when added to the saucepan.
- Preventing Scorching: Constant stirring is paramount to avoid scorching. Pay extra attention to the edges and bottom of the pan, where the pudding is most likely to stick. A silicone spatula works well for scraping the sides of the pan.
- Dairy-Free Adaptation: To make this pudding dairy-free, substitute the milk with your favorite plant-based milk (almond, soy, oat, or coconut all work well). Use a vegan butter substitute.
- Flavor Infusion: For a more intense flavor, consider infusing the milk with vanilla bean or citrus zest during the cooking process. Simply remove the vanilla bean or zest before straining the pudding.
- Adjusting Sweetness: Taste the pudding before chilling and adjust the sweetness to your liking. Remember that the flavor will intensify slightly as it chills.
Serving & Storage Suggestions
Serve the homemade pudding chilled in individual bowls, wine glasses, or parfait cups. Garnish with whipped cream, fresh berries, chocolate shavings, a sprinkle of cinnamon, or a drizzle of caramel sauce.
Store leftover pudding in an airtight container in the refrigerator for up to 3 days. Keep saran wrap firmly pressed on the surface of the pudding to prevent a skin from forming. It is not recommended to freeze this pudding, as the texture can become grainy upon thawing.
Nutritional Information
| Nutrient | Amount per Serving | % Daily Value |
|---|---|---|
| Calories | 300 kcal | 15% |
| Total Fat | 12g | 18% |
| Saturated Fat | 7g | 35% |
| Cholesterol | 180mg | 60% |
| Sodium | 100mg | 4% |
| Total Carbohydrate | 40g | 13% |
| Dietary Fiber | 0g | 0% |
| Sugars | 30g | N/A |
| Protein | 7g | 14% |
Nutritional information is an estimate and may vary based on specific ingredients and portion sizes.
Variations & Substitutions
- Maple Pecan Pudding: Substitute some of the sugar with maple syrup and stir in toasted pecans before chilling.
- Lemon Pudding: Add lemon zest to the milk during cooking and a tablespoon of lemon juice after straining.
- Gluten-Free Pudding: This recipe is naturally gluten-free, as it uses cornstarch as the thickening agent.
- Spiced Pudding: Add a pinch of nutmeg, cloves, or cardamom for a warm and comforting flavor.
- Coconut Pudding: Use full-fat coconut milk instead of regular milk for a rich, tropical flavor.
FAQs (Frequently Asked Questions)
Q: Can I use a different type of milk?
A: Yes, you can use any type of milk you prefer. Whole milk will result in the richest and creamiest pudding, but you can also use lower-fat milk, almond milk, soy milk, or oat milk.
Q: How do I prevent lumps in my pudding?
A: Make sure to whisk the cornstarch thoroughly with the sugar before adding the milk. Whisk constantly while cooking and strain the pudding through a fine-mesh sieve after cooking to remove any lumps.
Q: Can I make this pudding ahead of time?
A: Yes, you can make this pudding up to 3 days in advance. Store it in an airtight container in the refrigerator with plastic wrap pressed directly on the surface to prevent a skin from forming.
Q: What can I do if my pudding is too thick?
A: If your pudding is too thick, you can whisk in a little extra milk until it reaches your desired consistency.
Q: Can I add other flavors to the pudding?
A: Absolutely! Feel free to experiment with different extracts, spices, or toppings to create your own unique pudding flavor combinations.
Final Thoughts
Homemade pudding is more than just a dessert; it’s a warm hug in a bowl, a nostalgic trip down memory lane. This recipe is a blank canvas, ready for your creative touch. So go ahead, gather your ingredients, and get ready to create a truly decadent experience. Don’t be afraid to experiment with different flavors and toppings to make it your own. I encourage you to share your creations and feedback with me. Happy pudding-making!