
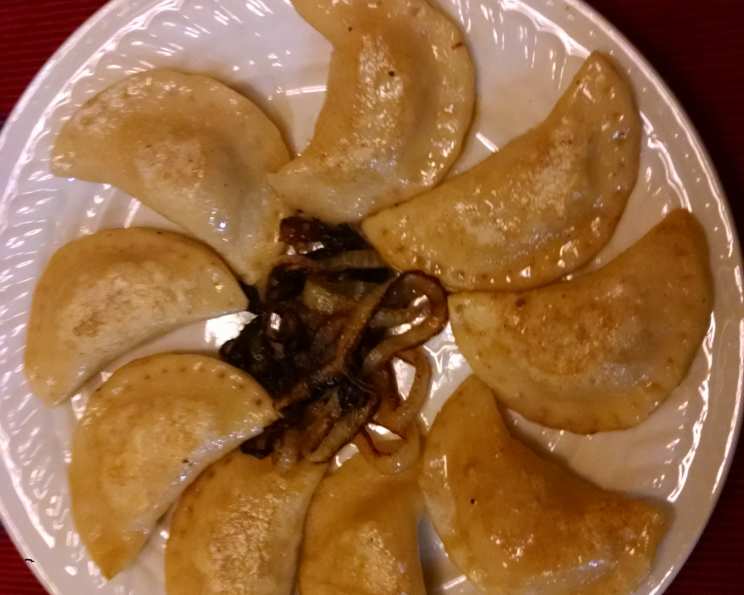
Homemade Sauerkraut Pierogies: An Old-World Tradition
The aroma of sauerkraut and browned butter always takes me back to my grandmother’s kitchen. I can almost feel the warmth radiating from her wood-burning stove as she deftly pinched the edges of each pierogi, sealing in the tangy treasure within. These weren’t just dumplings; they were edible stories, passed down through generations, each bite a comforting reminder of family and heritage. Sharing this recipe is like sharing a piece of my heart, a connection to the past that I hope you’ll cherish as much as I do.
Recipe Overview
- Prep Time: 1 hour
- Cook Time: 30 minutes
- Total Time: 1 hour 30 minutes
- Servings: 6-8
- Yield: Approximately 30 pierogies
- Dietary Type: Vegetarian (can be made vegan with substitutions)
Ingredients
Sauerkraut Filling
- 3 cups sauerkraut (or more, to taste)
- 1 medium chopped onion
- 4 tablespoons bacon fat (vegetable shortening or butter can be substituted)
- 2 tablespoons sour cream (optional, can be omitted or substituted with plant-based sour cream)
- Salt and pepper, to taste
Perogie Dough
- 2 1/2 cups flour
- 1/2 teaspoon salt
- 1 egg (can be substituted with a flax egg for a vegan version)
- 2 teaspoons oil
- 3/4 cup warm water
Equipment Needed
- Large pot
- Large bowl
- Rolling pin
- Biscuit cutter or drinking glass
- Slotted spoon or skimmer
- Colander
- Floured board or clean tea towel
Instructions
-
Prepare the Sauerkraut: Begin by rinsing the sauerkraut thoroughly in warm water. This helps to tame some of its intensity. Once rinsed, squeeze it dry with your hands or in a clean kitchen towel to remove excess moisture. Then, chop the sauerkraut very finely. This will ensure a smoother, more palatable filling.
-
Sauté the Onion: In a large skillet, melt the bacon fat (or your chosen substitute) over medium heat. Add the chopped onion and cook until tender and translucent, about 5-7 minutes. Stir occasionally to prevent burning.
-
Combine Filling Ingredients: Add the finely chopped sauerkraut to the skillet with the sautéed onions. Stir well to combine. If using, incorporate the sour cream, mixing it in thoroughly.
-
Season and Simmer: Season the filling to taste with salt and pepper. Remember that sauerkraut can already be quite salty, so add salt judiciously. Cook the filling over low heat for about 15 minutes, or until the sauerkraut is tender and the flavors have melded together beautifully. It’s crucial not to overcook the filling; you want it to retain some texture.
-
Chill the Filling: Remove the filling from the heat and transfer it to a bowl. Allow it to cool completely and then chill it in the refrigerator for at least an hour, or preferably longer. This step is essential because it allows the filling to firm up, making it easier to work with when assembling the pierogies.
-
Prepare the Dough: In a large, deep bowl, mix together the flour and salt.
-
Add Wet Ingredients: In a separate small bowl, lightly whisk the egg (or flax egg). Add the oil and warm water to the egg mixture and whisk again to combine.
-
Combine Wet and Dry: Gradually pour the wet ingredients into the bowl with the flour mixture, mixing with a wooden spoon or your hands until a dough begins to form.
-
Knead the Dough: Turn the dough out onto a lightly floured surface. Knead the dough for about 5-7 minutes, or until it is smooth and elastic. Be careful not to over-knead the dough, as this can make it tough. A light touch is key.
-
Rest the Dough: Divide the dough into two equal parts. Cover both parts with a clean kitchen towel or plastic wrap and let them rest for at least 10 minutes. This allows the gluten to relax, making the dough easier to roll out.
-
Roll and Cut: On a lightly floured surface, roll out one portion of the dough to a thickness of about 1/8 inch. Use a large biscuit cutter or the rim of a drinking glass to cut out circles of dough.
-
Fill and Seal: Place a dough circle in the palm of your hand. Add a spoonful of the chilled sauerkraut filling to the center of the circle. Be careful not to overfill, as this can make it difficult to seal the edges. Fold the dough over to form a half-moon shape. Press the edges together firmly with your fingers to seal. Make sure the edges are completely sealed to prevent the filling from escaping during cooking. You can also use a fork to crimp the edges for a decorative touch and extra security.
-
Repeat: Repeat steps 11 and 12 with the remaining dough and filling. As you assemble the pierogies, place them on a lightly floured board or tea towel and cover them with another tea towel to prevent them from drying out.
-
Cook the Pierogies: Bring a large pot of salted water to a rapid boil. Gently drop a few pierogies into the boiling water at a time, being careful not to overcrowd the pot.
-
Cook Until Puffed: Stir the pierogies very gently with a wooden spoon to prevent them from sticking to the bottom of the pot. Cook for 3-4 minutes, or until they float to the surface and look puffed up. The cooking time will vary depending on the size and thickness of the pierogies.
-
Drain and Butter: Use a slotted spoon or skimmer to remove the cooked pierogies from the boiling water and transfer them to a colander to drain thoroughly. Place the drained pierogies in a deep dish and sprinkle generously with melted butter to prevent them from sticking together. Cover to keep them hot.
-
Serve: Serve the pierogies immediately in a large dish. Do not overcrowd them. Top with melted butter, chopped crisp bacon, and/or chopped onions lightly browned in butter.
Expert Tips & Tricks
- Make Ahead: Pierogies can be made ahead of time and refrigerated or frozen. To freeze, place uncooked pierogies on a baking sheet lined with parchment paper and freeze until solid. Then, transfer them to a freezer bag.
- Prevent Sticking: To prevent the pierogies from sticking to the pot while cooking, add a tablespoon of oil to the boiling water.
- Flax Egg: To make a flax egg, combine 1 tablespoon of ground flaxseed meal with 3 tablespoons of water. Let it sit for 5 minutes to thicken before adding it to the dough.
- Flavor Boost: Add a clove of minced garlic to the onions while sautéing for an extra layer of flavor in the filling.
Serving & Storage Suggestions
Serve these delightful pierogies hot, topped with your favorite accompaniments: a dollop of sour cream, crispy bacon bits, caramelized onions, or a generous drizzle of melted butter. Leftover pierogies can be stored in an airtight container in the refrigerator for up to 3 days. For longer storage, freeze cooked pierogies for up to 2 months. Reheat refrigerated or frozen pierogies by pan-frying them in butter until golden brown, steaming them in a double boiler until heated through, baking them in the oven, or deep-frying them.
Nutritional Information
| Nutrient | Amount per Serving | % Daily Value |
|---|---|---|
| Calories | 365 kcal | N/A |
| Calories from Fat | 50g | 14% |
| Total Fat | 5.6 g | 8% |
| Saturated Fat | 1.5 g | 7% |
| Cholesterol | 49.6 mg | 16% |
| Sodium | 1021.2 mg | 42% |
| Total Carbohydrate | 67 g | 22% |
| Dietary Fiber | 5.7 g | 22% |
| Sugars | 3.5 g | N/A |
| Protein | 11 g | 22% |
Note: Nutritional information is an estimate and may vary based on specific ingredients and portion sizes.
Variations & Substitutions
- Vegan Pierogies: Substitute the egg with a flax egg, sour cream with plant-based sour cream, and bacon fat/butter with vegetable oil or vegan butter.
- Potato and Cheese Pierogies: Substitute the sauerkraut filling with a mixture of mashed potatoes and shredded cheese.
- Sweet Pierogies: Fill the pierogies with fruit fillings like blueberries, apples, or cherries.
- Gluten-Free Pierogies: Use a gluten-free flour blend in the dough recipe. Be sure to add a binder like xanthan gum to help with the texture.
FAQs (Frequently Asked Questions)
Q: Can I make the dough ahead of time?
A: Yes, you can make the dough ahead of time. Wrap it tightly in plastic wrap and store it in the refrigerator for up to 24 hours. Let it come to room temperature before rolling it out.
Q: Why is my dough too sticky?
A: If your dough is too sticky, add a tablespoon of flour at a time until it reaches the desired consistency.
Q: Can I freeze uncooked pierogies?
A: Absolutely! Place the uncooked pierogies on a baking sheet lined with parchment paper and freeze them until solid. Then, transfer them to a freezer bag for longer storage.
Q: How do I prevent the filling from leaking out?
A: Make sure to seal the edges of the pierogies tightly. You can also use a fork to crimp the edges for a more secure seal. Ensure the filling is not too wet or overfilled.
Q: What can I serve with pierogies?
A: Pierogies are delicious served with sour cream, bacon bits, caramelized onions, or a side of kielbasa.
Final Thoughts
Now it’s your turn to create some memories in your own kitchen with this cherished recipe. Don’t be intimidated by the process – each step is a labor of love, and the end result is well worth the effort. Feel free to experiment with different fillings and toppings to make these pierogies your own. And please, share your creations and feedback – I’d love to hear about your experience and any delicious variations you come up with! Pair these with a crisp, dry white wine or a hearty Polish beer for the ultimate comfort meal.