
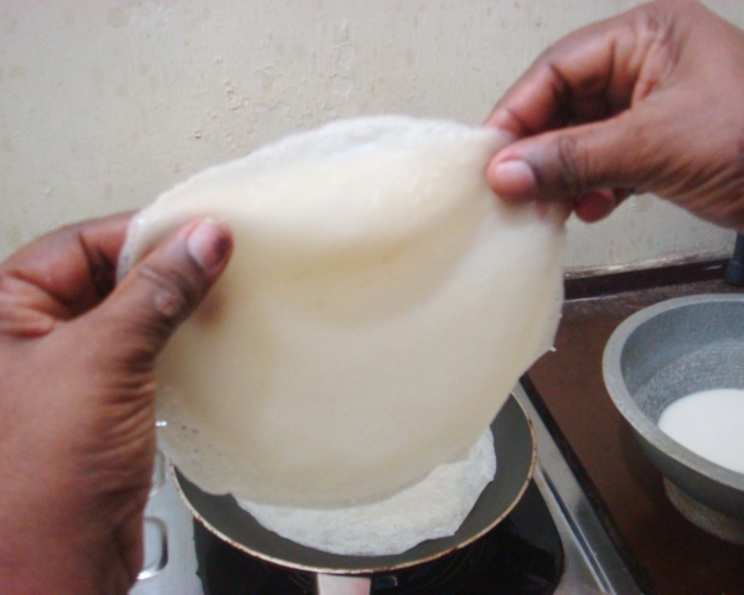
The Delicate Art of Homemade Spring Roll Wrappers
I still remember the first time I encountered spring rolls, not in a restaurant, but at a bustling street market in Hanoi. The air was thick with the aroma of spices and grilling meats, but it was the delicate, almost translucent wrappers, glistening with a light sheen of oil, that truly captivated me. Watching the vendor deftly assemble each roll, layering vibrant greens, fragrant herbs, and succulent shrimp, I knew I had to learn the secrets of this culinary magic. The fresh, clean taste of those spring rolls, dipped in a tangy peanut sauce, remains one of my most cherished food memories, a constant reminder of the simple perfection that can be achieved with just a few humble ingredients.
Recipe Overview
- Prep Time: 15 minutes
- Cook Time: 30 minutes
- Total Time: 45 minutes
- Servings: Varies based on size and filling
- Yield: Approximately 15-20 wrappers
- Dietary Type: Vegan
Ingredients
- 1 cup flour
- 1/4 teaspoon salt
- 3/4 cup water (plus more if needed)
Equipment Needed
- Mixing bowl
- Whisk or fork
- Non-stick pan (approximately 6-inch diameter)
- Cooking spray or butter (optional)
- Spoon or spatula
- Plate or parchment paper for stacking wrappers
Instructions
- Sift the flour into a mixing bowl. This helps to prevent lumps in the batter.
- Add the salt to the flour and mix thoroughly.
- Gradually add the water, a little at a time, while continuously mixing with a whisk or fork. The goal is to create a smooth, thin batter. You may need to add a little more water than the recipe specifies to achieve the desired consistency.
- Mix the batter thoroughly until it is free of lumps and has a thin, pourable consistency, similar to heavy cream.
- Cover the bowl with plastic wrap or a clean kitchen towel and let the batter rest for about 30 minutes. This allows the gluten in the flour to relax, resulting in more pliable and less elastic wrappers.
- After the resting period, lightly spray a non-stick pan with cooking spray or brush it with a thin layer of melted butter. This helps to prevent the wrappers from sticking to the pan.
- Place the pan over medium-low heat. Allow the pan to heat up for one or two minutes. Then, reduce the heat to low. Maintaining a low heat is crucial for preventing the wrappers from browning or burning.
- Once the pan is heated, pour approximately 1 1/2 tablespoons of the batter into the middle of the pan.
- Working quickly, use the back of a spoon to spread the batter in a circular motion, creating a thin wrapper about 6 inches in diameter. The thinner the wrapper, the more delicate it will be.
- Cook the wrapper until it is dry to the touch and starts to shrink slightly from the sides of the pan. This usually takes a few minutes. Watch carefully to prevent browning. The wrapper should remain mostly white.
- Gently remove the cooked wrapper from the pan using a spatula and transfer it to a plate.
- Repeat steps 8-11 until all the batter is used, stacking the cooked wrappers on top of each other. Placing a sheet of parchment paper between the wrappers can help prevent them from sticking together.
- Once the wrappers are cool enough to handle, they are ready to use in your favorite spring roll recipe.
Expert Tips & Tricks
- Consistency is Key: The consistency of the batter is paramount. If it’s too thick, the wrappers will be too thick and chewy. If it’s too thin, they will be difficult to handle and prone to tearing. Aim for a consistency similar to heavy cream.
- The Right Heat: Low and slow is the way to go. Cooking the wrappers over low heat ensures they dry out evenly without browning.
- Don’t Overcook: Overcooked wrappers will be brittle and difficult to roll. They should be dry and slightly translucent but still pliable.
- Stacking Strategy: Stacking the wrappers as they come off the pan helps them retain moisture and stay flexible.
- Making Ahead: You can make the wrappers ahead of time and store them in the refrigerator. To prevent them from drying out, wrap them tightly in plastic wrap or place them in an airtight container.
Serving & Storage Suggestions
Serve your homemade spring rolls immediately after assembling them for the best flavor and texture. They are delicious with a variety of dipping sauces, such as peanut sauce, sweet chili sauce, or hoisin sauce.
Store leftover wrappers in the refrigerator, tightly wrapped in plastic wrap or in an airtight container, for up to 2 days. To prevent them from sticking together, you can place a sheet of parchment paper between each wrapper.
Reheating isn’t typically necessary as spring roll wrappers are usually consumed cold or at room temperature. However, if you prefer a slightly warmed wrapper, you can steam them briefly before assembling your spring rolls.
Nutritional Information
| Nutrient | Amount per Serving (approx. 2 wrappers) | % Daily Value* |
|---|---|---|
| Calories | 80 kcal | 4% |
| Total Fat | 0.5g | 1% |
| Saturated Fat | 0g | 0% |
| Cholesterol | 0mg | 0% |
| Sodium | 80mg | 3% |
| Total Carbohydrate | 17g | 6% |
| Dietary Fiber | 1g | 4% |
| Sugars | 0g | 0% |
| Protein | 2g | 4% |
*Percent Daily Values are based on a 2,000 calorie diet. Your daily values may be higher or lower depending on your calorie needs.
Variations & Substitutions
- Gluten-Free: Substitute the all-purpose flour with a gluten-free all-purpose blend. Be sure to choose a blend that is designed for baking and contains xanthan gum or another binder to help create a cohesive batter. Rice flour may also work, but the texture may be slightly different.
- Flavor Infusion: Add a pinch of your favorite spices to the batter for a subtle flavor boost. Turmeric powder, garlic powder, or onion powder can add a unique twist.
- Herbaceous Wrappers: Finely chop fresh herbs like cilantro or mint and add them to the batter for a vibrant green color and fresh flavor.
- Sweet Wrappers: Add a touch of sugar to the batter and use them for sweet spring rolls filled with fruits and cream.
FAQs (Frequently Asked Questions)
Q: Why is my batter lumpy?
A: Lumpy batter is usually caused by adding the water too quickly. Add the water gradually, whisking continuously to ensure a smooth consistency. You can also try sifting the flour to remove any clumps before mixing.
Q: My wrappers are tearing easily. What am I doing wrong?
A: Tearing can be caused by a batter that is too thin or wrappers that are overcooked. Ensure your batter has the right consistency (similar to heavy cream) and cook the wrappers until they are just dry and slightly translucent, but still pliable.
Q: How do I prevent the wrappers from sticking together?
A: Stack the wrappers on a plate as they come off the pan, and place a sheet of parchment paper between each wrapper. This will prevent them from sticking together and make them easier to separate when you’re ready to use them.
Q: Can I freeze these wrappers?
A: While you can freeze them, the texture may change slightly upon thawing. Wrap them tightly in plastic wrap and then in a freezer bag. Thaw completely before using, and be prepared for them to be a bit more delicate.
Q: What fillings work best with these wrappers?
A: The possibilities are endless! Traditional fillings include cooked shrimp, rice noodles, fresh herbs (mint, cilantro, basil), shredded carrots, cucumber, and lettuce. Feel free to experiment with different vegetables, proteins, and sauces to create your own unique spring roll combinations.
Final Thoughts
Making your own spring roll wrappers might seem daunting, but trust me, it’s a rewarding experience that elevates the simple spring roll to a whole new level. The delicate texture and fresh flavor of homemade wrappers are simply unmatched. So, gather your ingredients, embrace the process, and prepare to impress your friends and family with your newfound culinary skills. I encourage you to experiment with different fillings and dipping sauces to create your own signature spring roll recipe. And don’t forget to share your creations and feedback – I’d love to hear about your spring roll adventures!