
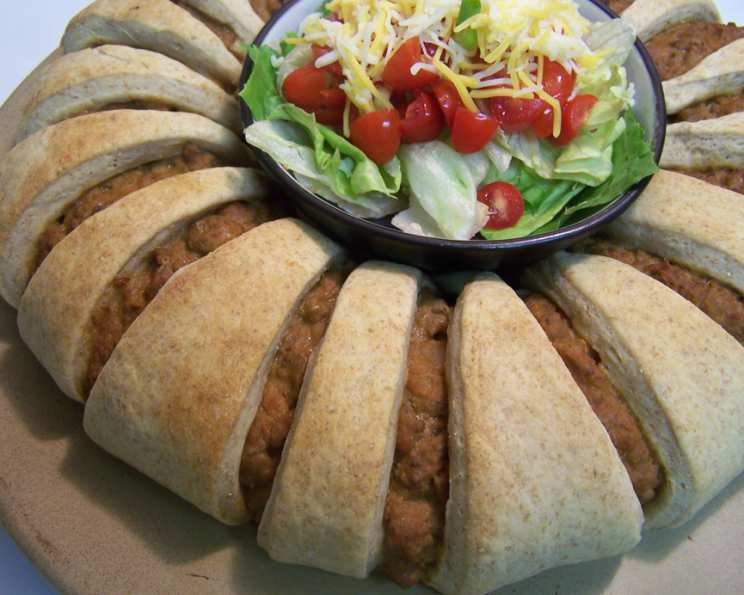
Homemade Taco Ring: A Family Favorite with a Delicious Twist
I remember the first time I made a taco ring. It was for my son’s birthday party, and I wanted something fun, festive, and crowd-pleasing. While everyone else was making taco salads, I wanted to make something different. I found several recipes online, but they all used crescent roll dough. I’ve always preferred a slightly more robust dough that rises beautifully. I knew I had to make my own version using my tried-and-true dinner roll dough as the base. The aroma of the baking dough filled the house, mingling perfectly with the savory scent of seasoned ground beef. When I pulled it out of the oven, golden brown and bubbling with cheesy goodness, the kids went wild. It was a hit and has been requested for every special occasion since!
Recipe Overview
- Prep Time: 30 minutes
- Cook Time: 10-15 minutes
- Total Time: 40-45 minutes (excluding dough preparation)
- Servings: 6-8
- Yield: 1 Taco Ring
- Dietary Type: Varies (Can be adapted to be dairy-free)
Ingredients
For the Crust:
- 1 lb bread dough (1/2 recipe of Lorilyn’s Dinner Roll Dough or use one of the two balls of dough after rising & the other can be frozen for future use)
For the Filling:
- 1 lb ground beef
- 1 (1 1/4 ounce) packet taco seasoning (or fajita seasoning for extra spice)
- 2-3 tablespoons water
- 1/2 cup green pepper, diced
- 1/2 cup onion (can use white, green, or red)
- 1 (16 ounce) can refried beans (sometimes I’ll use 1/2 can spicy & 1/2 can traditional)
- 1 (4 ounce) can diced green chilies
- 3/4 cup grated cheese (I like the taco blend)
For Toppings:
- Green pepper, diced
- Green onion, sliced (or whatever onion you used in the filling)
- Black olives, sliced
- Grated cheese
- Tomatoes, chopped
- Lettuce, shredded
- Sour cream
- Salsa
Equipment Needed
- Large skillet or Dutch oven
- Pizza cutter or sharp knife
- Cookie sheet or pizza stone
- Small pastry roller (optional)
Instructions
- Preheat your oven to 350 degrees Fahrenheit (175 degrees Celsius).
- On a lightly floured surface, roll out the dinner roll dough into a large circle, approximately 12-16 inches in diameter. Aim for a uniform thickness to ensure even baking.
- Using a pizza cutter or sharp knife, carefully cut the dough circle into 12-16 pizza-like wedges.
- On an ungreased cookie sheet or pizza stone, arrange the dough wedges in a sunburst pattern. The wide ends should be toward the center of the baking sheet, slightly overlapping each other. This creates the ring shape. There should be an opening in the center where there is no dough.
- Using your hands or a small pastry roller, gently press the wide ends of the dough together and slightly inward toward the middle of the ring. This creates a wide, solid base for supporting the filling.
- Cover the dough ring with a sheet of foil or a large tea towel. This will help prevent the dough from drying out and allow it to rise slightly while you prepare the filling.
- In a large skillet or Dutch oven, brown the ground beef over medium-high heat. Use a spatula to break the beef into small, taco-sized pieces. Once browned, drain off any excess grease.
- Add the taco seasoning and water to the browned beef. Cook and stir until most of the liquid is absorbed and the seasoning has evenly coated the meat. If the mixture seems too dry, you can add a little extra water, one tablespoon at a time.
- Add the diced green pepper, onion, refried beans, and grated cheese to the meat mixture. Stir until all ingredients are well combined and the cheese is melted.
- Spoon the hot meat mixture over the wide ends of the dough, arranging it in a ring pattern. If you have extra filling, you can fill in the spaces to use it all.
- Carefully bring the pointed ends of the wedges up and over the filling. Tuck the pointed ends underneath the wide ends to encase the filling. Continue this process all the way around the ring. It’s okay if some filling peeks out between the wedges; this adds to the visual appeal and creates natural cutting and serving lines.
- Bake the taco ring uncovered for 10-15 minutes, or until the crust is golden brown and the filling is heated through. For a slightly doughier crust, bake for the shorter end of the time range.
- Remove the taco ring from the oven and let it cool slightly before serving.
- Serve the taco ring topped with your desired toppings, such as diced green pepper, sliced green onion, sliced black olives, grated cheese, chopped tomatoes, shredded lettuce, sour cream, and salsa.
Expert Tips & Tricks
- Dough Consistency: The consistency of your dough is key. If it’s too sticky, it will be difficult to work with. If it’s too dry, it won’t rise properly. Aim for a dough that is soft and pliable but not overly sticky.
- Seasoning: Taste the meat filling after adding the taco seasoning and adjust as needed. Some taco seasoning packets are saltier than others, so you may want to add a pinch of sugar or a squeeze of lime juice to balance the flavors.
- Preventing Soggy Crust: To prevent the crust from becoming soggy, make sure to drain the ground beef well after browning. Also, avoid adding too much water to the meat filling. A drier filling will result in a crispier crust.
- Cheese Placement: Add a layer of cheese to the dough before adding the meat. The cheese will melt, creating a barrier that prevents the filling from soaking into the dough, helping the crust stay crispy.
Serving & Storage Suggestions
Serve the taco ring immediately after baking while it’s warm and the cheese is melted. Arrange the toppings in separate bowls so that everyone can customize their own slice. Leftover taco ring can be refrigerated in an airtight container for up to 3 days. To reheat, microwave individual slices for 30-60 seconds, or bake the entire ring in a preheated oven at 350 degrees Fahrenheit (175 degrees Celsius) for 10-15 minutes. The taco ring can also be frozen for longer storage. Wrap it tightly in plastic wrap and then in foil, and freeze for up to 2 months. Thaw completely in the refrigerator before reheating.
Nutritional Information
| Nutrient | Amount per Serving | % Daily Value |
|---|---|---|
| Calories | 350 kcal | 18% |
| Total Fat | 20g | 31% |
| Saturated Fat | 10g | 50% |
| Cholesterol | 75mg | 25% |
| Sodium | 800mg | 33% |
| Total Carbohydrate | 30g | 10% |
| Dietary Fiber | 5g | 20% |
| Sugars | 5g | – |
| Protein | 20g | 40% |
Note: Nutritional information is an estimate and may vary based on specific ingredients and portion sizes.
Variations & Substitutions
- Gluten-Free: Use a gluten-free bread dough recipe to make a gluten-free taco ring.
- Vegetarian: Substitute the ground beef with seasoned lentils or crumbled tofu.
- Spicy: Add a pinch of cayenne pepper or a dash of hot sauce to the meat filling for extra heat. You could also use spicy refried beans.
- Dairy-Free: Omit the cheese in the filling and use dairy-free sour cream and cheese alternatives for toppings.
- Crust Variations: Instead of rolling out a circle, try making individual taco pockets using small rounds of dough for a fun, personalized twist.
FAQs (Frequently Asked Questions)
Q: Can I use store-bought pizza dough instead of dinner roll dough?
A: Yes, you can use store-bought pizza dough as a shortcut. However, the texture will be different. Pizza dough will result in a thinner, crispier crust, while dinner roll dough will be softer and more bread-like.
Q: Can I make the dough ahead of time?
A: Absolutely! Making the dough ahead of time is a great way to save time on the day you plan to bake the taco ring. You can prepare the dough, let it rise, and then store it in the refrigerator for up to 24 hours.
Q: What other toppings can I use?
A: The possibilities are endless! Feel free to get creative with your toppings. Some other great options include guacamole, pico de gallo, pickled jalapeños, and crumbled tortilla chips.
Q: Can I freeze the taco ring?
A: Yes, the taco ring freezes well. Wrap it tightly in plastic wrap and then in foil to prevent freezer burn. Thaw it completely in the refrigerator before reheating.
Q: How do I prevent the bottom of the crust from getting soggy?
A: Besides ensuring the beef is properly drained, try preheating your baking sheet in the oven while it preheats. Then assemble the taco ring directly on the hot sheet.
Final Thoughts
This homemade taco ring is a guaranteed crowd-pleaser, perfect for parties, potlucks, or a fun family dinner. With its customizable toppings and adaptable filling, it’s a versatile dish that everyone will love. Don’t be intimidated by the dough-making process; once you master the basic steps, you’ll find it’s a rewarding experience. I encourage you to give this recipe a try and share your own creative twists and topping combinations. Enjoy, and happy cooking!